StreamSpace Studio Node Configuration Guide
Complete reference for configuring workflow nodes in StreamSpace Studio.
Quick Navigation
Jump to Section: AI Capabilities | Contact Actions | Engage & Route | Send Message | Collect | Logic | Built-in Tools | Loop
Table of Contents
🤖 AI Capabilities
📧 Contact Actions
🔀 Engage & Route
💬 Send Message
📝 Collect
⚡ Logic
🛠️ Built-in Tools
🔄 Loop
🤖 AI Capabilities
Quick Jump: ↑ Top | Contact Actions →
AI-powered nodes for intelligent conversation handling, intent detection, and automated responses.
Intent Classifier Node
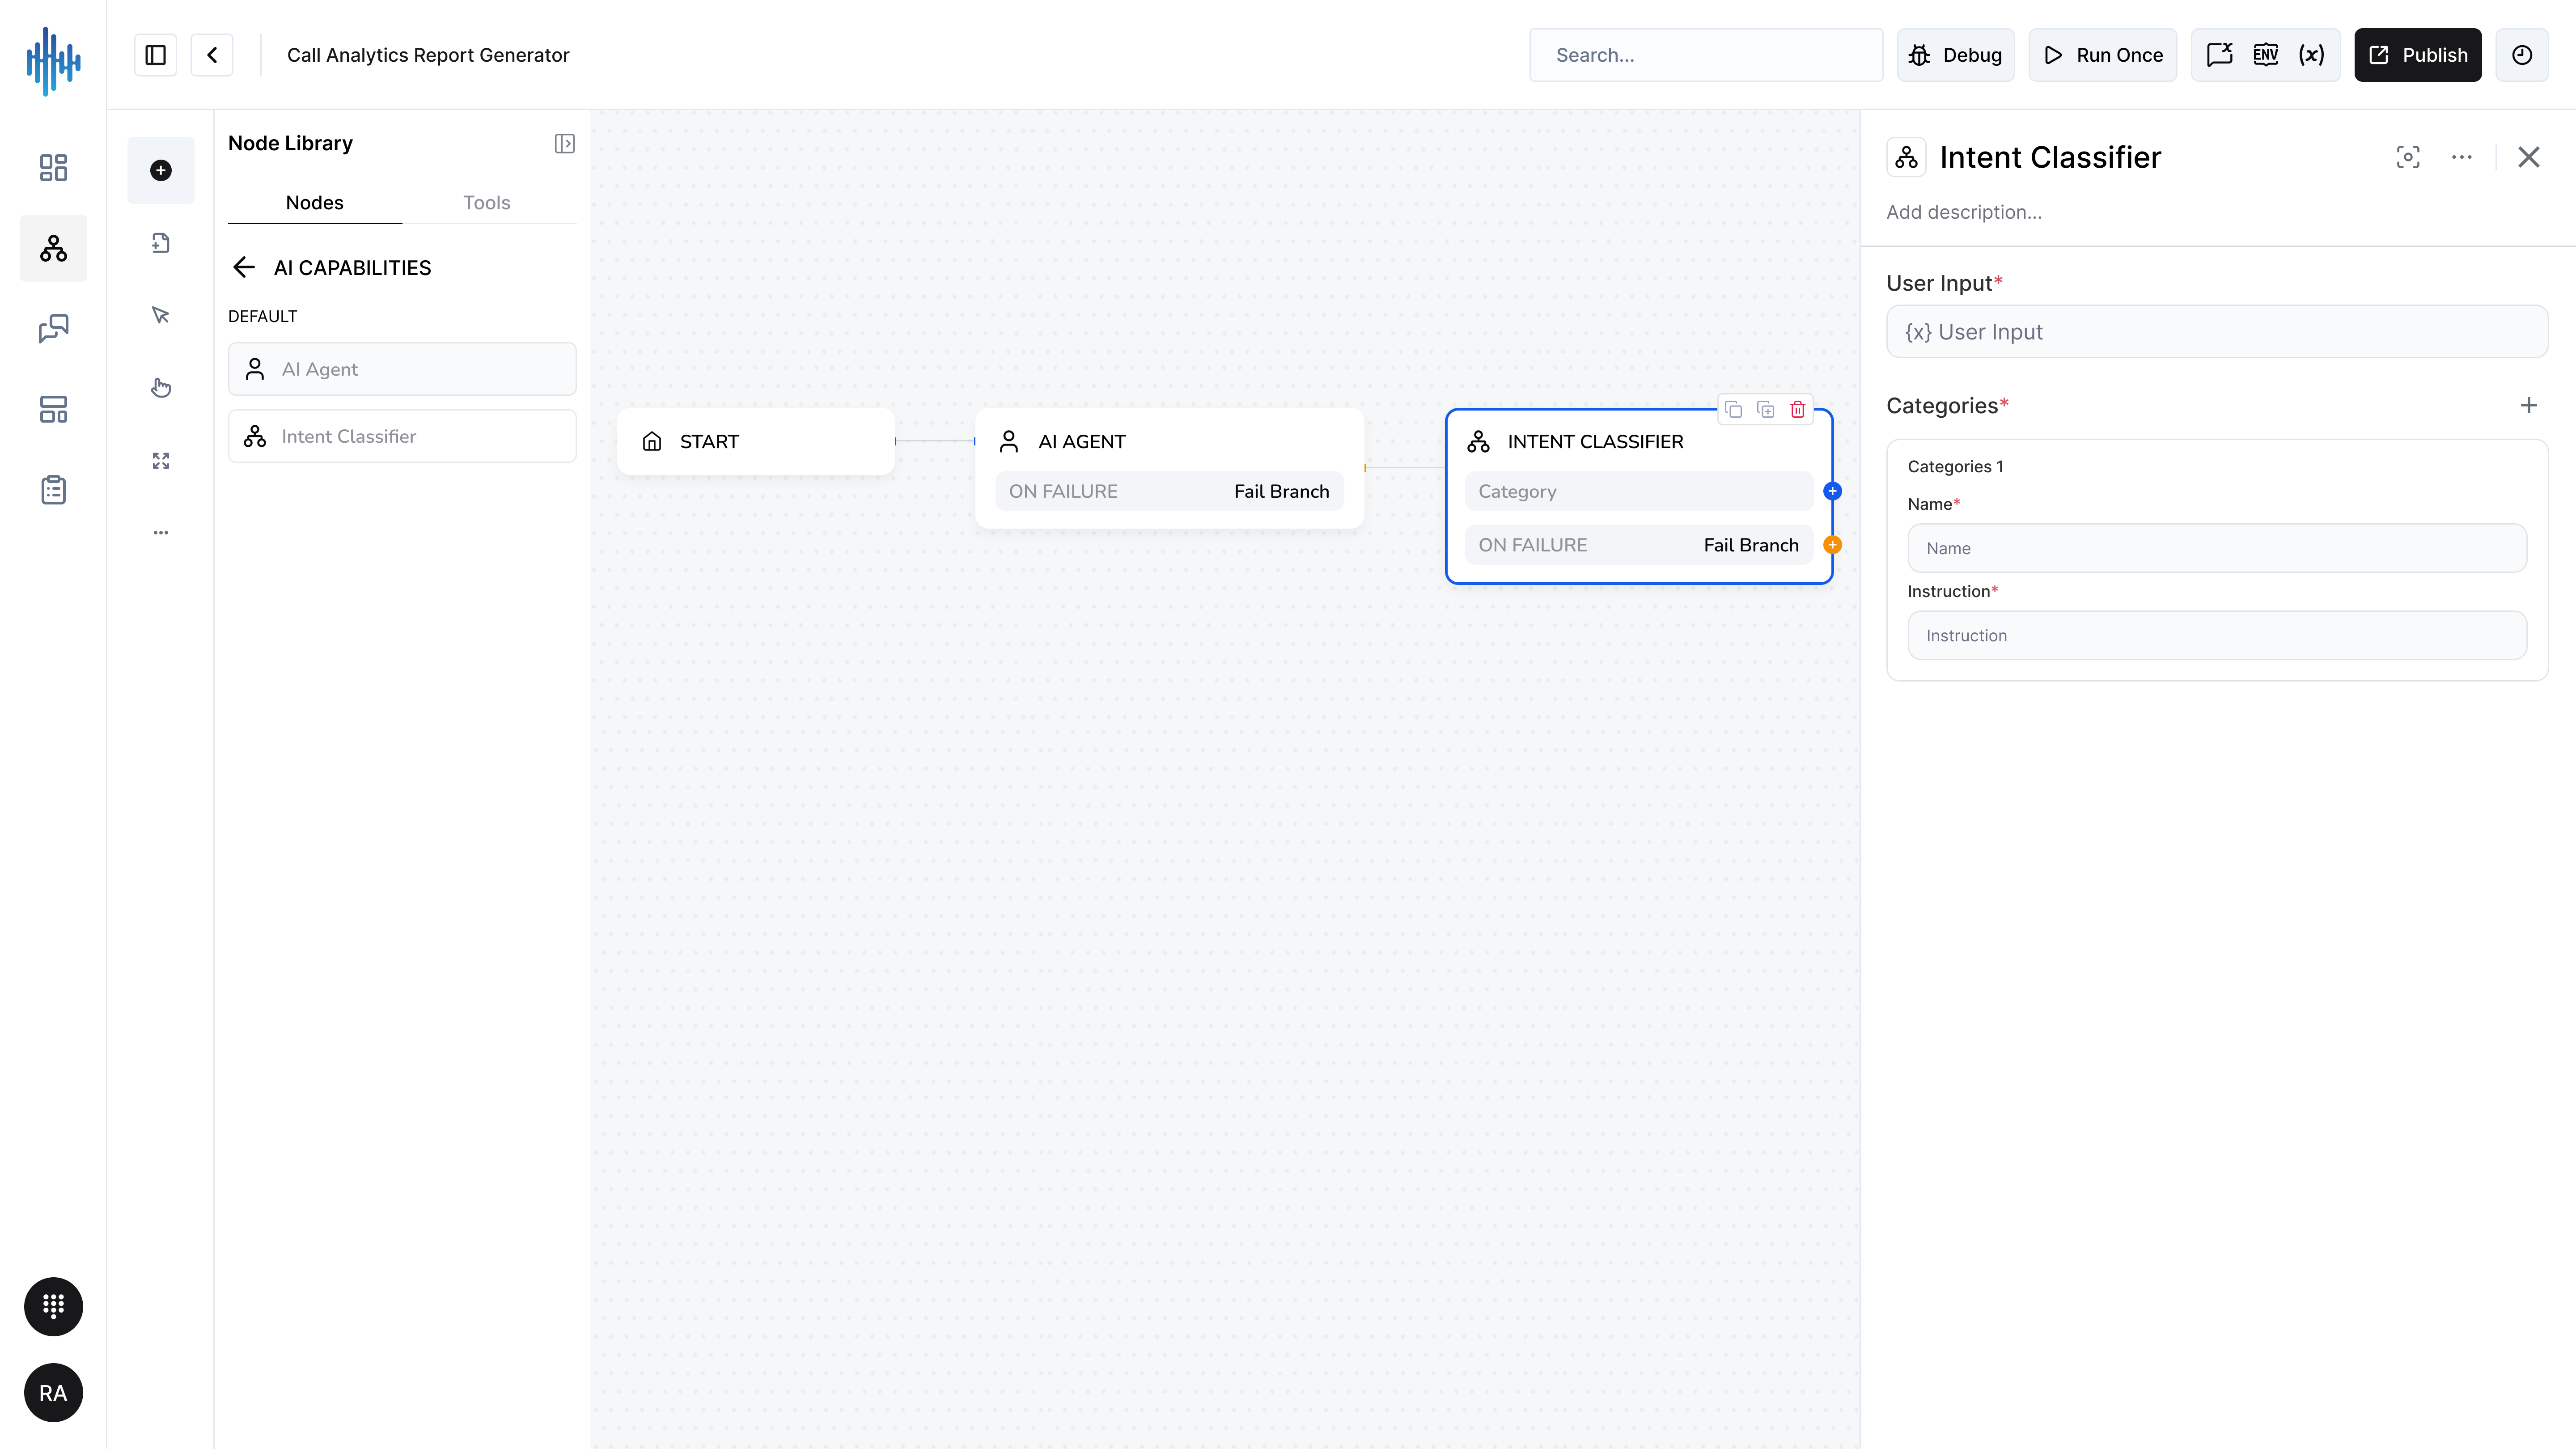
Purpose: Automatically categorizes user messages into predefined intent categories to route conversations appropriately.
When to Use:
- Route conversations based on user's goal or request
- Categorize support tickets automatically
- Trigger different workflows based on intent
- Build intelligent chatbots with contextual responses
Configuration Settings:
| Field | Description | Required | Example |
|---|---|---|---|
| User Input | The message text to classify | ✅ Yes | User's message variable |
| Categories | Intent categories to classify into | ✅ Yes | Multiple categories |
Category Configuration:
Each category requires:
- Name: Unique identifier for the intent (e.g., "Billing", "Technical Support")
- Instruction: Description or examples of what this intent includes
Setup Steps:
- Add Intent Classifier node to your workflow
- Connect user input from chat or form
- Click "+ Add Category" to create intent categories
- For each category:
- Enter a clear Name
- Provide detailed Instructions with examples
- Connect output to routing logic or response nodes
Output Data:
The node returns the classified intent category name that can be used in subsequent nodes for routing decisions.
Best Practices:
✅ DO:
- Use clear, distinct category names
- Provide detailed instructions with multiple examples
- Test with real user messages
- Create at least 3-5 intent categories
- Include a "General" or "Other" category for unmatched intents
❌ DON'T:
- Create overlapping or ambiguous categories
- Use vague category names
- Skip providing instruction details
- Create too many categories (keep under 10-15)
Common Use Cases:
Customer Support Routing:
Categories:
- Billing Issues (payment problems, invoice questions)
- Technical Support (app not working, bugs, errors)
- Account Management (password reset, profile updates)
- General Inquiry (other questions)
E-commerce Assistant:
Categories:
- Product Information (specs, features, availability)
- Order Status (tracking, delivery questions)
- Returns & Refunds (return process, refund status)
- Shopping Assistance (recommendations, comparisons)
Troubleshooting:
| Problem | Solution |
|---|---|
| Intents not classifying correctly | Add more detailed instructions and examples |
| Too many "Other" classifications | Review and refine category definitions |
| Overlap between categories | Make category boundaries more distinct |
Related Nodes:
- AI Agent - Generate intelligent responses based on intent
- Switch Node - Route to different paths based on classified intent
AI Agent Node
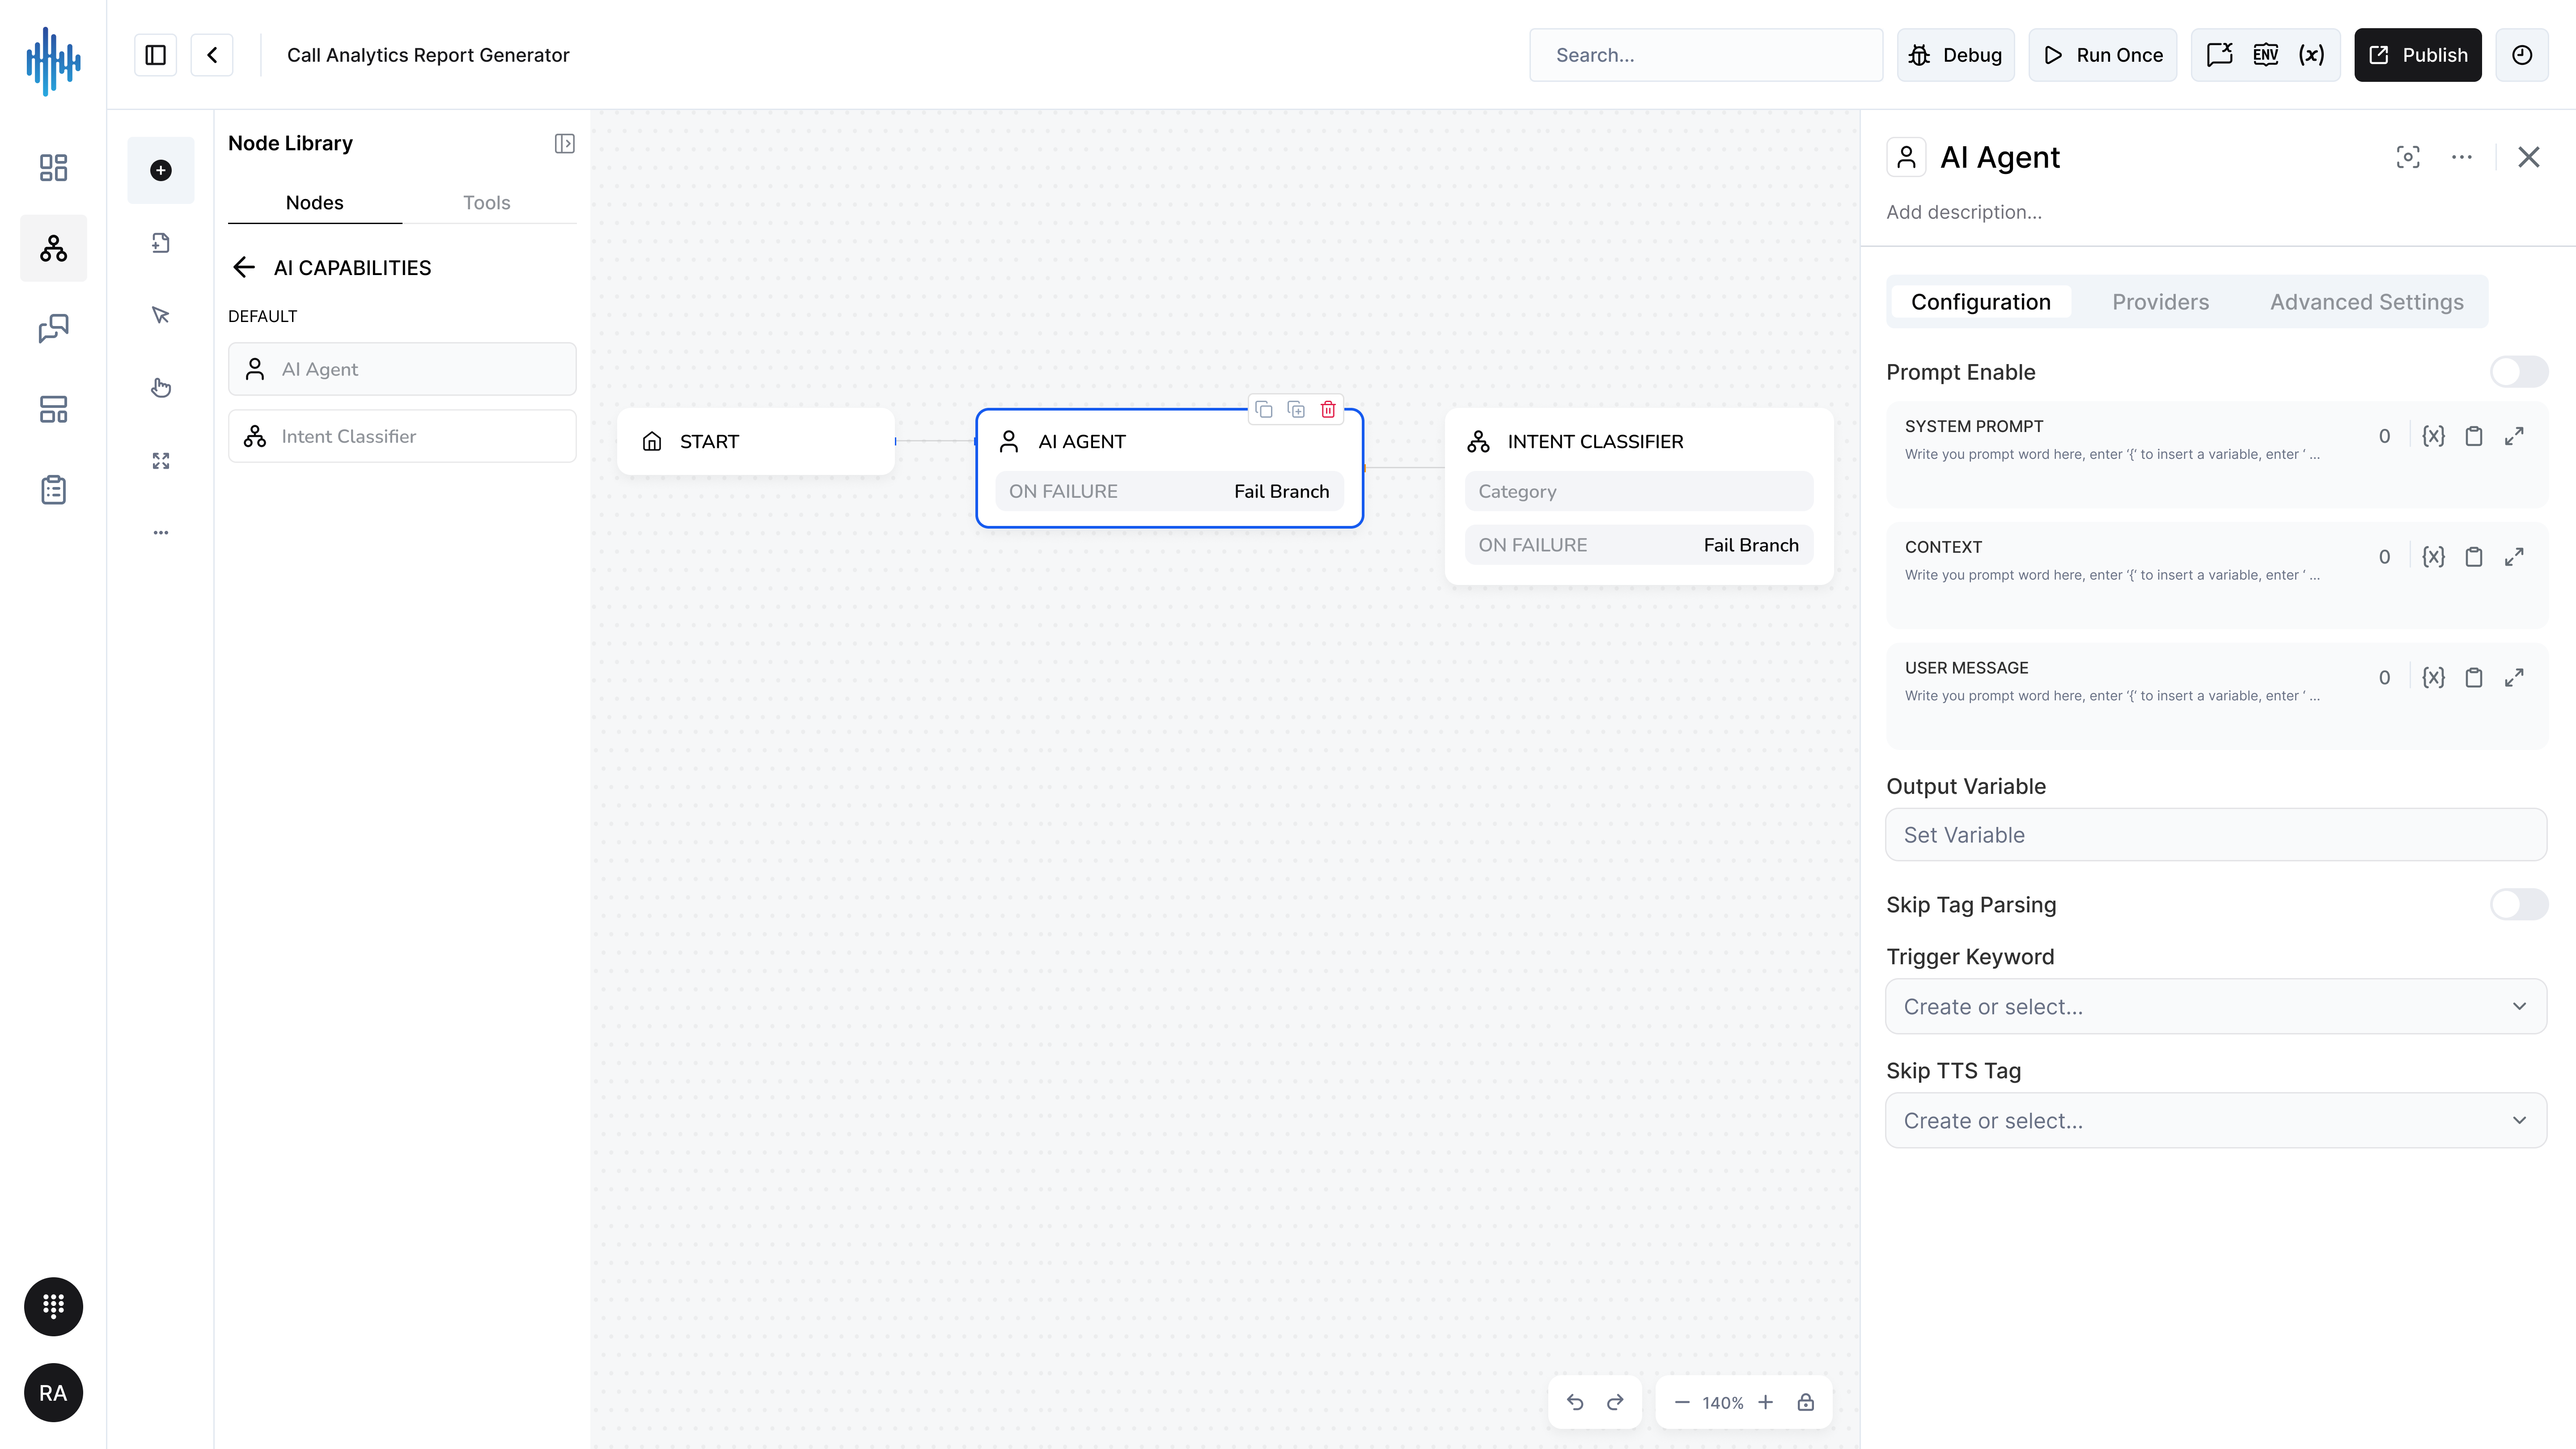
Purpose: Generates intelligent, context-aware responses using large language models (LLMs) with customizable prompts and settings.
When to Use:
- Create conversational chatbots
- Generate dynamic responses based on context
- Provide intelligent customer support
- Build AI assistants with specific knowledge
- Automate content generation
Configuration Tab
Prompt Configuration:
| Field | Description | Required |
|---|---|---|
| Prompt Enable | Toggle to enable/disable custom prompting | ❌ No |
| SYSTEM PROMPT | Instructions that define the AI's role and behavior | ❌ No |
| CONTEXT | Background information and data for the AI to reference | ❌ No |
| USER MESSAGE | The actual user's message or query | ✅ Yes |
Advanced Settings:
| Field | Description | Default |
|---|---|---|
| Output Variable | Variable name to store the AI's response | - |
| Skip Tag Parsing | Disable automatic tag processing | Off |
| Trigger Keywords | Keywords that activate this node | - |
| Skip TTS Tag | Skip text-to-speech tag processing | - |
Prompt Best Practices:
SYSTEM PROMPT Example:
You are a helpful customer support agent for StreamSpace Company.
Your role is to assist customers with billing questions,
account issues, and general inquiries. Be professional,
friendly, and concise. Always offer to escalate complex
issues to human agents.
CONTEXT Example:
Customer Name: {{contact.name}}
Account Type: {{contact.subscription_type}}
Last Login: {{contact.last_login}}
Previous Issues: {{contact.ticket_history}}
USER MESSAGE Example:
{{user_input}}
Providers Tab
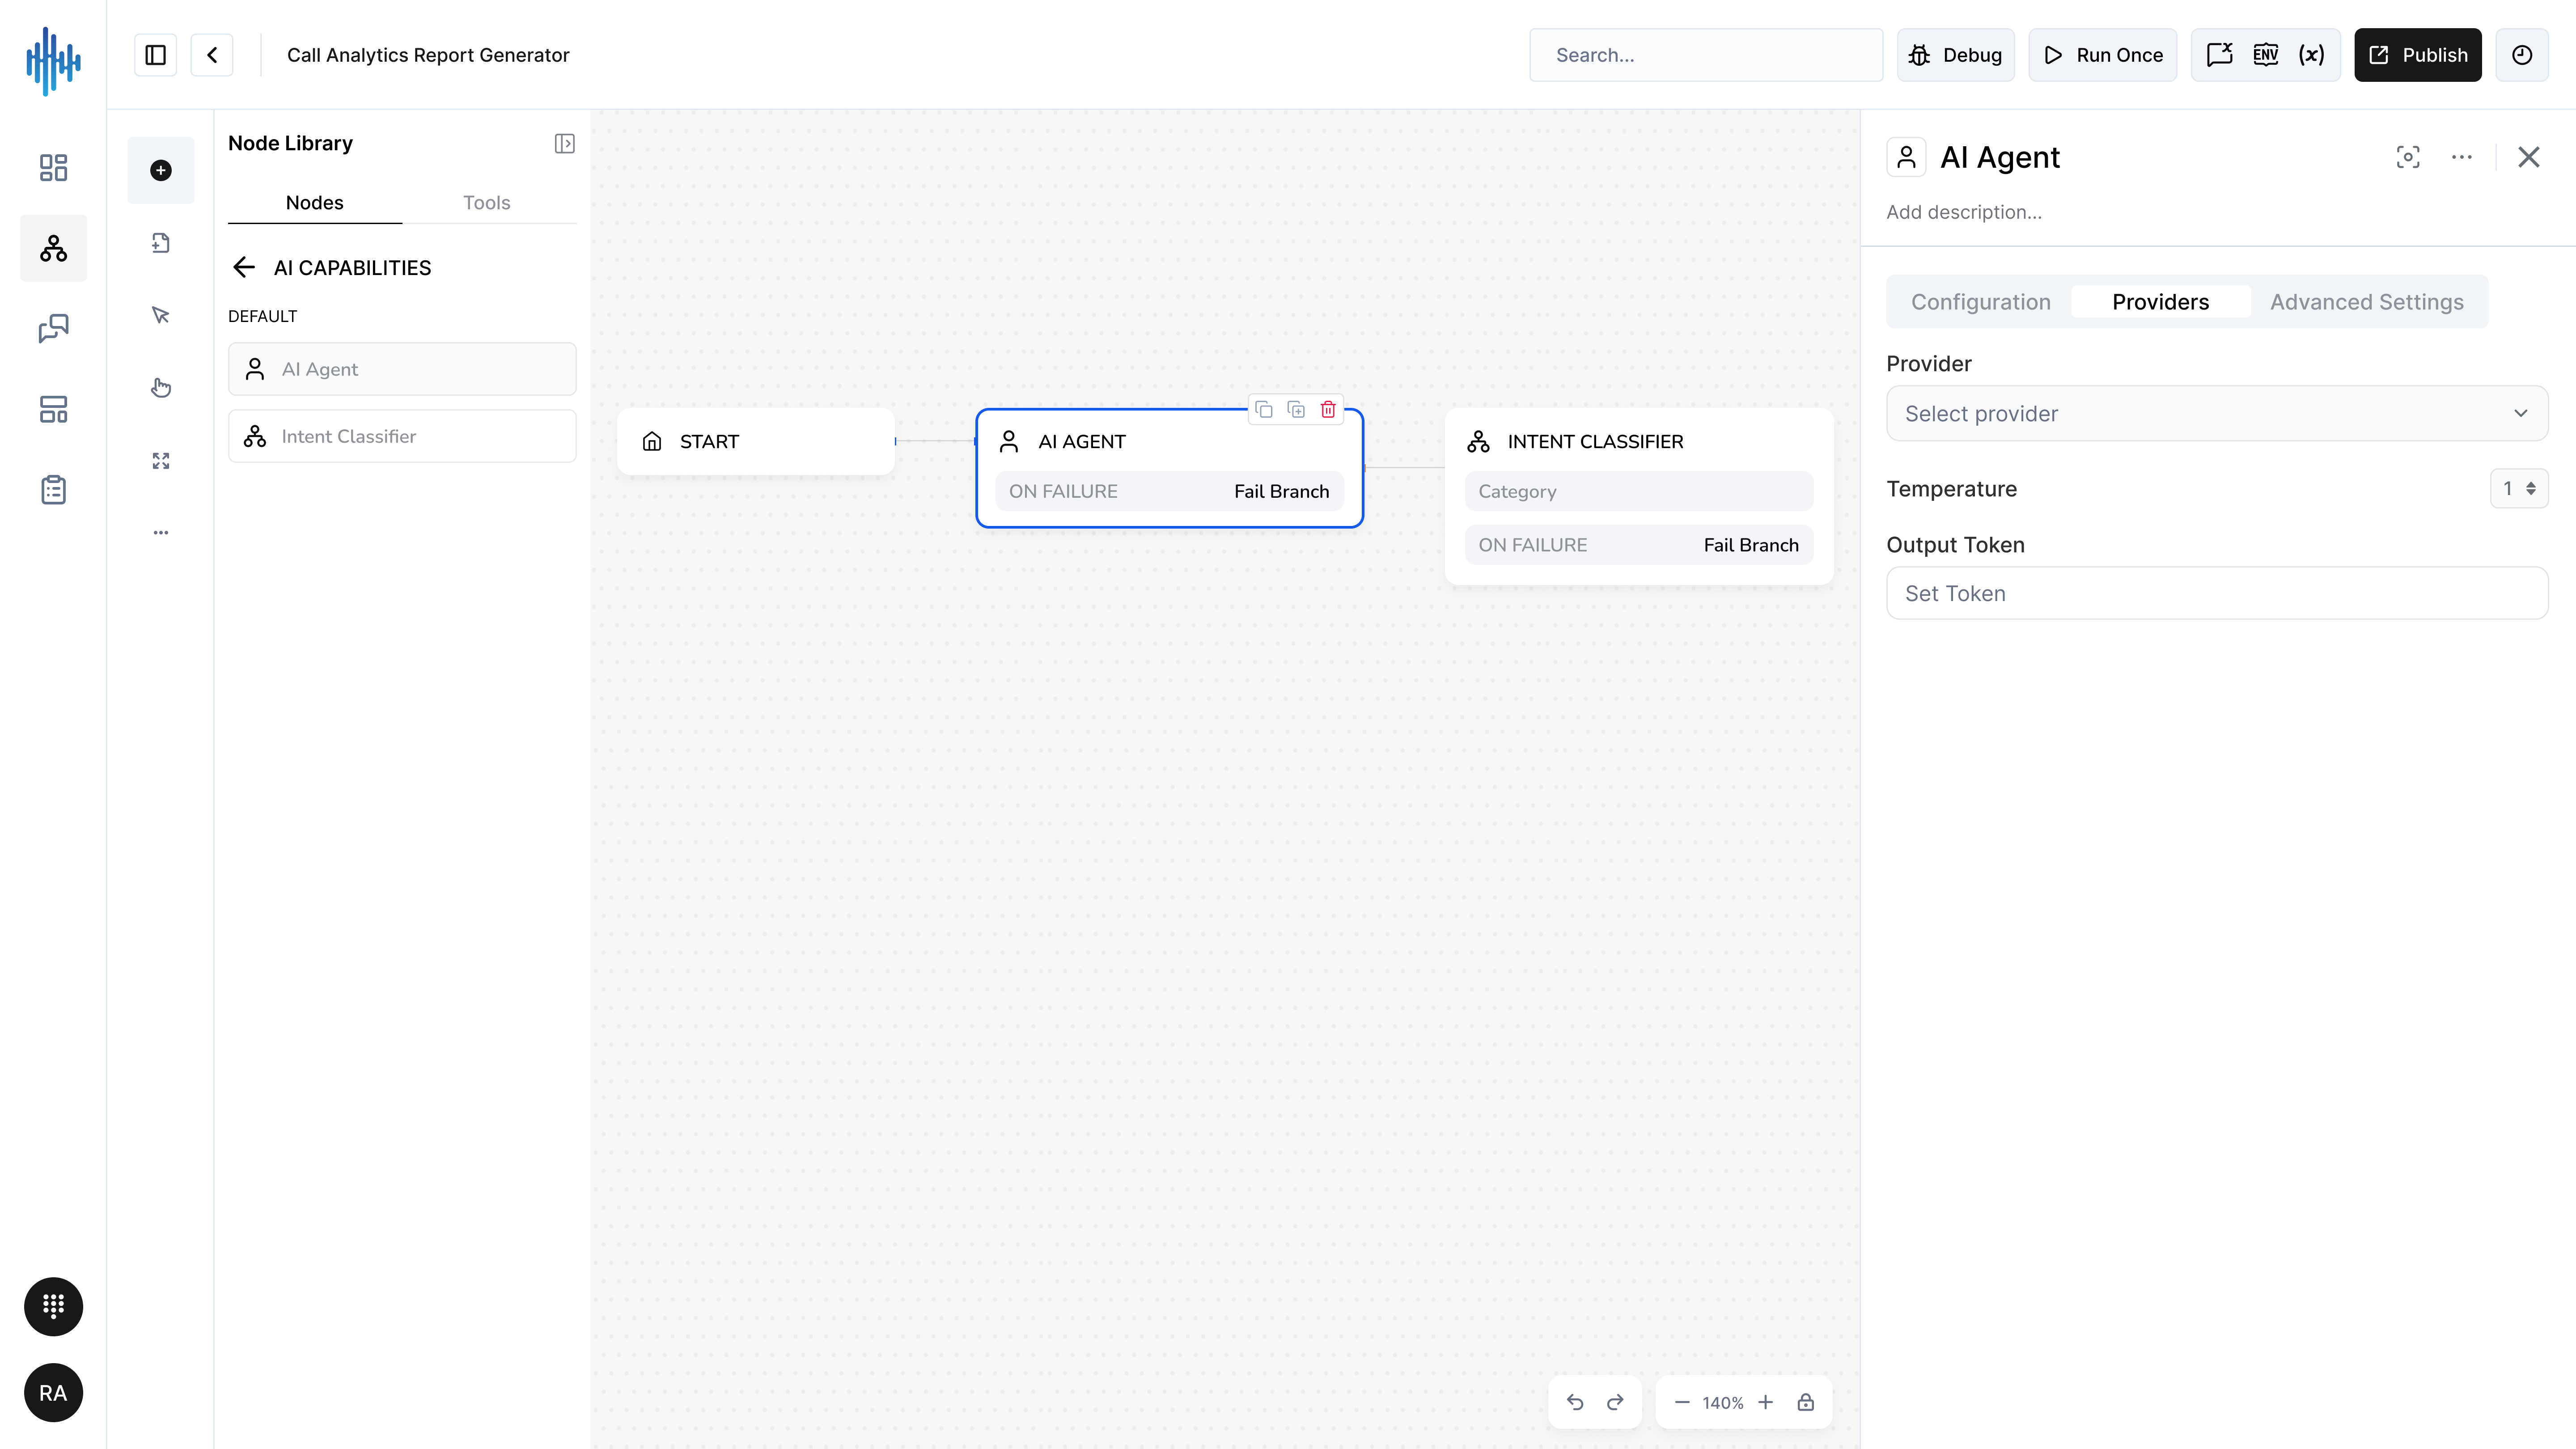
Provider Configuration:
| Field | Description | Required |
|---|---|---|
| Provider | Select AI model provider | ✅ Yes |
| Temperature | Controls response randomness (0-1) | ❌ No |
| Output Token | Maximum response length | ❌ No |
Available Providers:
- OpenAI (GPT-4, GPT-3.5)
- Anthropic (Claude)
- Google (Gemini, PaLM)
- Custom providers
Temperature Settings:
- 0.0 - 0.3: Deterministic, consistent responses (recommended for support)
- 0.4 - 0.7: Balanced creativity and consistency
- 0.8 - 1.0: Creative, varied responses (recommended for content generation)
Output Token Limits:
- Short responses: 100-300 tokens
- Standard responses: 300-1000 tokens
- Long-form content: 1000-4000 tokens
Advanced Settings Tab
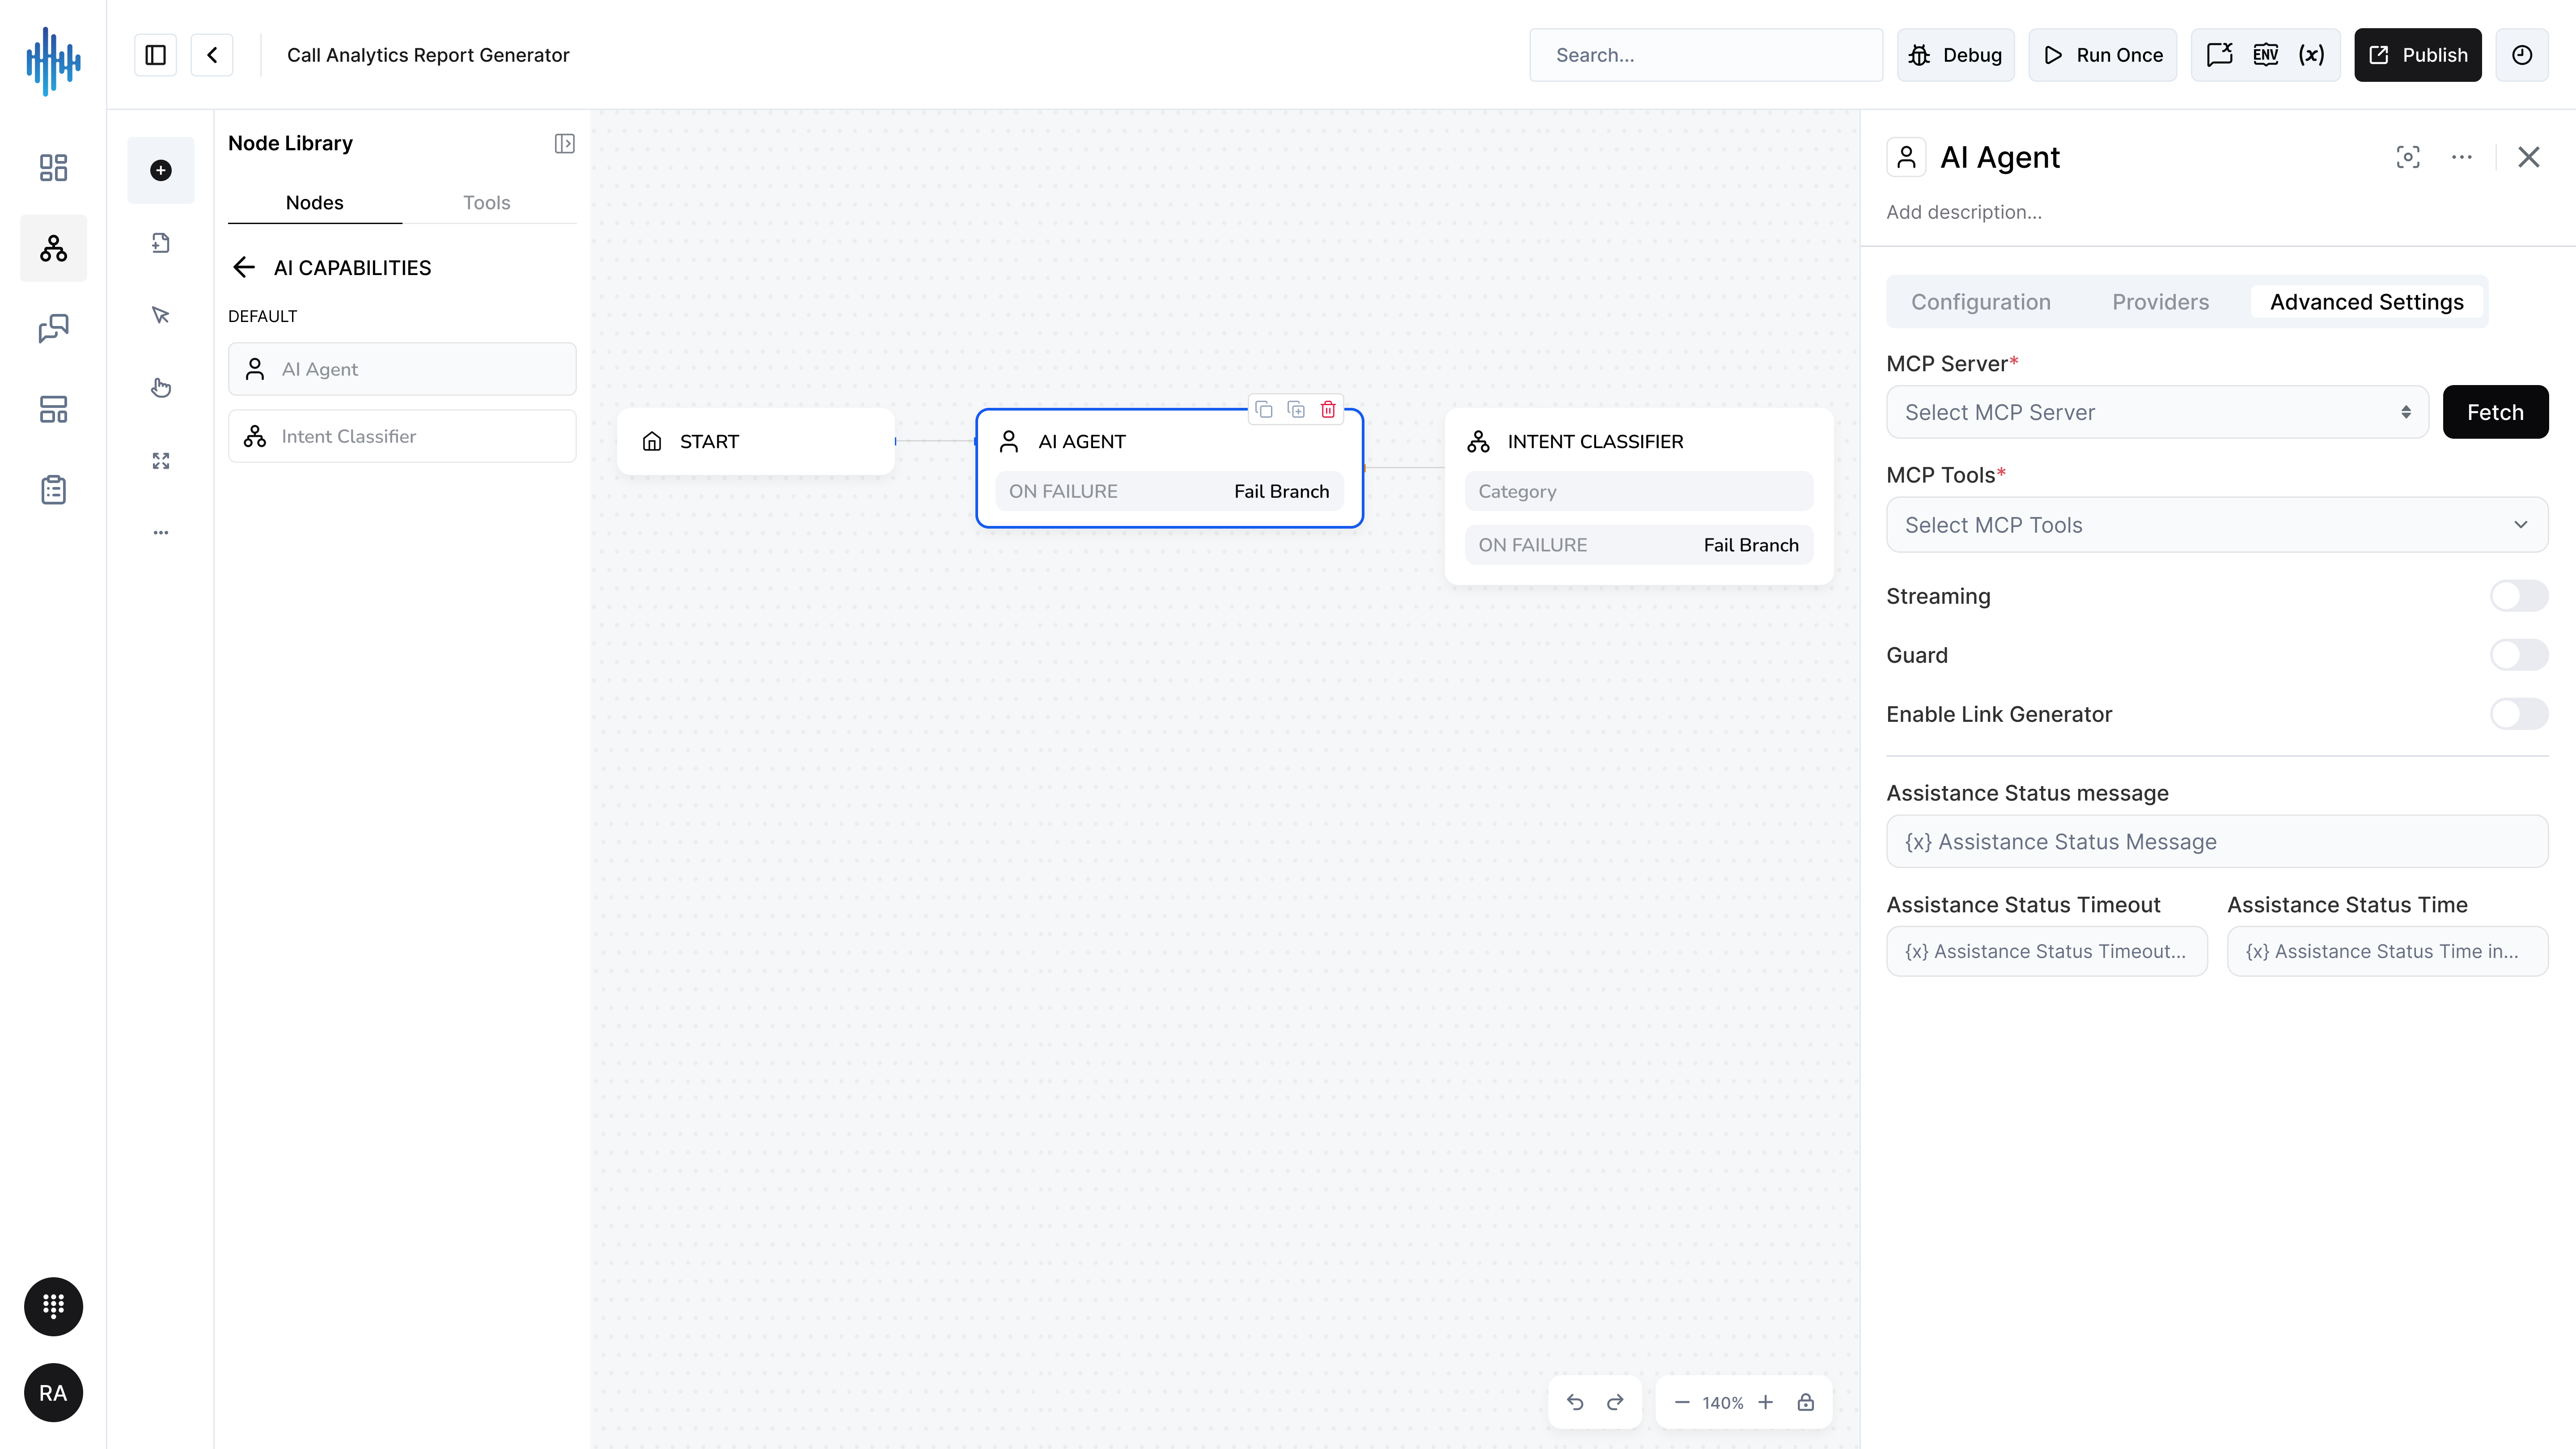
MCP (Model Context Protocol) Configuration:
| Field | Description | Required |
|---|---|---|
| MCP Server | Select MCP server for enhanced capabilities | ❌ No |
| MCP Tools | Available tools from the MCP server | ❌ No |
Advanced Features:
| Setting | Description | Default |
|---|---|---|
| Streaming | Enable real-time response streaming | Off |
| Guard | Enable content safety filtering | Off |
| Enable Link Generator | Generate clickable links in responses | Off |
Assistance Status:
| Field | Purpose |
|---|---|
| Assistance Status Message | Custom message shown during AI processing |
| Assistance Status Timeout | Maximum wait time before timeout |
| Assistance Status Time | Display duration of status message |
Complete Setup Guide
Step 1: Configure Basic Prompts
- Add AI Agent node to canvas
- Open Configuration tab
- Write clear SYSTEM PROMPT defining the AI's role
- Add CONTEXT with relevant variables
- Set USER MESSAGE to capture user input
Step 2: Select Provider & Model
- Switch to Providers tab
- Select your AI provider (OpenAI, Anthropic, etc.)
- Set Temperature (0.7 recommended for most uses)
- Configure Output Token limit
Step 3: Advanced Options (Optional)
- Go to Advanced Settings tab
- Configure MCP Server if using external tools
- Enable Streaming for real-time responses
- Set up Guardrails for content safety
- Configure status messages for user feedback
Step 4: Test & Refine
- Test with sample user messages
- Review AI responses for quality
- Adjust prompts and temperature as needed
- Monitor token usage and response times
Output Variables:
Store the AI's response in a variable for use in subsequent nodes:
{{ai_response}}
Common Use Cases:
Customer Support Bot:
SYSTEM PROMPT: You are a friendly support agent...
CONTEXT: Customer account info, order history
USER MESSAGE: Customer's question
Temperature: 0.5 (balanced)
Content Generator:
SYSTEM PROMPT: You are a creative content writer...
CONTEXT: Brand guidelines, product info
USER MESSAGE: Content request
Temperature: 0.8 (creative)
FAQ Assistant:
SYSTEM PROMPT: Answer based on knowledge base...
CONTEXT: FAQ documents, policies
USER MESSAGE: User question
Temperature: 0.2 (consistent)
Best Practices:
✅ DO:
- Write specific, detailed SYSTEM PROMPTs
- Include relevant CONTEXT for personalization
- Test with various user inputs
- Monitor token usage to control costs
- Use appropriate temperature for your use case
- Enable Guardrails for customer-facing bots
❌ DON'T:
- Leave SYSTEM PROMPT vague or generic
- Include excessive context (increases costs)
- Set temperature too high for factual responses
- Ignore token limits (can cause errors)
- Skip testing with edge cases
Troubleshooting:
| Problem | Solution |
|---|---|
| Responses are too generic | Add more specific SYSTEM PROMPT and CONTEXT |
| Responses are inconsistent | Lower temperature to 0.3-0.5 |
| Responses are too similar | Increase temperature to 0.6-0.8 |
| Timeout errors | Reduce Output Token limit or check provider status |
| Inappropriate responses | Enable Guardrails in Advanced Settings |
Related Nodes:
- Intent Classifier - Classify intent before generating response
- Send Text Message - Send AI response to user
📧 Contact Actions
Quick Jump: ↑ Top | ← AI Capabilities | Engage & Route →
Manage customer contact data, retrieve contact information, and update contact records.
Fetch Contact Node
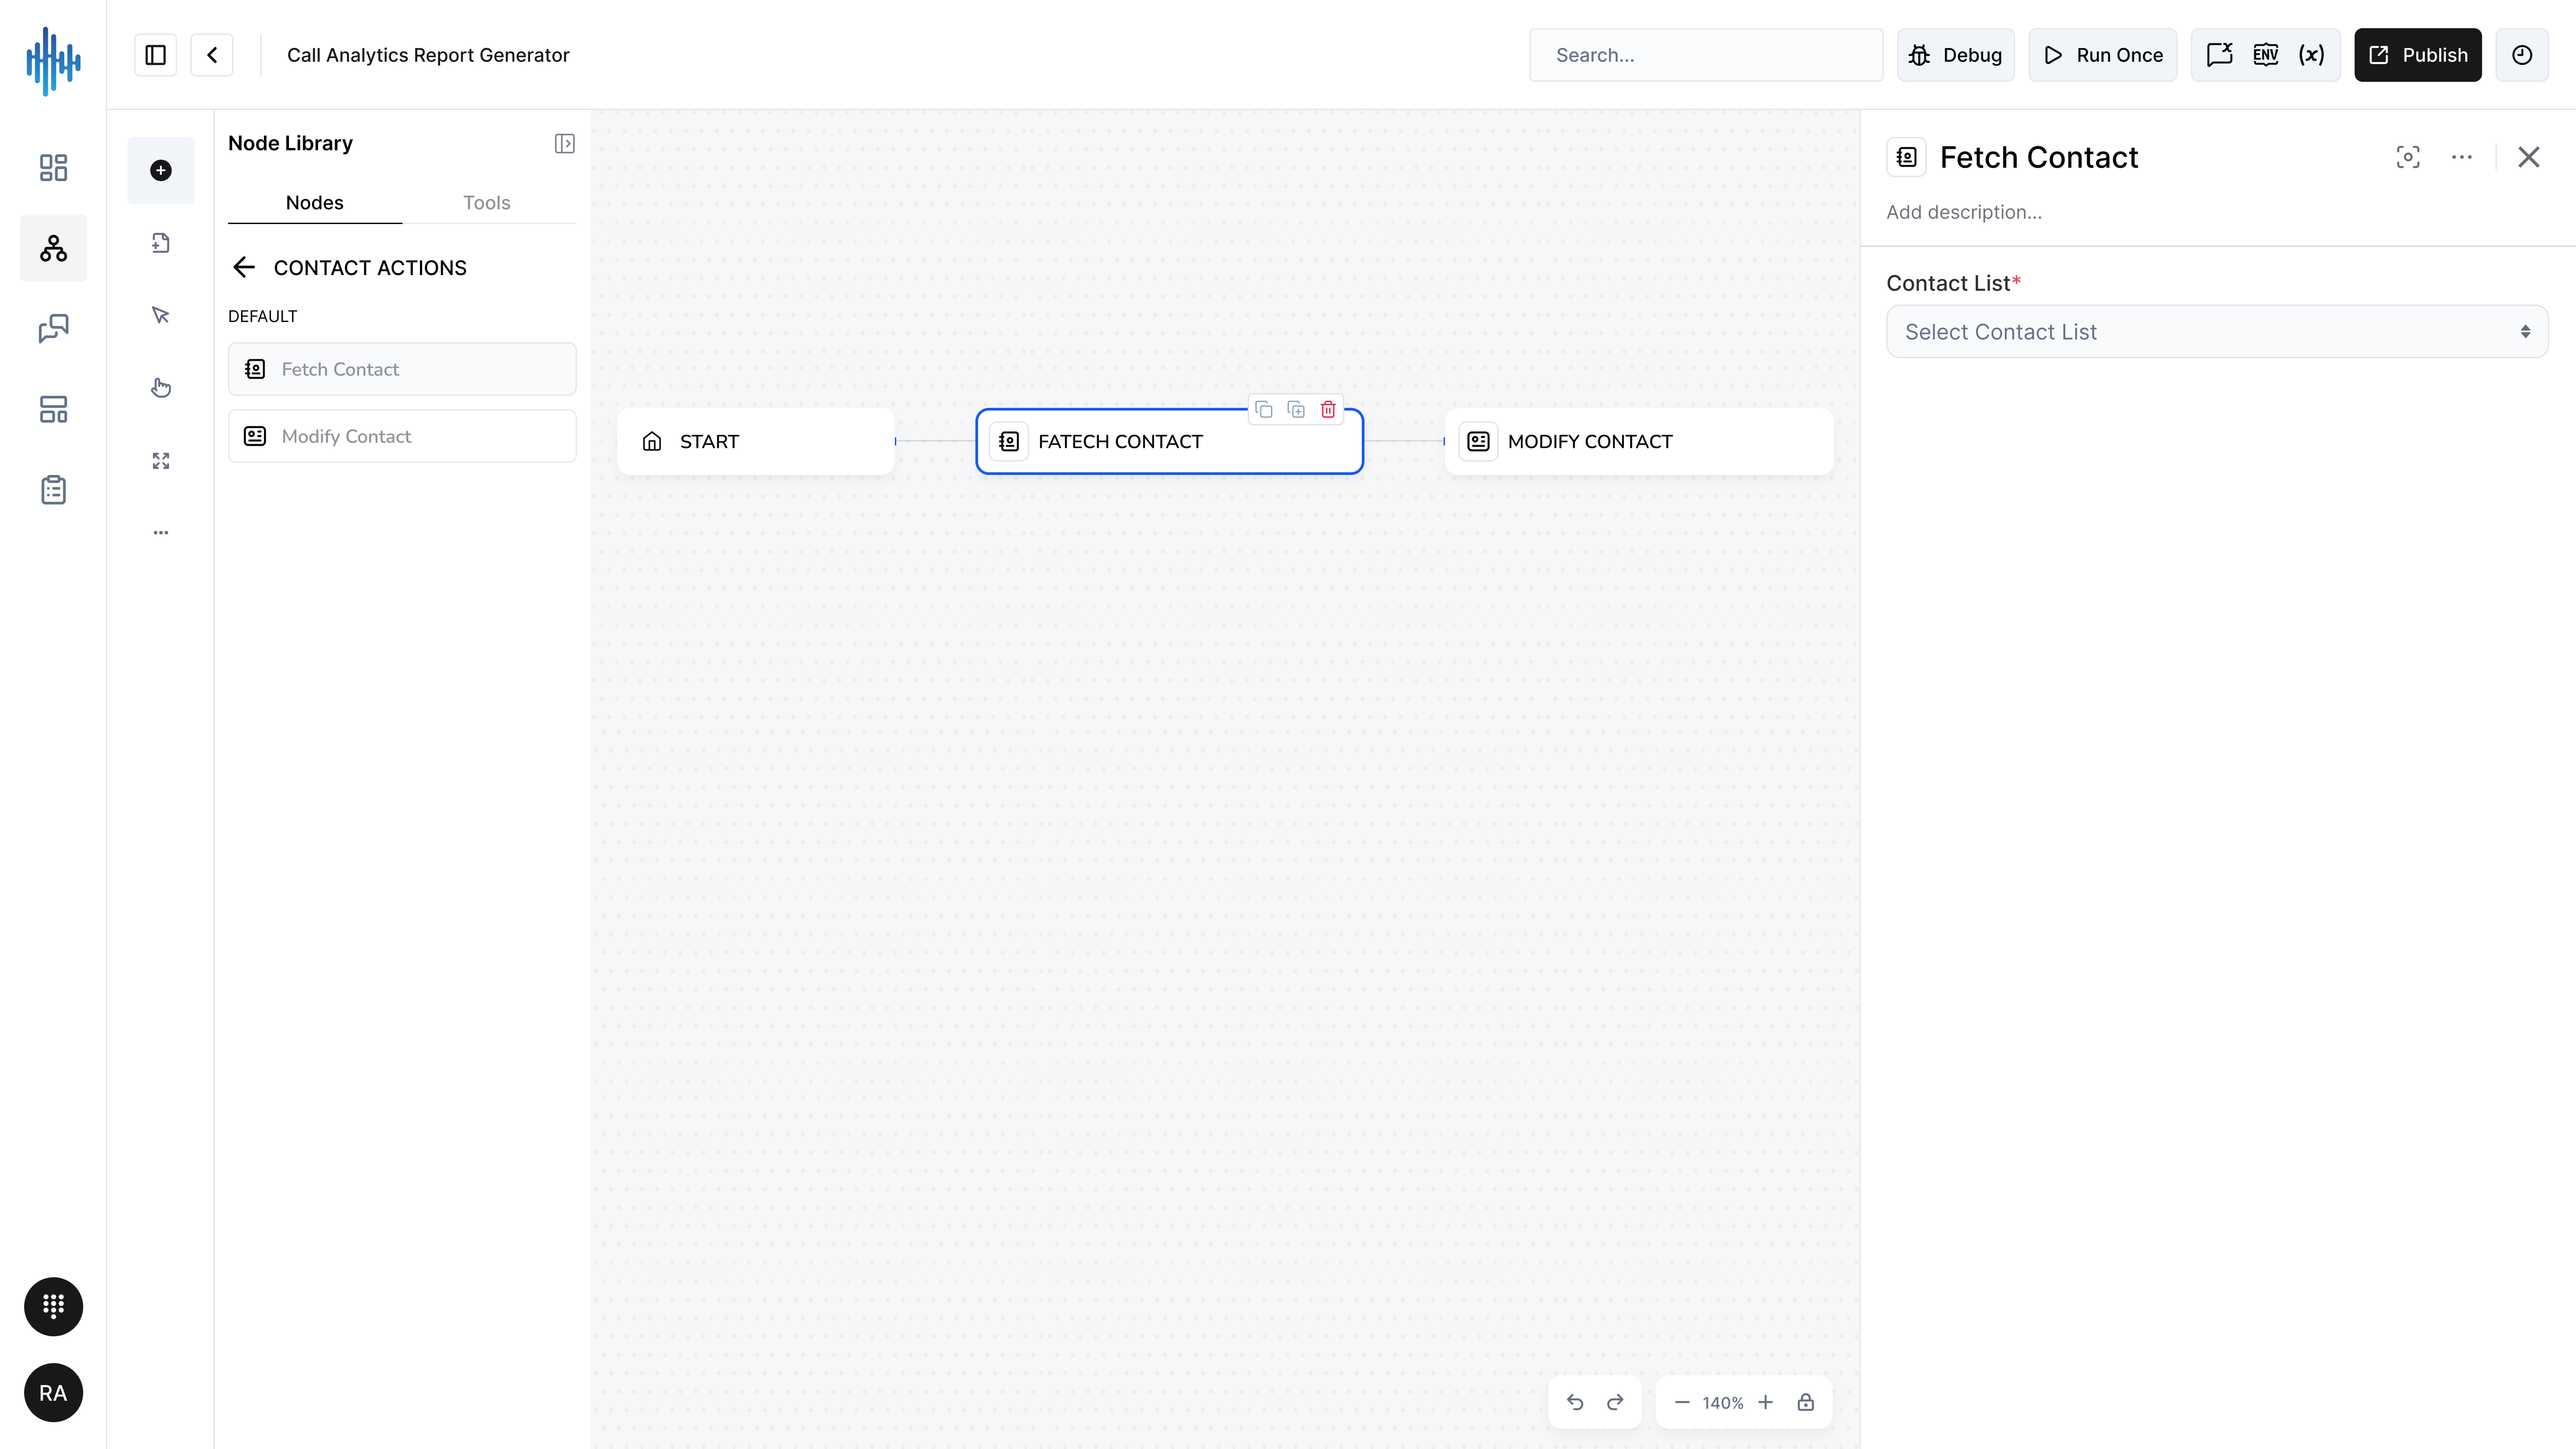
Purpose: Retrieves contact information from your contact database based on identifiers.
When to Use:
- Load customer profile at conversation start
- Retrieve contact details for personalization
- Check if contact exists before creating
- Get contact information for routing decisions
Configuration Settings:
| Field | Description | Required |
|---|---|---|
| Contact List | Select which contact list to search | ✅ Yes |
Setup Steps:
- Add Fetch Contact node to workflow
- Select the Contact List from dropdown
- Connect from a trigger or previous node
- The node automatically fetches contact based on session identifier
- Use fetched contact data in subsequent nodes
Output Data:
Returns contact object with fields:
- Contact ID
- Name
- Phone number
- Custom fields
- Tags
- Contact metadata
Usage Example:
Workflow: Chat Start
↓
Fetch Contact → Load customer profile
↓
AI Agent → Use {{contact.name}} for personalized greeting
Best Practices:
✅ DO:
- Fetch contact early in the workflow
- Store contact data in variables for reuse
- Handle cases where contact doesn't exist
❌ DON'T:
- Fetch contacts multiple times unnecessarily
- Assume contact always exists
Related Nodes:
- Modify Contact - Update contact after fetching
Modify Contact Node
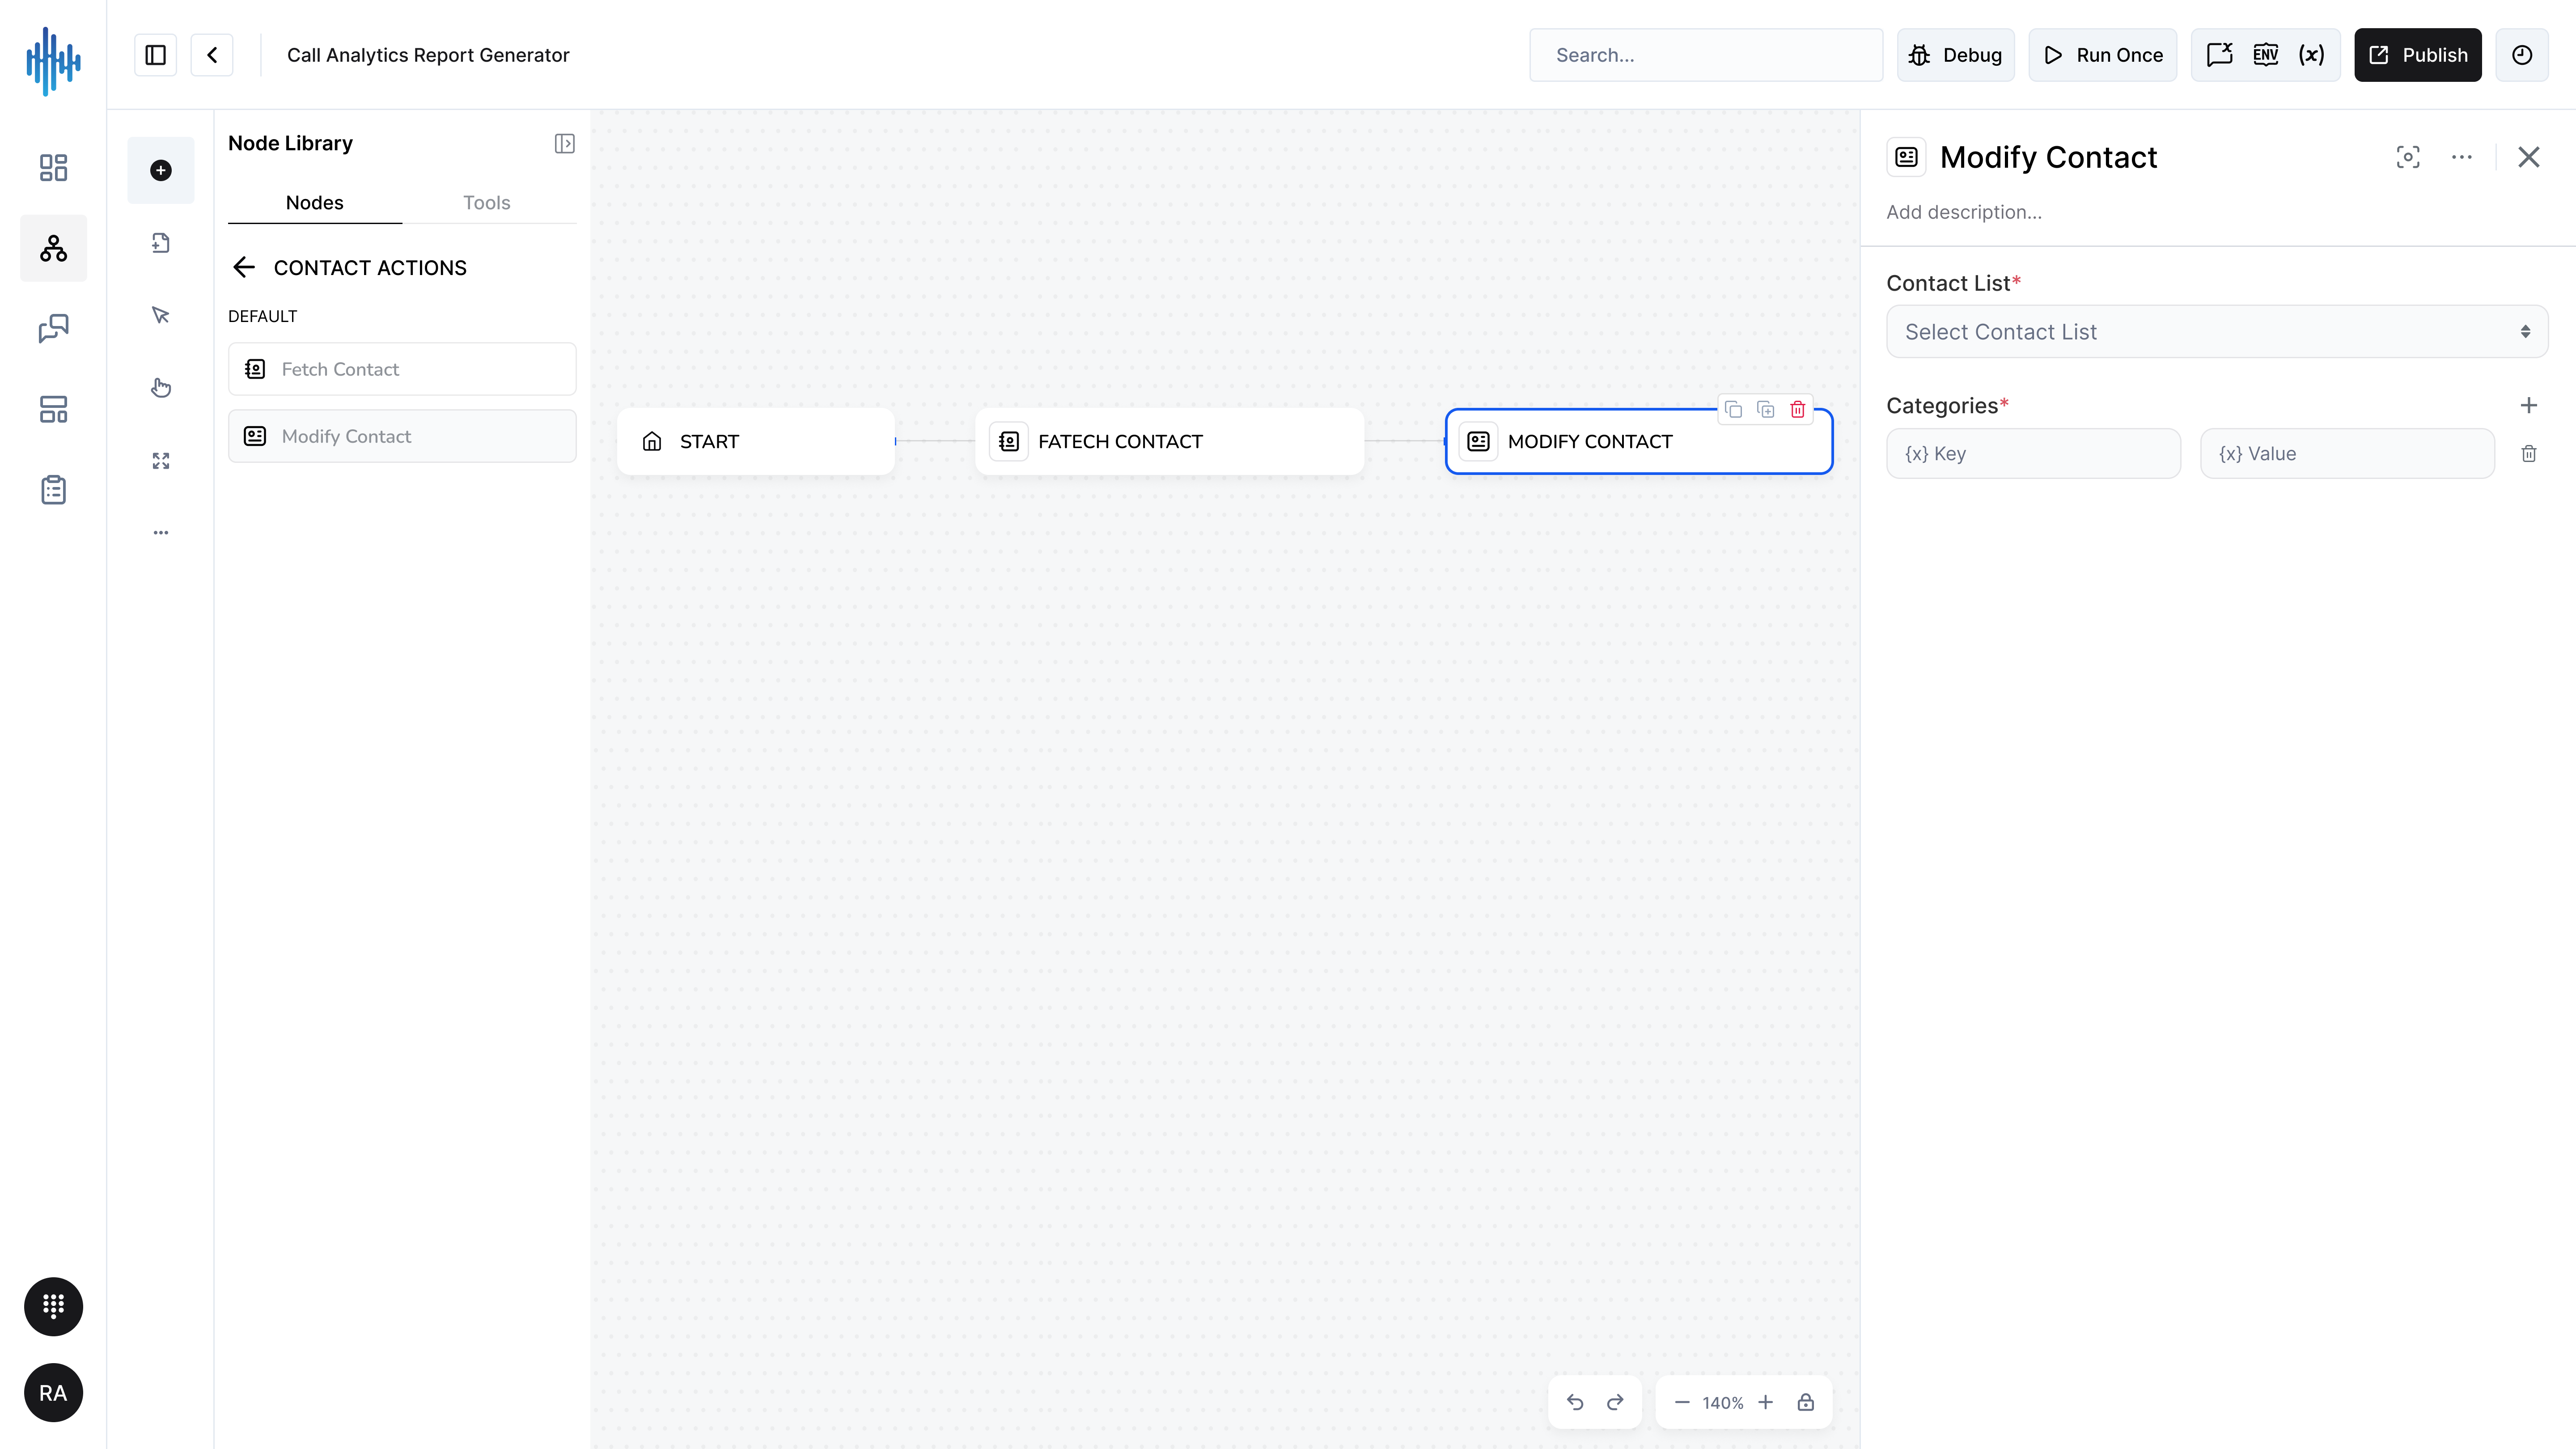
Purpose: Updates existing contact records with new information or adds new contact details.
When to Use:
- Update contact information during conversation
- Add tags or notes to contacts
- Store conversation data in contact record
- Update contact preferences or settings
Configuration Settings:
| Field | Description | Required |
|---|---|---|
| Contact List | Target contact list to update | ✅ Yes |
| Contact Details | Fields to update (dynamic) | ✅ Yes |
Setup Steps:
- Add Modify Contact node to workflow
- Select Contact List from dropdown
- Click "+ Add Field" to add contact details
- Map data to contact fields:
- Standard fields (name, email, phone)
- Custom fields
- Tags
- Connect to previous nodes providing data
Contact Detail Options:
You can update:
- Name: Full name or first/last name separately
- Email: Primary email address
- Phone: Phone number
- Custom Fields: Any custom fields defined in your contact list
- Tags: Add or remove contact tags
- Notes: Append conversation notes
Best Practices:
✅ DO:
- Update contacts with collected information
- Use variables to dynamically populate fields
- Add tags for segmentation
- Validate data before updating
❌ DON'T:
- Overwrite important data without checking
- Update every message (causes unnecessary API calls)
- Store sensitive data in unencrypted fields
Common Use Cases:
Update After Form Collection:
Collect User Info → Modify Contact (update name, email, phone)
Add Tags Based on Intent:
Intent Classifier → Modify Contact (add "Interested-in-Billing" tag)
Store Conversation Summary:
AI Agent → Modify Contact (append summary to notes field)
Related Nodes:
- Fetch Contact - Retrieve contact before modifying
🔀 Engage & Route
Quick Jump: ↑ Top | ← Contact Actions | Send Message →
Control conversation flow, route to appropriate handlers, and manage customer engagement.
Hybrid Engage Node
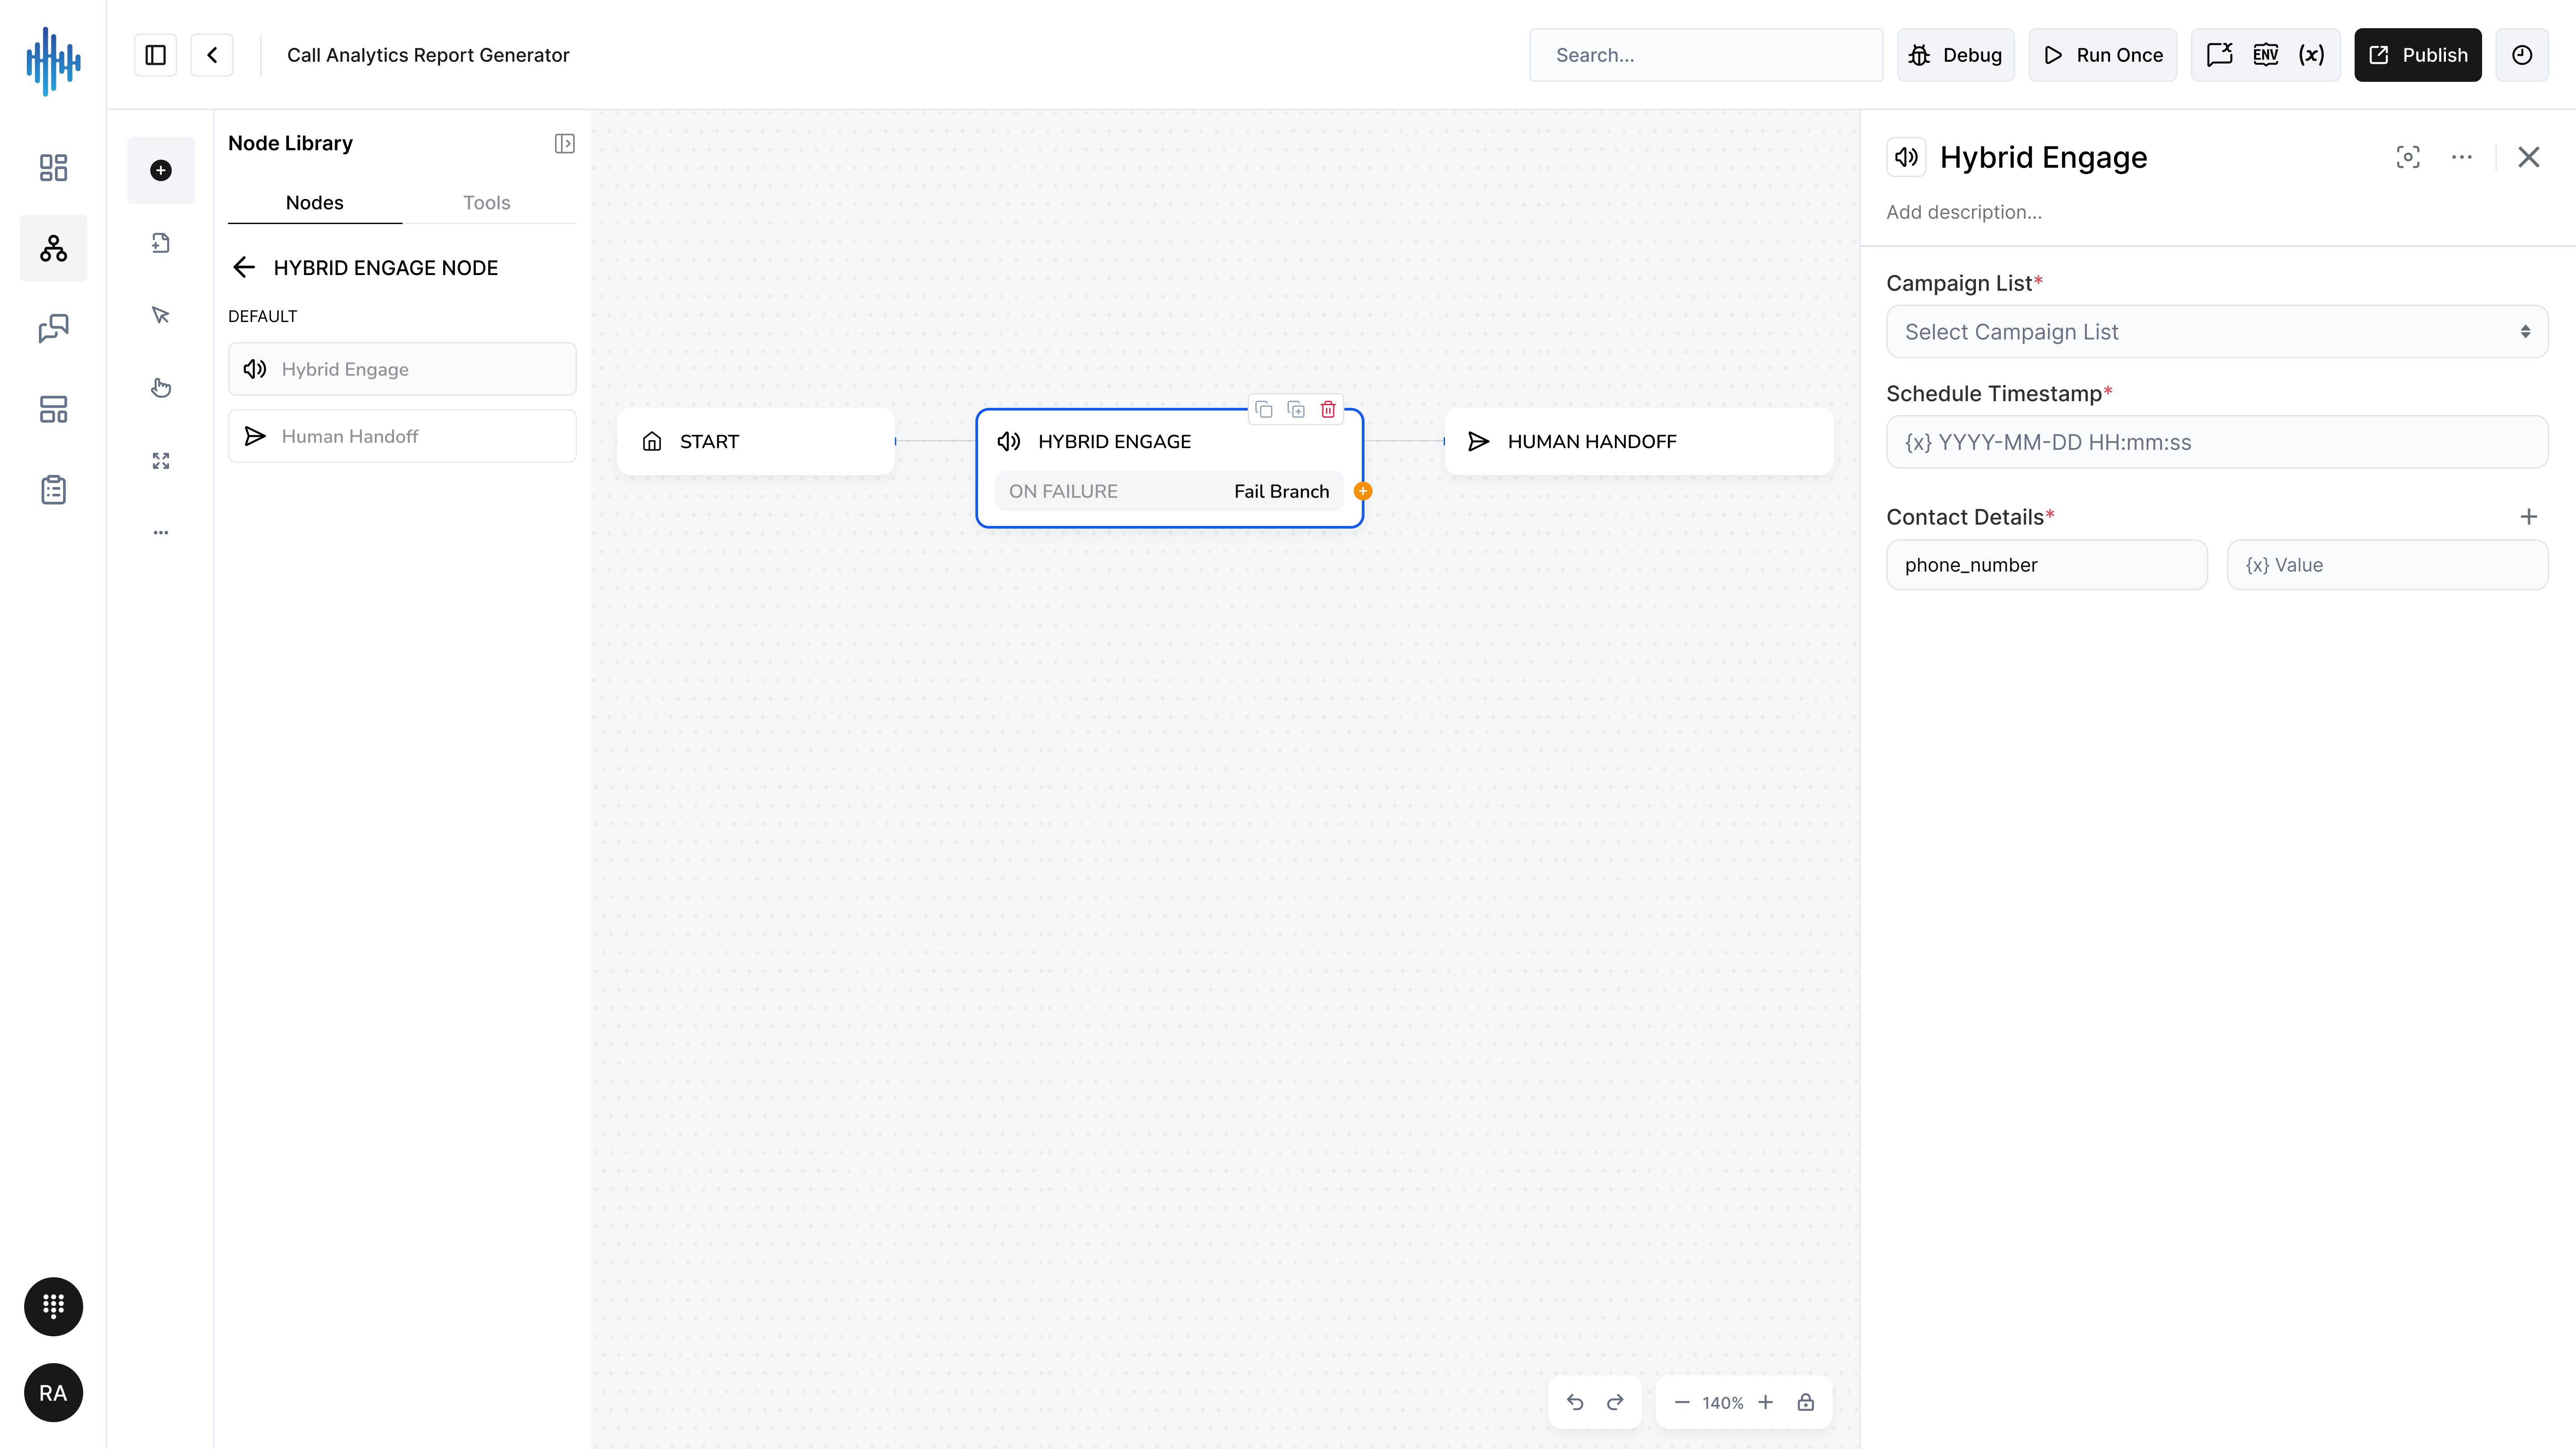
Purpose: Manages scheduled campaign engagement with contacts, enabling automated outreach at specific times.
When to Use:
- Schedule automated follow-up messages
- Send campaign messages at optimal times
- Manage drip campaigns
- Coordinate multi-touch outreach
Configuration Settings:
| Field | Description | Required |
|---|---|---|
| Campaign List | Select campaign to engage | ✅ Yes |
| Schedule Timestamp | When to send the message (YYYY-MM-DD HH:mm:ss) | ❌ No |
| Contact Details | Contact field mapping | ✅ Yes |
Setup Steps:
- Add Hybrid Engage node to workflow
- Select Campaign List from dropdown
- Set Schedule Timestamp (leave empty for immediate)
- Map Contact Details (typically phone_number)
- Connect to trigger or previous node
Scheduling Options:
Immediate Engagement:
- Leave Schedule Timestamp empty
- Message sends immediately when workflow reaches this node
Scheduled Engagement:
- Format:
YYYY-MM-DD HH:mm:ss - Example:
2026-02-15 14:30:00 - Use variables for dynamic scheduling:
{{scheduled_time}}
Best Practices:
✅ DO:
- Schedule messages during business hours
- Use contact's timezone for scheduling
- Test campaigns before deploying
- Monitor engagement metrics
❌ DON'T:
- Send messages at inappropriate times
- Schedule too many messages close together
- Forget to map contact details correctly
Common Use Cases:
Follow-up After Purchase:
Order Complete → Hybrid Engage (schedule follow-up in 7 days)
Appointment Reminder:
Appointment Booked → Hybrid Engage (schedule reminder 1 hour before)
Human Handoff Node
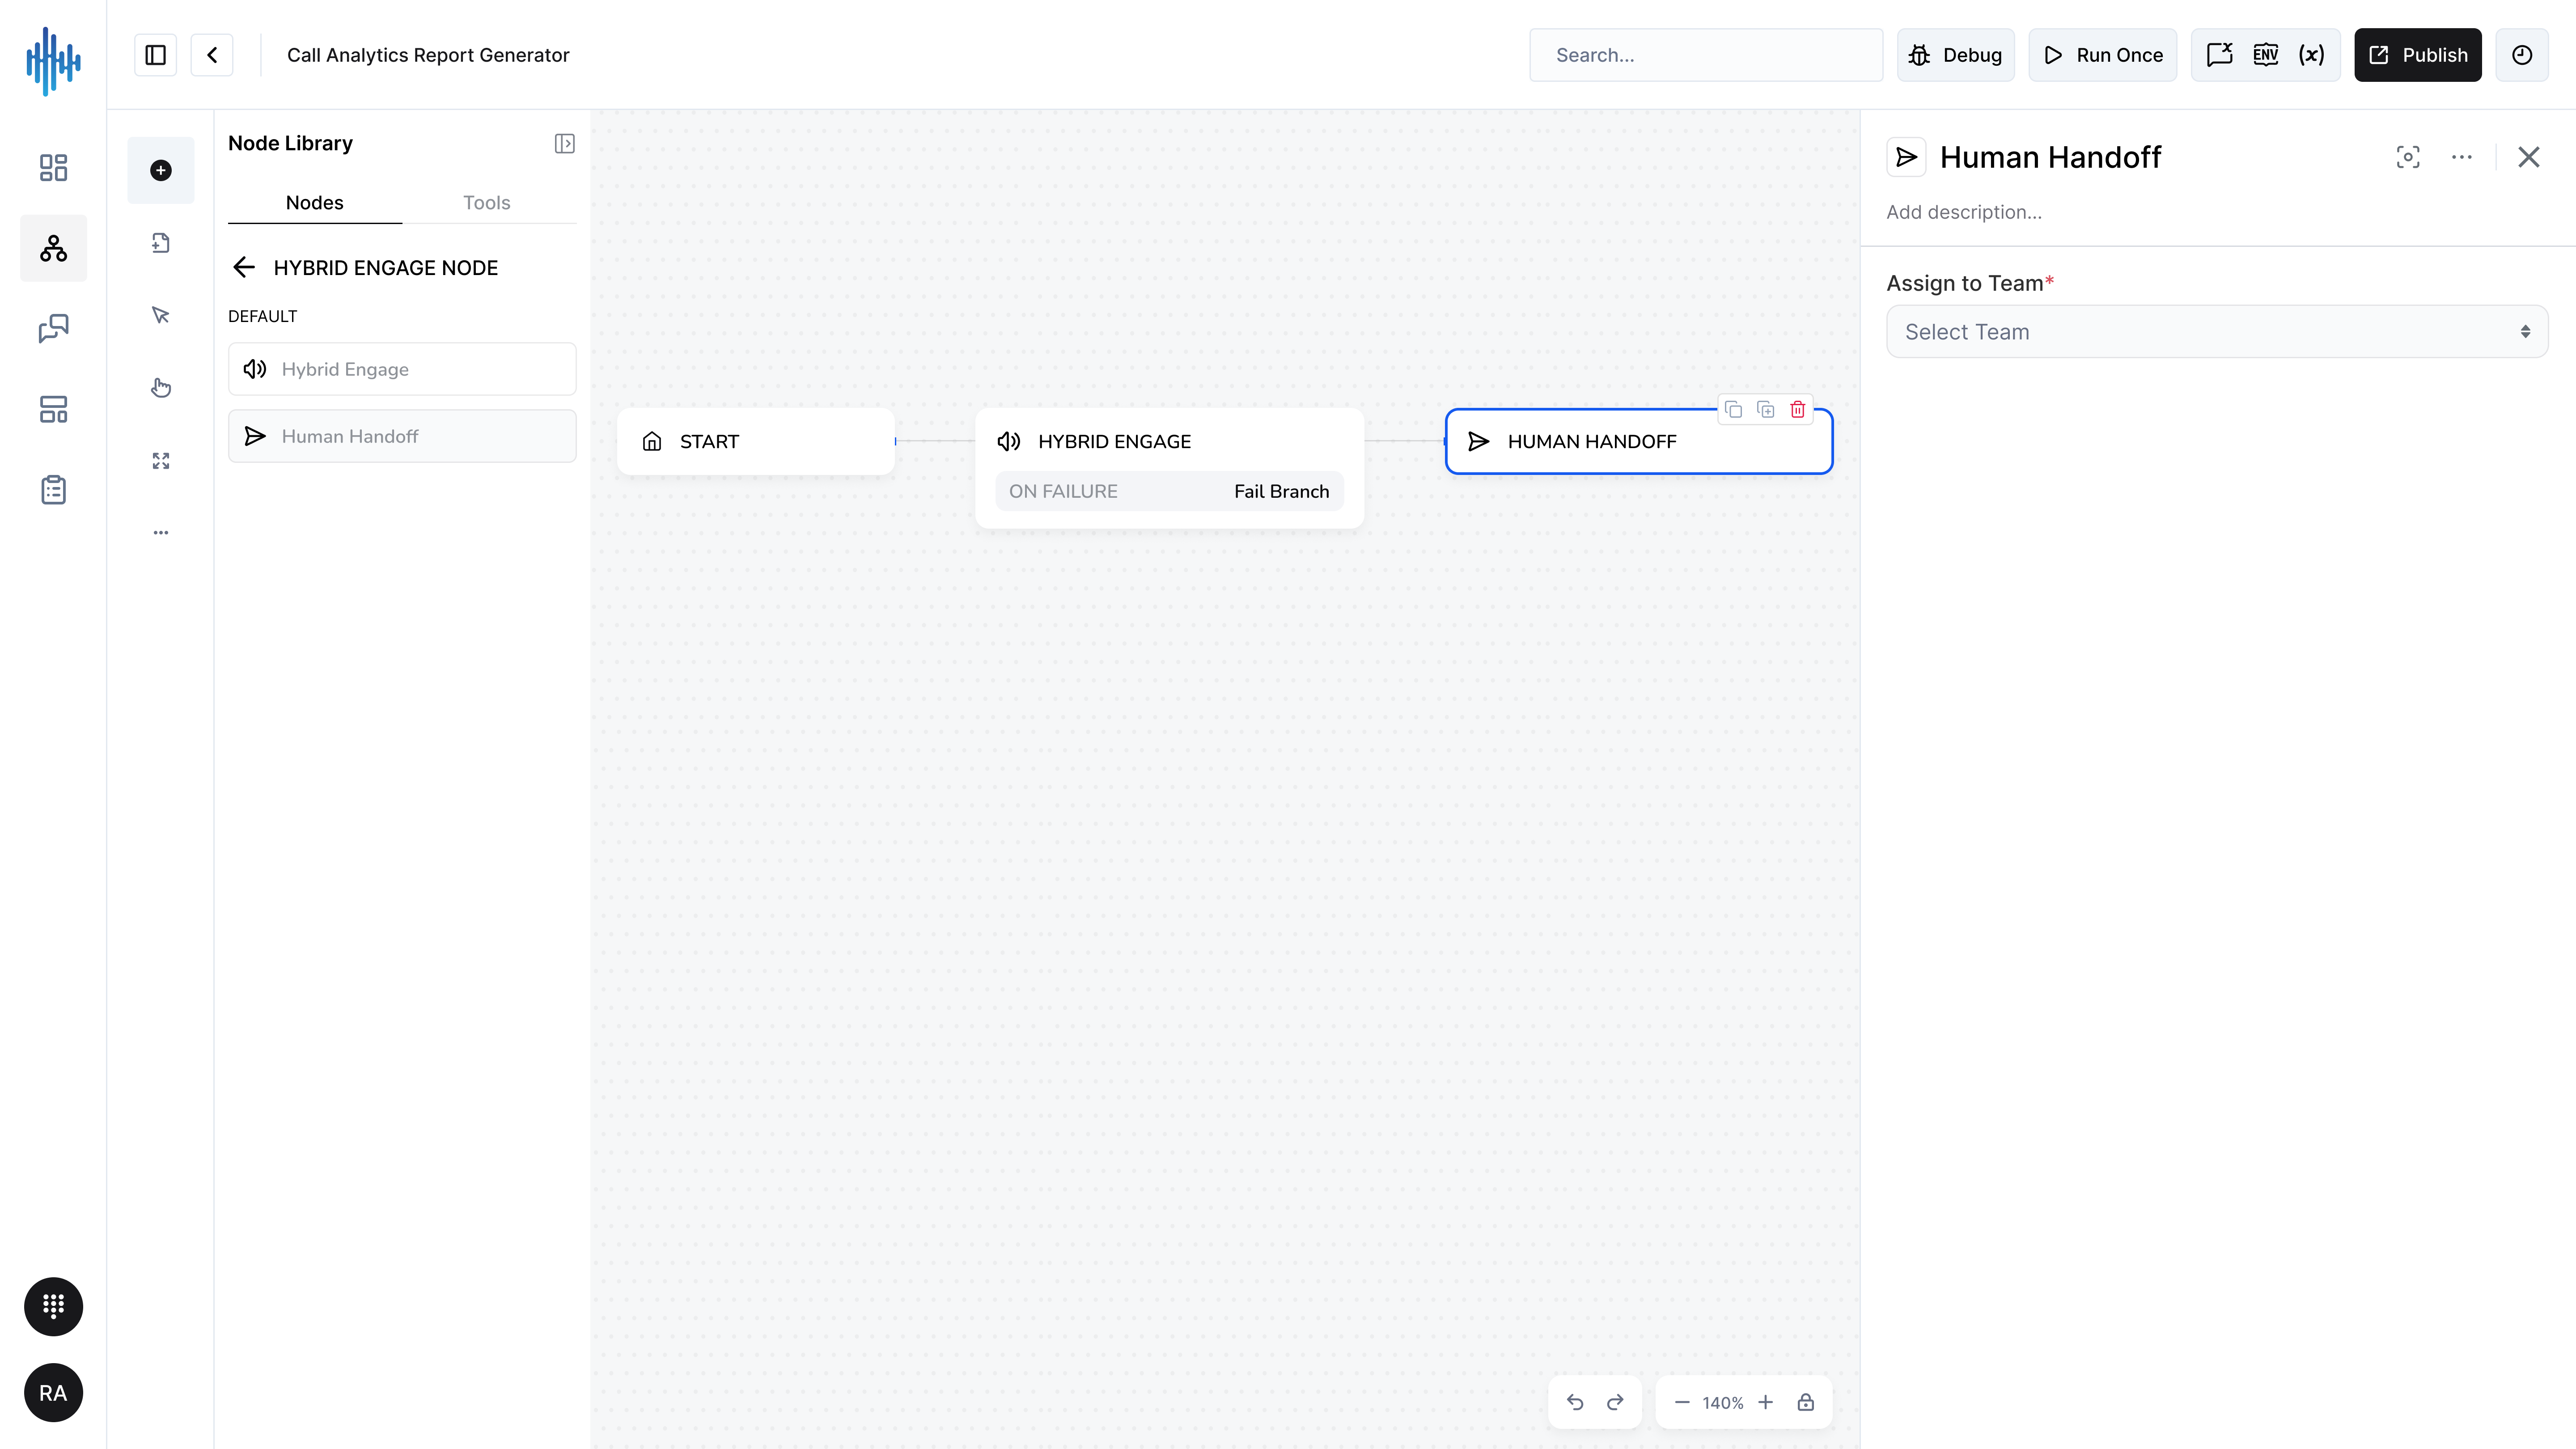
Purpose: Transfers the conversation from AI automation to a human agent for personalized handling.
When to Use:
- Customer explicitly requests human agent
- Complex issue beyond AI capabilities
- Escalation required for sensitive matters
- High-value customer requiring personal attention
Configuration Settings:
| Field | Description | Required |
|---|---|---|
| Assign To Team | Select which team receives the handoff | ✅ Yes |
Available Teams:
Select from configured teams:
- Sales Team
- Support Team
- Technical Team
- Billing Team
- Custom teams
Setup Steps:
- Add Human Handoff node to workflow
- Select Assign To Team from dropdown
- Connect from decision logic (If node, Intent Classifier, etc.)
- Conversation is transferred to selected team's queue
Best Practices:
✅ DO:
- Notify customer about handoff
- Provide agent with conversation context
- Set appropriate team based on issue type
- Track handoff reasons for analysis
❌ DON'T:
- Handoff too early (let AI handle simple queries)
- Forget to notify customer
- Send to wrong team
Common Use Cases:
Customer Requests Agent:
Intent: "Talk to Human" → Human Handoff (Support Team)
Complex Technical Issue:
AI Agent (can't resolve) → Human Handoff (Technical Team)
High-Value Lead:
Lead Score > 80 → Human Handoff (Sales Team)
Workflow Example:
User Message
↓
Intent Classifier
↓
[If intent = "Complex Issue"]
→ Human Handoff (Support Team)
↓
[Else]
→ AI Agent (handle automatically)
Related Nodes:
- Intent Classifier - Determine when handoff is needed
- AI Agent - Try AI response before handoff
💬 Send Message
Quick Jump: ↑ Top | ← Engage & Route
Send various message types to users including text, rich media, cards, carousels, and location information.
Send Text Message Node
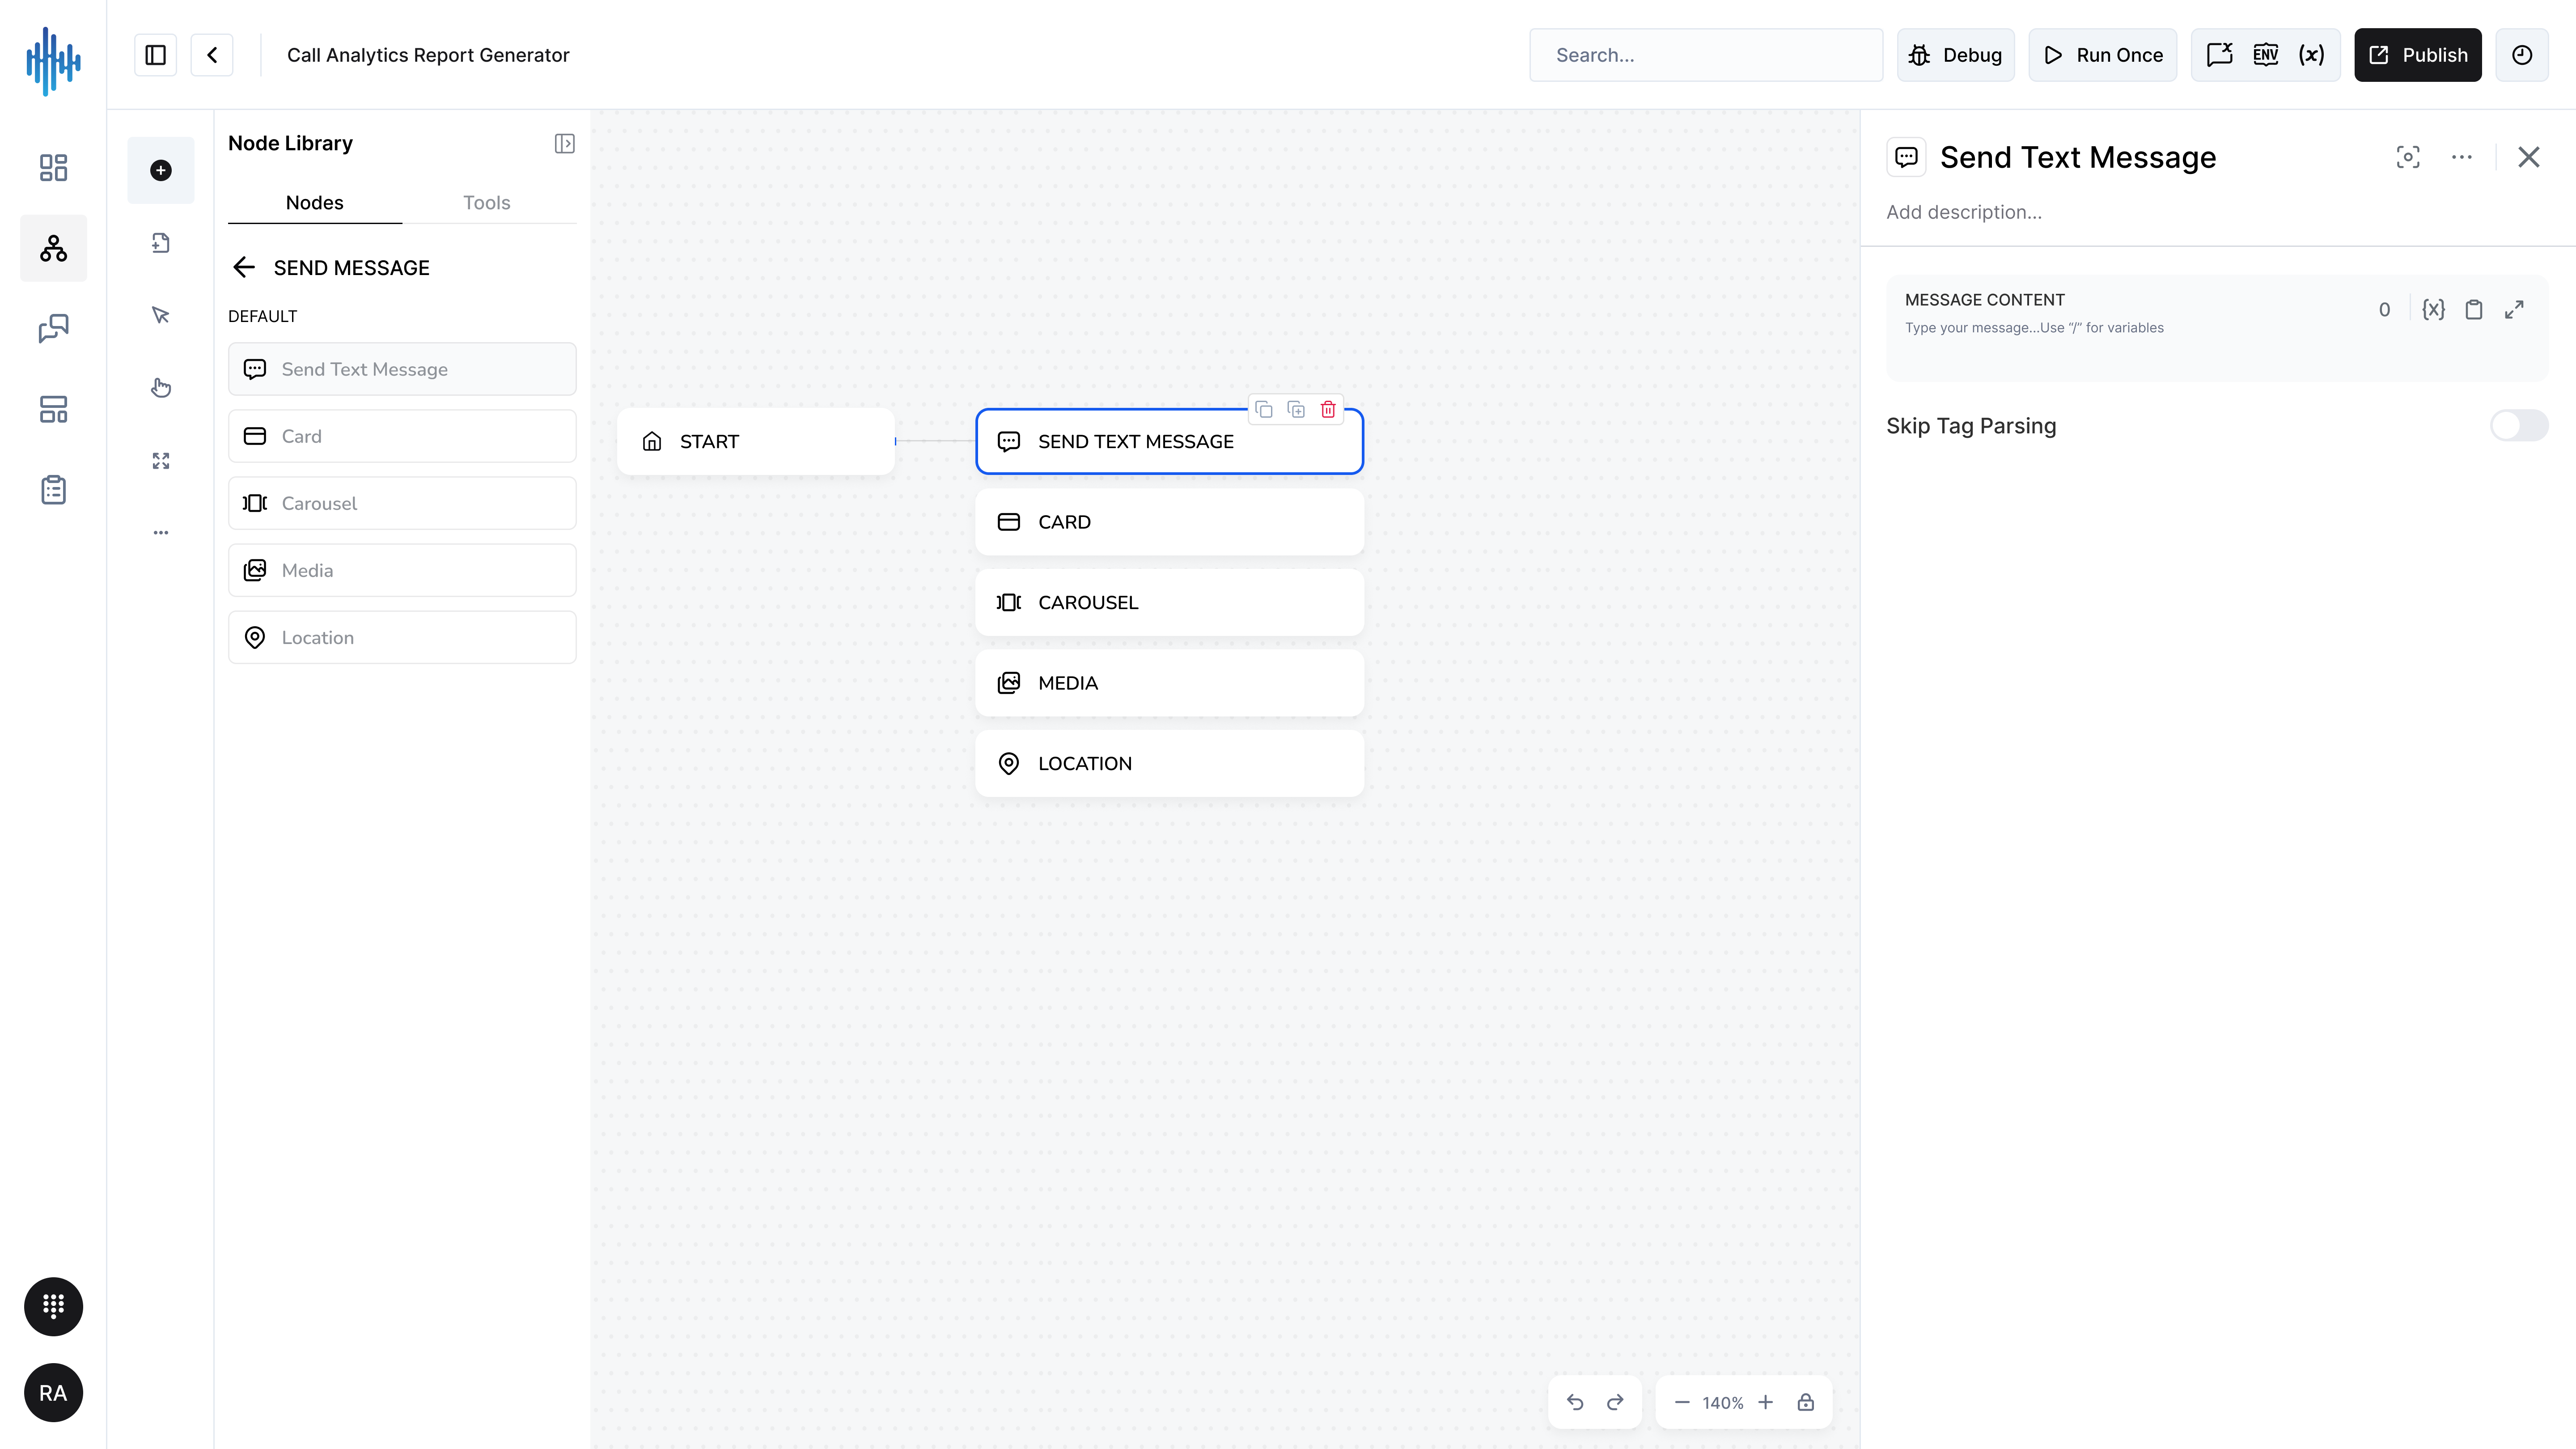
Purpose: Sends plain text messages to users through configured communication channels.
When to Use:
- Send simple text responses
- Deliver AI-generated messages
- Send confirmations or notifications
- Provide information or answers
Configuration Settings:
| Field | Description | Required |
|---|---|---|
| MESSAGE CONTENT | The text message to send | ✅ Yes |
| Skip Tag Parsing | Disable variable replacement | ❌ No |
Message Content:
- Supports plain text
- Supports variables:
{{variable_name}} - Supports multi-line messages
- Maximum length varies by channel
Setup Steps:
- Add Send Text Message node to workflow
- Enter message text in MESSAGE CONTENT
- Use variables for dynamic content:
{{user_name}} - Enable/disable Skip Tag Parsing as needed
- Connect from previous nodes
Using Variables:
Hello {{contact.name}}!

Your order #{{order.id}} has been confirmed.

Thank you for shopping with us!
Best Practices:
✅ DO:
- Keep messages concise and clear
- Use personalization with variables
- Test message formatting
- Consider character limits per channel
❌ DON'T:
- Send overly long messages
- Forget to test variable replacement
- Use complex formatting (use Card node instead)
Related Nodes:
Card Node
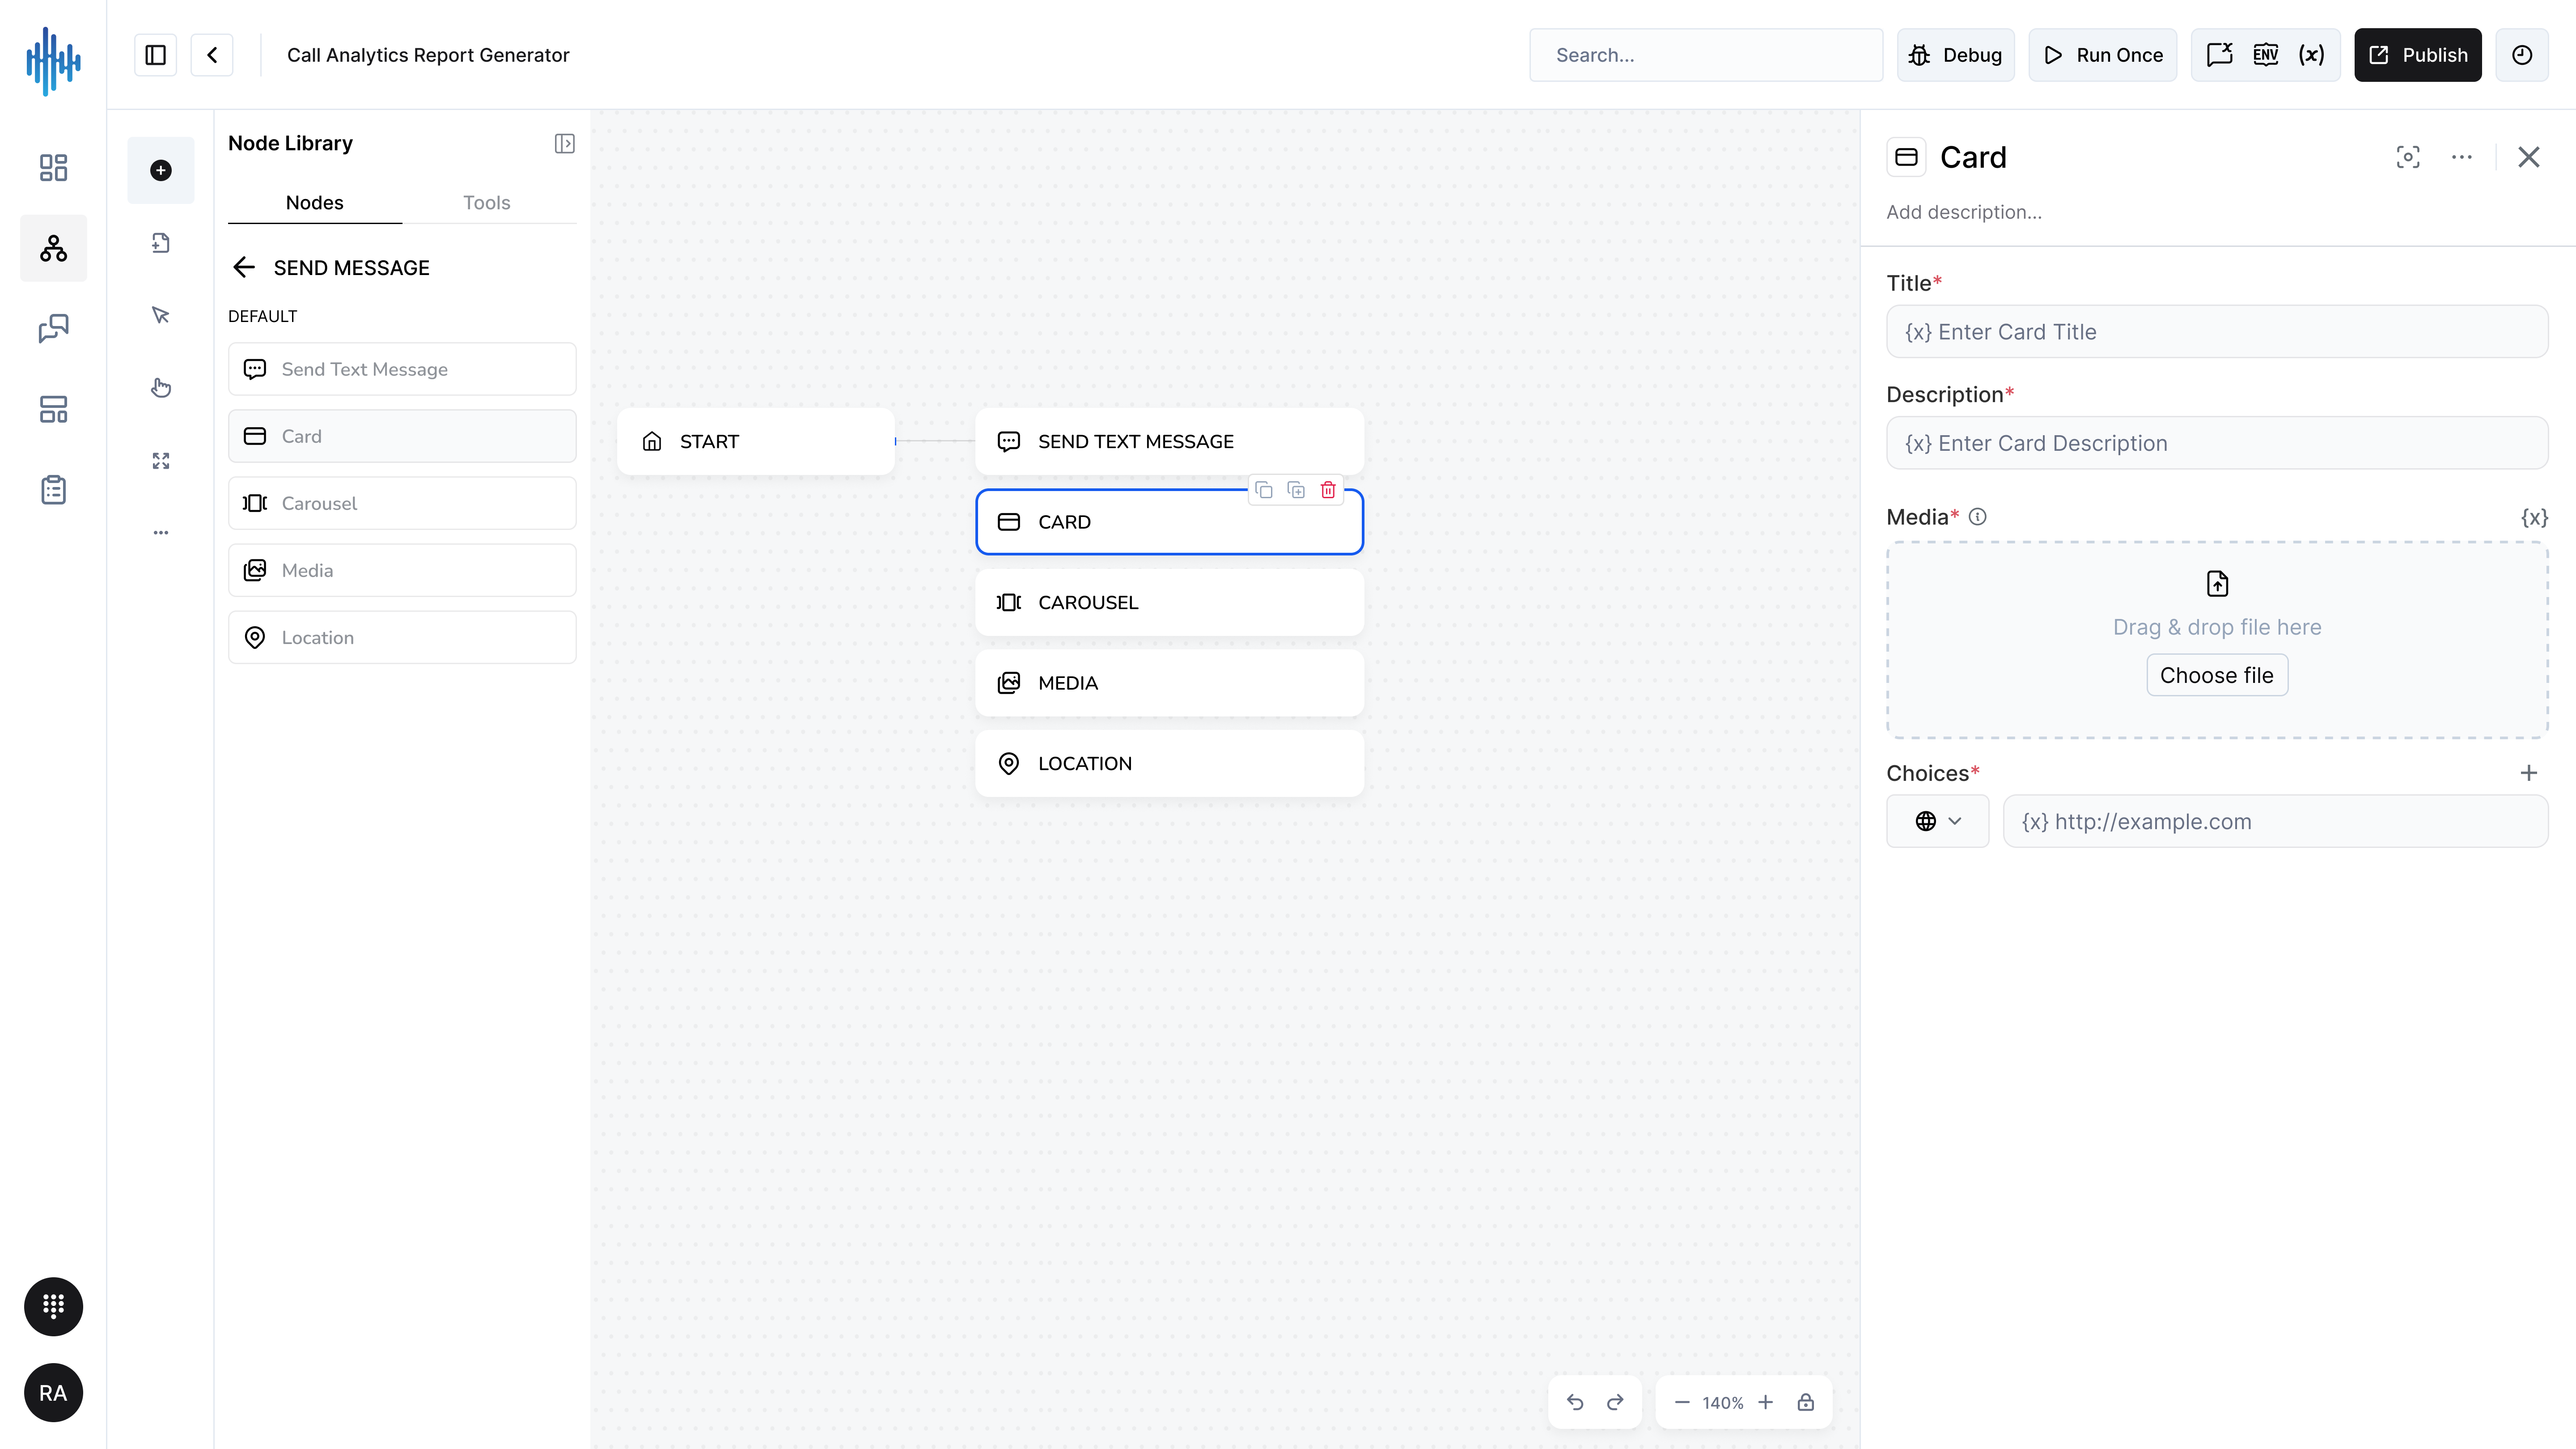
Purpose: Sends rich card messages with title, description, media, and interactive buttons.
When to Use:
- Present product information
- Show options with buttons
- Share content with images
- Create interactive messages
Configuration Settings:
| Field | Description | Required |
|---|---|---|
| Title | Card headline | ✅ Yes |
| Description | Card body text | ✅ Yes |
| Media | Image or video file | ❌ No |
| Choices | Action buttons (URLs or actions) | ❌ No |
Setup Steps:
- Add Card node to workflow
- Enter Title text
- Add Description with details
- Upload or link Media file
- Add Choices (buttons):
- Click "+" to add button
- Enter button text
- Add URL or action
- Connect to previous nodes
Button Configuration:
Each button can:
- Open a URL
- Trigger a workflow action
- Submit data
- Navigate to another screen
Best Practices:
✅ DO:
- Use clear, action-oriented button text
- Optimize images for mobile viewing
- Limit to 3-4 buttons per card
- Test on multiple devices
❌ DON'T:
- Overload with too many buttons
- Use large image files (optimize first)
- Make titles too long
Common Use Cases:
Product Showcase:
Title: "Premium Wireless Headphones"
Description: "Noise-cancelling, 30hr battery"
Media: Product image
Buttons: "Buy Now", "Learn More"
Service Selection:
Title: "How can we help?"
Description: "Choose a service below"
Buttons: "Billing", "Technical", "Account"
Media Node
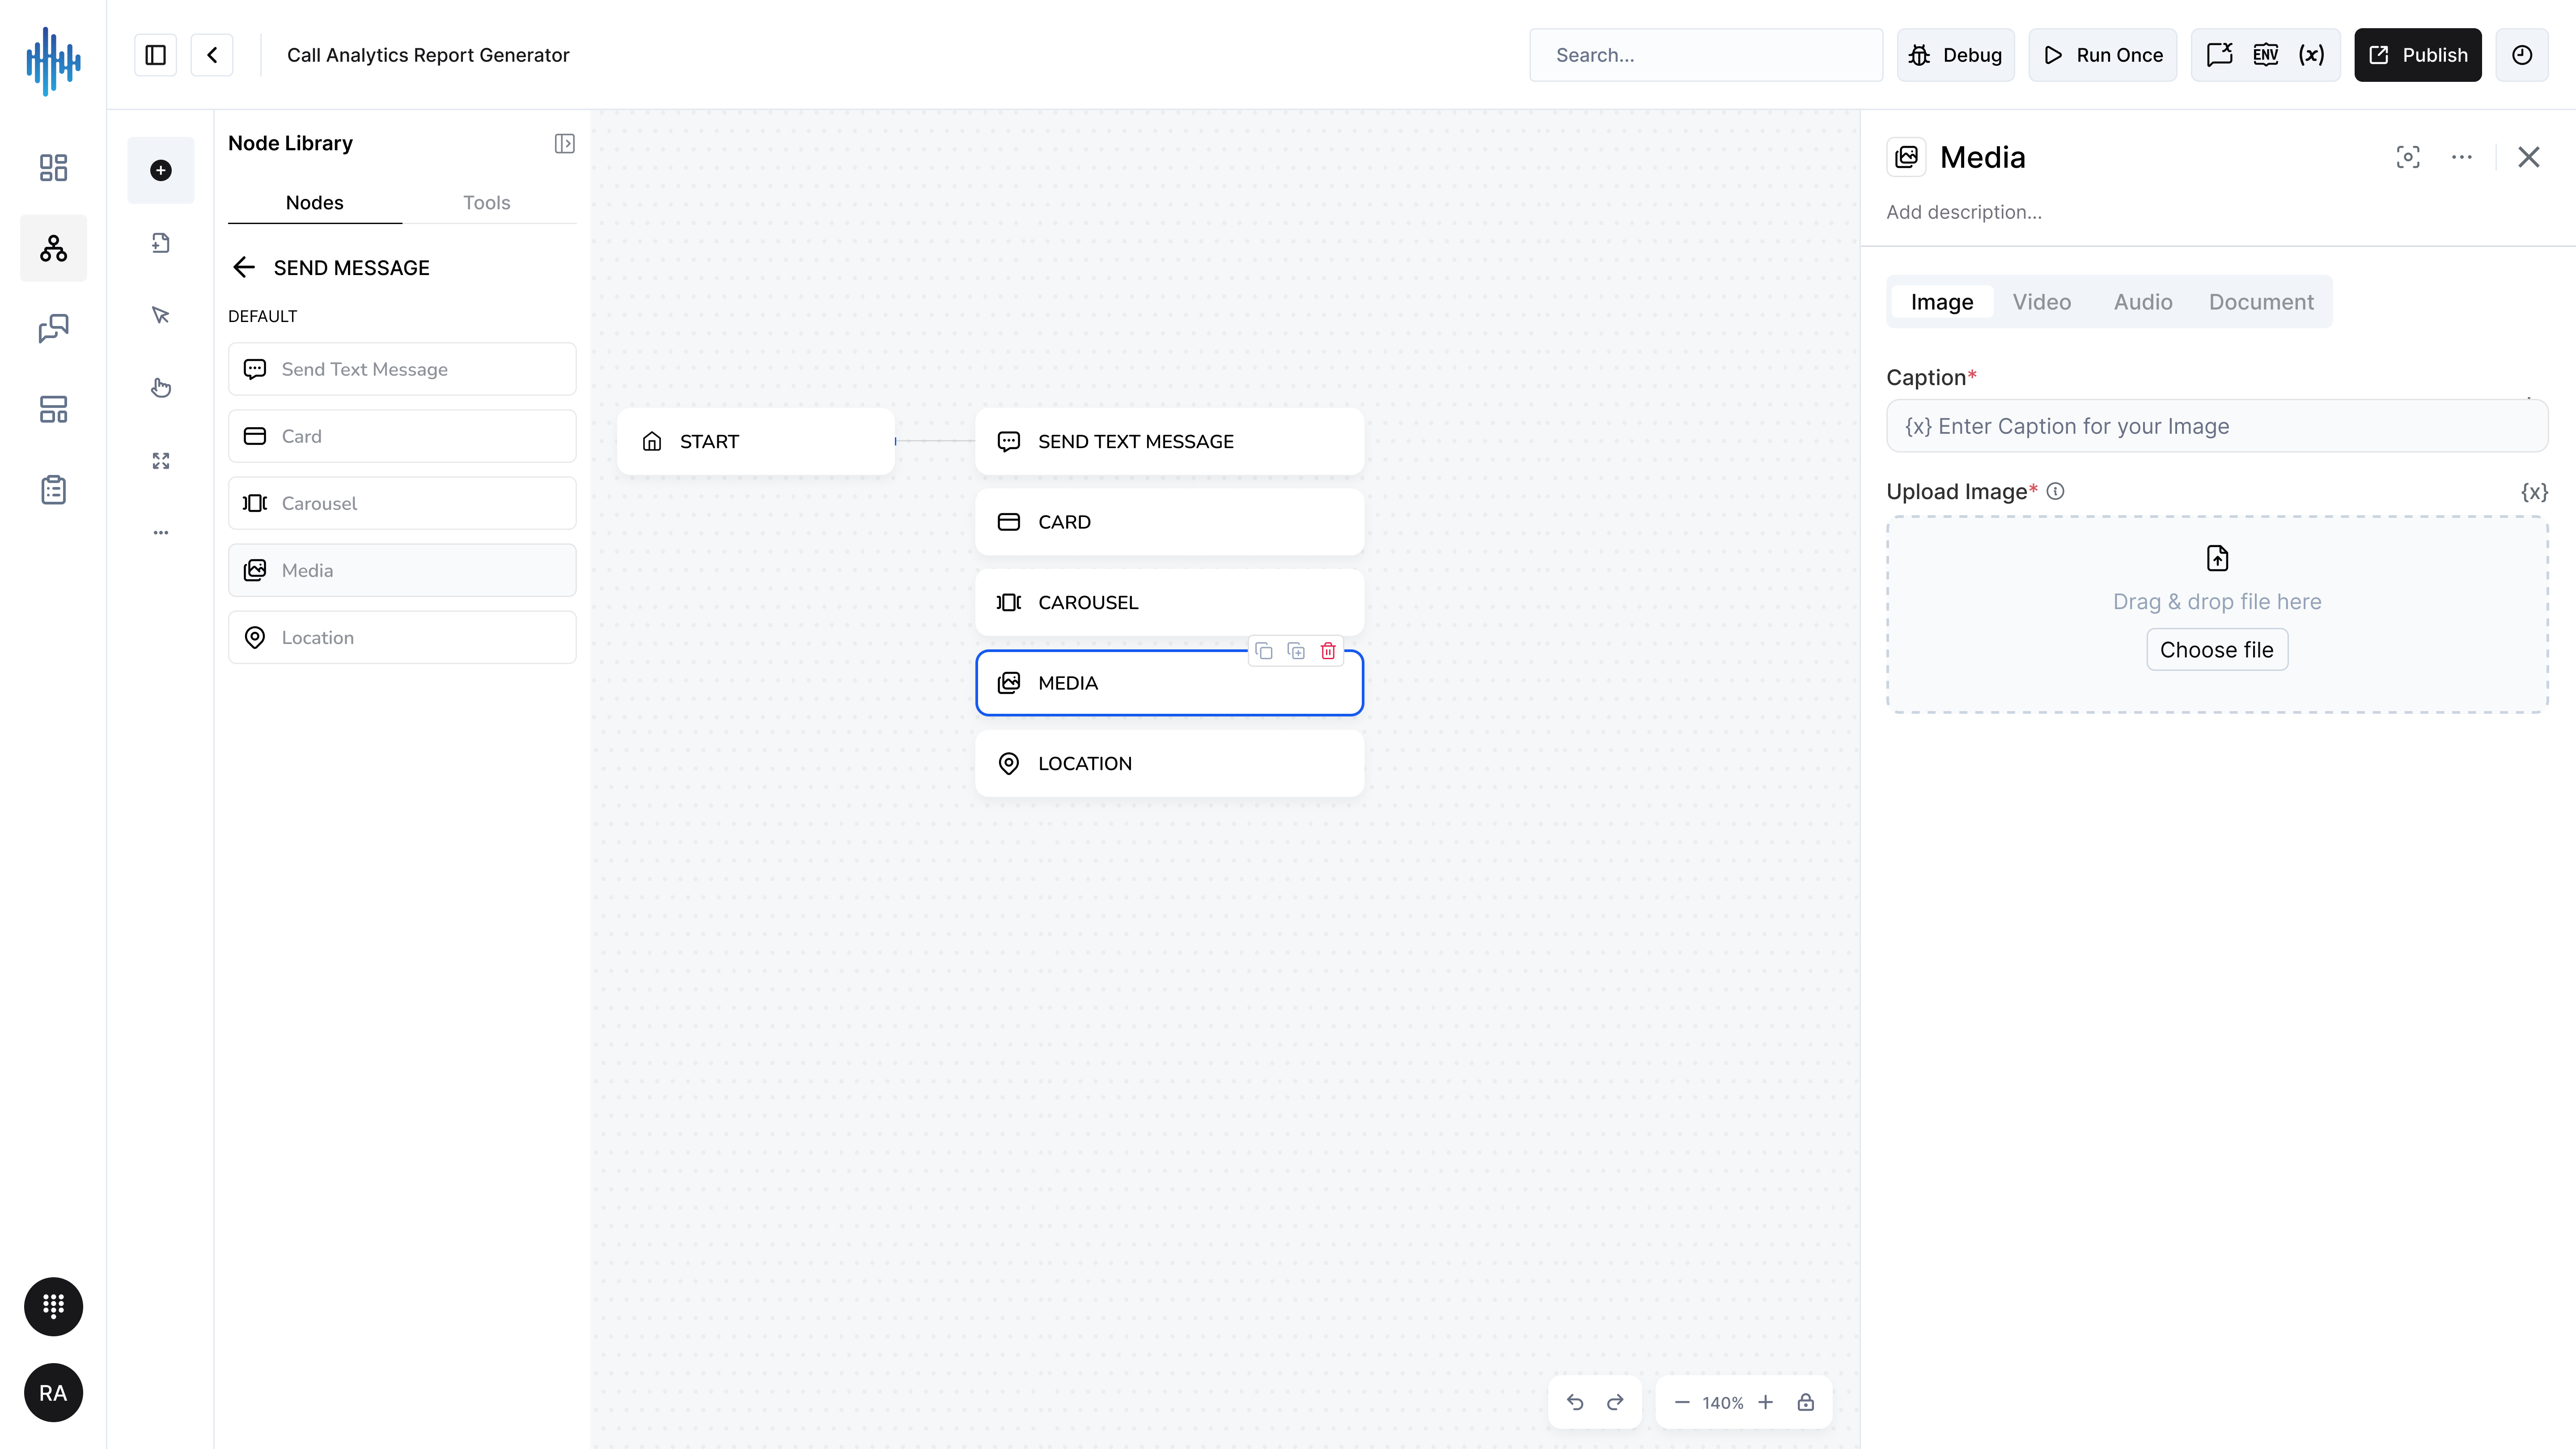
Purpose: Sends media files (images, videos, audio, documents) to users.
When to Use:
- Share images or photos
- Send videos or GIFs
- Deliver audio files
- Share PDF documents or files
Configuration Settings:
| Field | Description | Required |
|---|---|---|
| Media Type | Select type: Image, Video, Audio, Document | ✅ Yes |
| Caption | Optional text caption | ❌ No |
| Upload Image | File upload area | ✅ Yes |
Supported Media Types:
Image Tab:
- JPEG, PNG, GIF
- Max file size: 5MB
- Recommended: 1200x630px
Video Tab:
- MP4, MOV
- Max file size: 16MB
- Recommended: 1080p or lower
Audio Tab:
- MP3, WAV
- Max file size: 5MB
Document Tab:
- PDF, DOCX, XLSX
- Max file size: 10MB
Setup Steps:
- Add Media node to workflow
- Select media type tab (Image/Video/Audio/Document)
- Enter optional Caption
- Upload file:
- Drag & drop file
- Or click "Choose Image/File"
- Connect to previous nodes
Best Practices:
✅ DO:
- Compress large files before upload
- Add descriptive captions
- Test media displays correctly
- Use appropriate file formats
❌ DON'T:
- Upload files exceeding size limits
- Send without captions (reduces accessibility)
- Use proprietary formats
Common Use Cases:
Send Receipt:
Type: Document (PDF)
Caption: "Here's your receipt for order #12345"
Share Product Image:
Type: Image
Caption: "Our new summer collection!"
Carousel Node
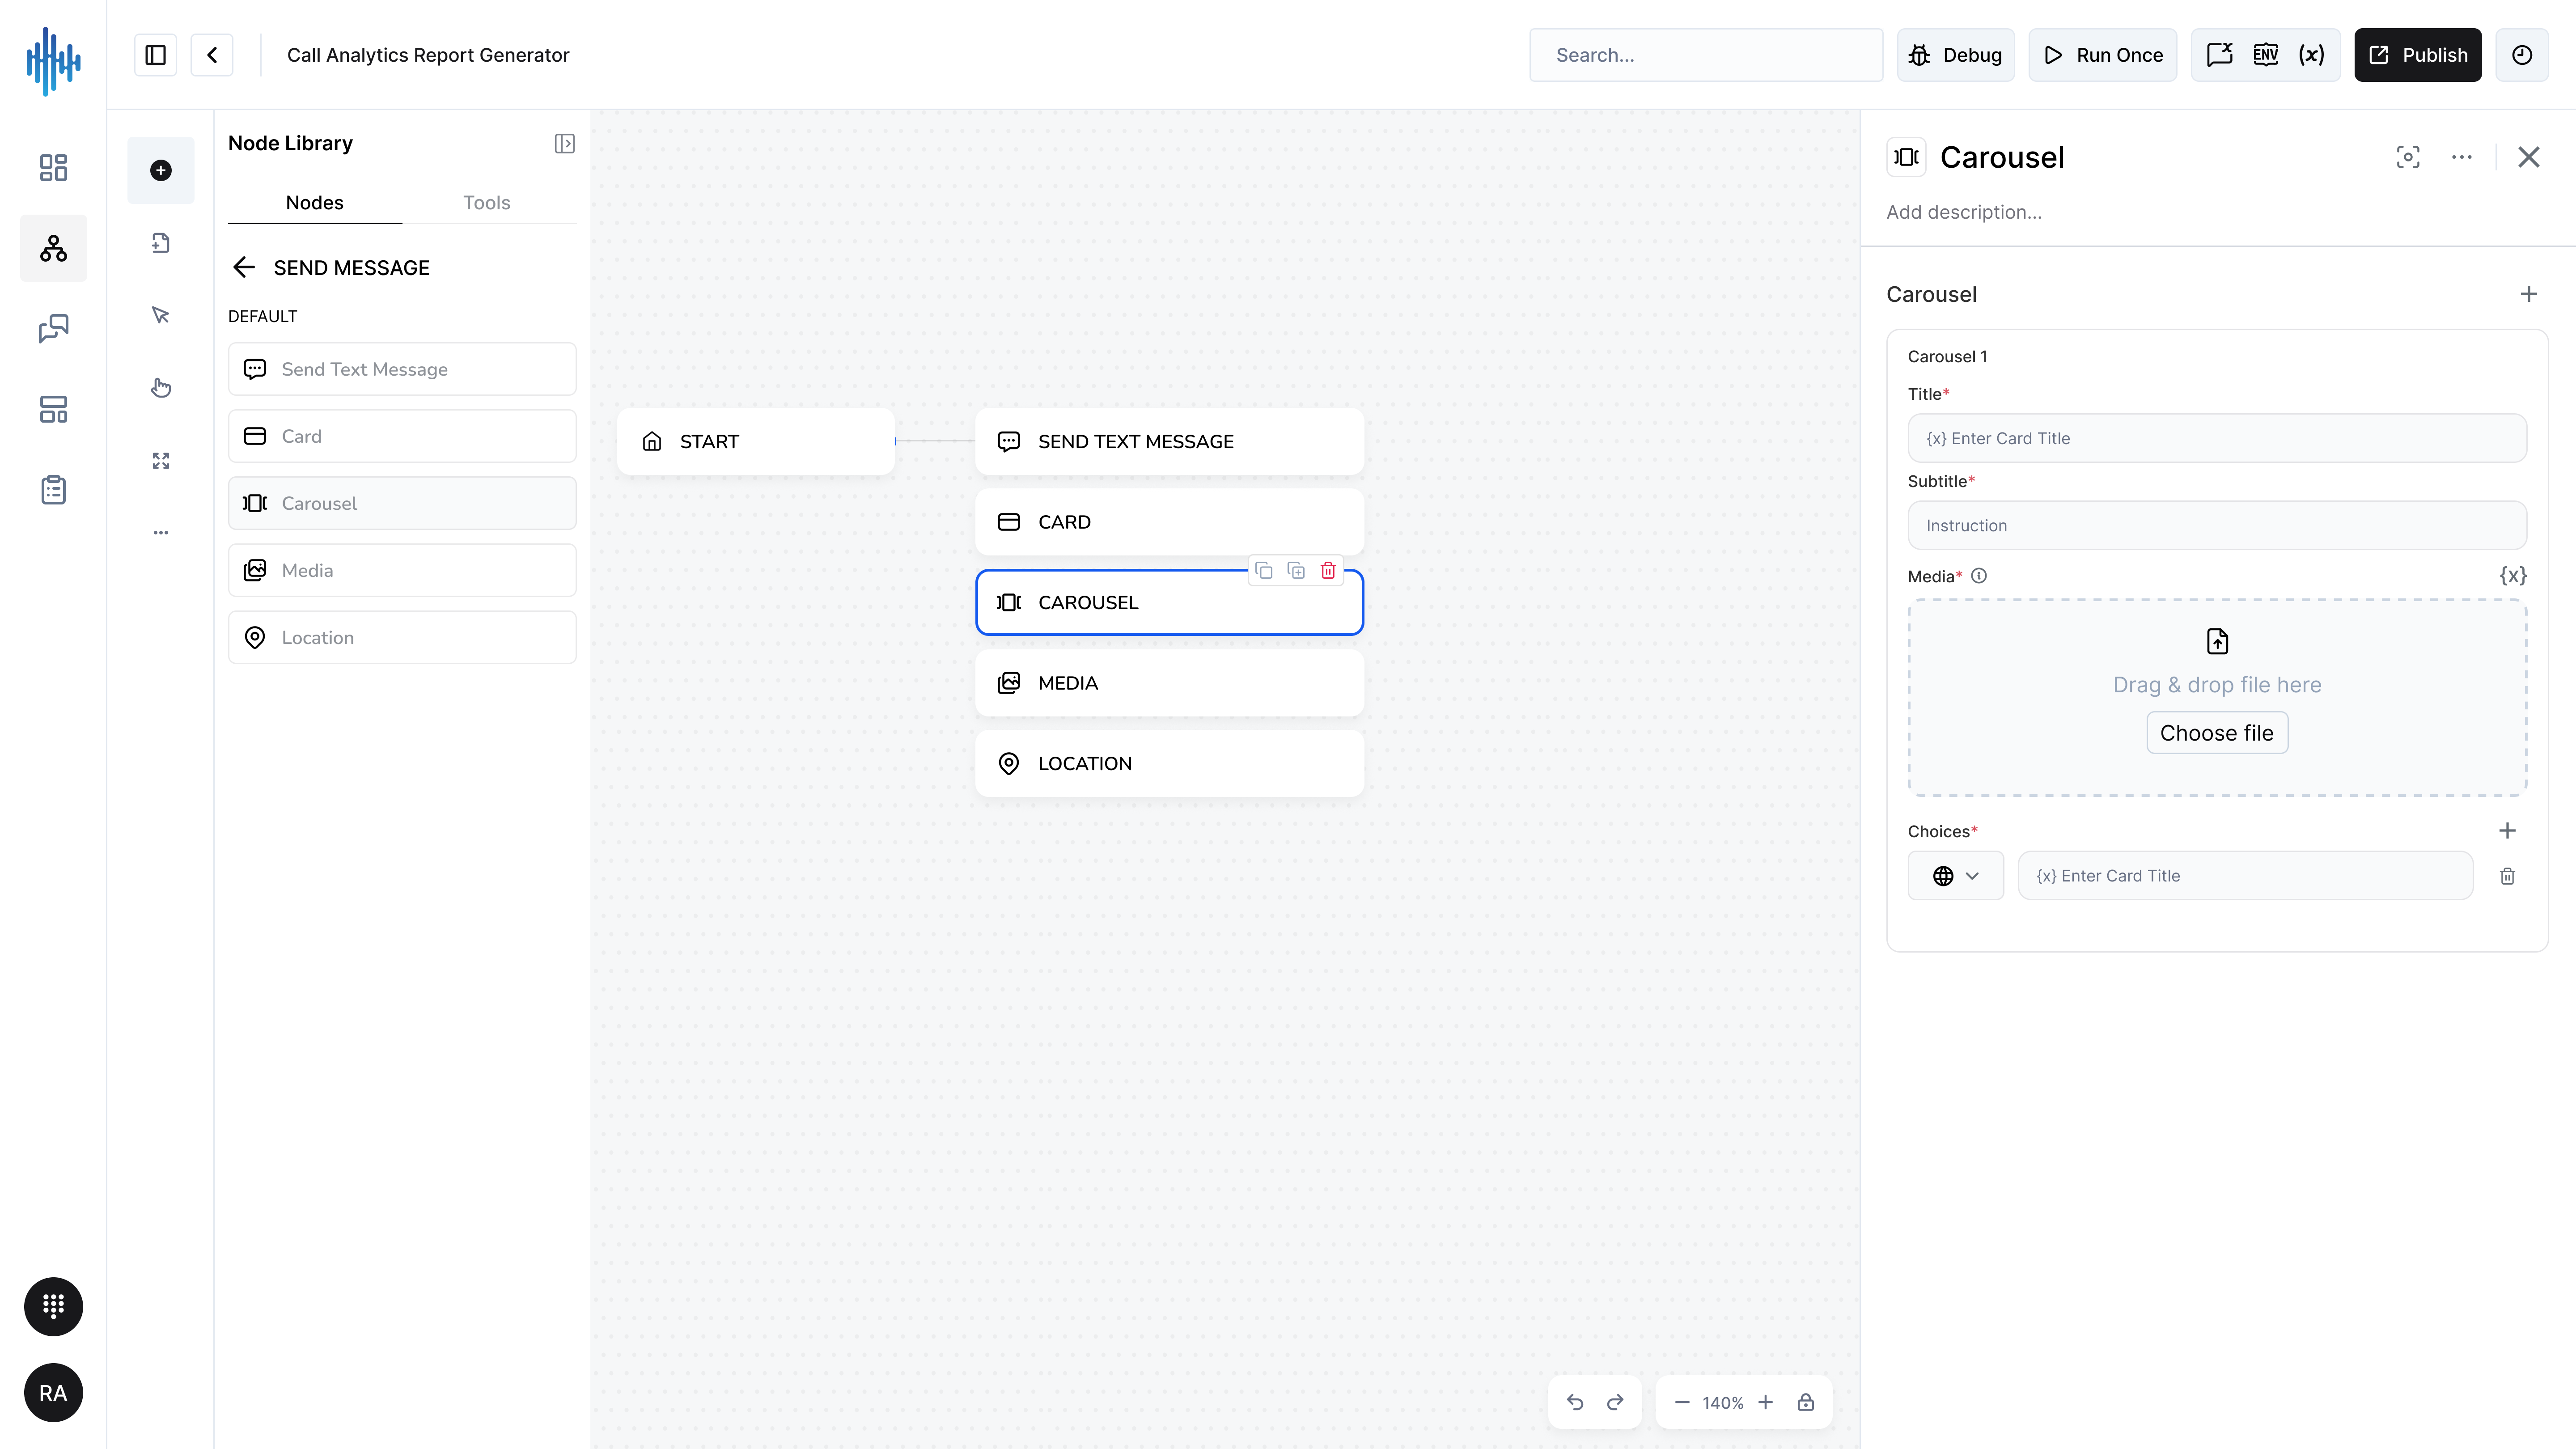
Purpose: Sends multiple cards in a scrollable carousel format for presenting options or products.
When to Use:
- Show multiple products
- Present service options
- Display image galleries
- Offer multiple choices
Configuration Settings:
Each carousel card includes:
| Field | Description | Required |
|---|---|---|
| Title | Card title | ✅ Yes |
| Subtitle | Card description | ❌ No |
| Media | Image or video | ❌ No |
| Choices | Button actions | ❌ No |
Setup Steps:
- Add Carousel node to workflow
- Configure first card:
- Add Title
- Add Subtitle
- Upload Media
- Add Choices (buttons)
- Click "+" to add more cards
- Repeat configuration for each card
- Recommended: 2-5 cards per carousel
Card Best Practices:
✅ DO:
- Keep card count between 2-5
- Use consistent image sizes
- Make titles concise
- Add clear call-to-action buttons
❌ DON'T:
- Create too many cards (overwhelming)
- Mix different image aspect ratios
- Make subtitles too long
Common Use Cases:
Product Catalog:
Card 1: Product A (image, price, "Buy" button)
Card 2: Product B (image, price, "Buy" button)
Card 3: Product C (image, price, "Buy" button)
Service Selection:
Card 1: Basic Plan ($9/mo, "Choose" button)
Card 2: Pro Plan ($29/mo, "Choose" button)
Card 3: Enterprise (Custom, "Contact" button)
Location Node
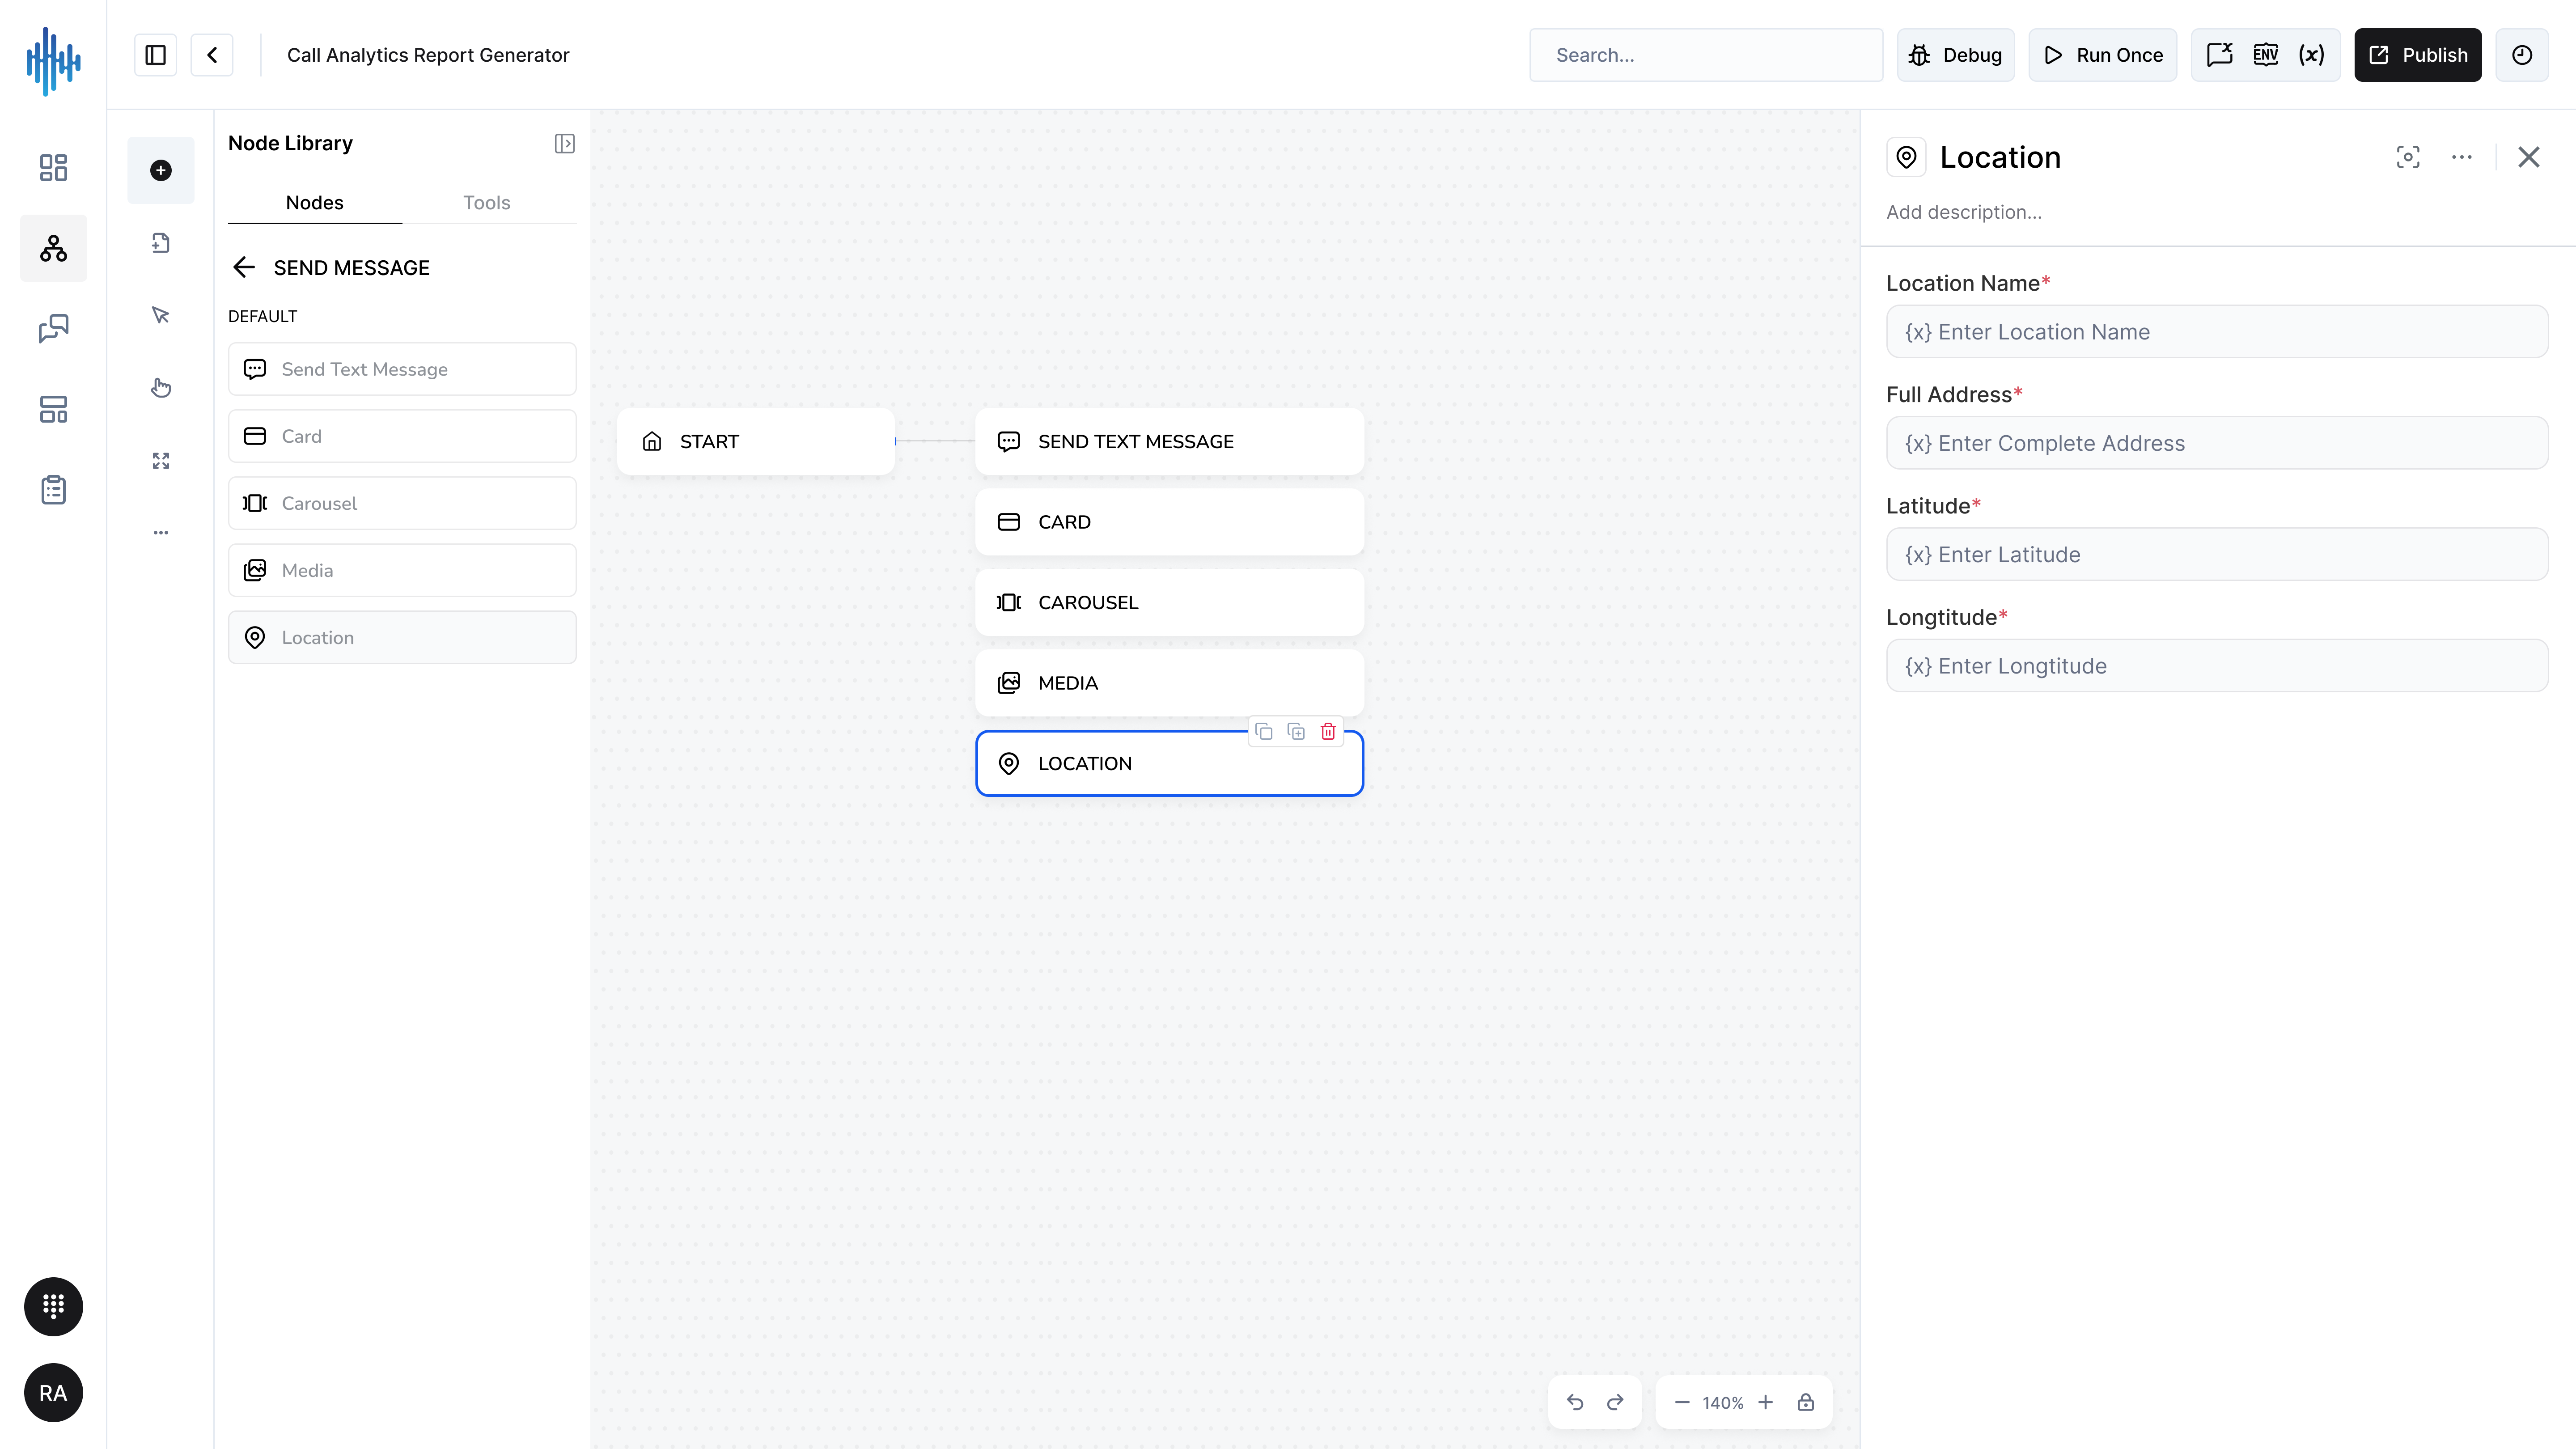
Purpose: Sends location information with map preview to users.
When to Use:
- Share store or office locations
- Send meeting place addresses
- Provide directions
- Show service area locations
Configuration Settings:
| Field | Description | Required |
|---|---|---|
| Location Name | Name of the place | ✅ Yes |
| Full Address | Complete street address | ✅ Yes |
| Latitude | GPS latitude coordinate | ✅ Yes |
| Longitude | GPS longitude coordinate | ✅ Yes |
Setup Steps:
- Add Location node to workflow
- Enter Location Name (e.g., "Main Office")
- Enter Full Address
- Enter Latitude coordinate
- Enter Longitude coordinate
- Connect to previous nodes
Finding Coordinates:
Use Google Maps:
- Right-click on location
- Select coordinates
- Copy latitude and longitude
Best Practices:
✅ DO:
- Verify coordinates are accurate
- Use descriptive location names
- Include complete addresses
- Test location renders correctly
❌ DON'T:
- Swap latitude/longitude
- Use incomplete addresses
- Forget to include location name
Common Use Cases:
Store Locator:
Location Name: "StreamSpace Store - Downtown"
Full Address: "123 Main St, New York, NY 10001"
Latitude: 40.7128
Longitude: -74.0060
Meeting Point:
Location Name: "Coffee Shop Meeting"
Full Address: "456 Park Ave, Los Angeles, CA 90012"
Latitude: 34.0522
Longitude: -118.2437
Additional Resources
Need Help?
- Contact StreamSpace Studio support
- Visit the documentation portal
- Join the community forum
Related Guides:
- Workflow Builder Guide
- Best Practices for Node Configuration
- Advanced Workflow Patterns
- Troubleshooting Common Issues
Last Updated: February 11, 2026
Version: 1.0
📝 Collect
Quick Jump: ↑ Top | ← Send Message | Logic →
Gather and validate information from users through various input methods.
Get User Input Node
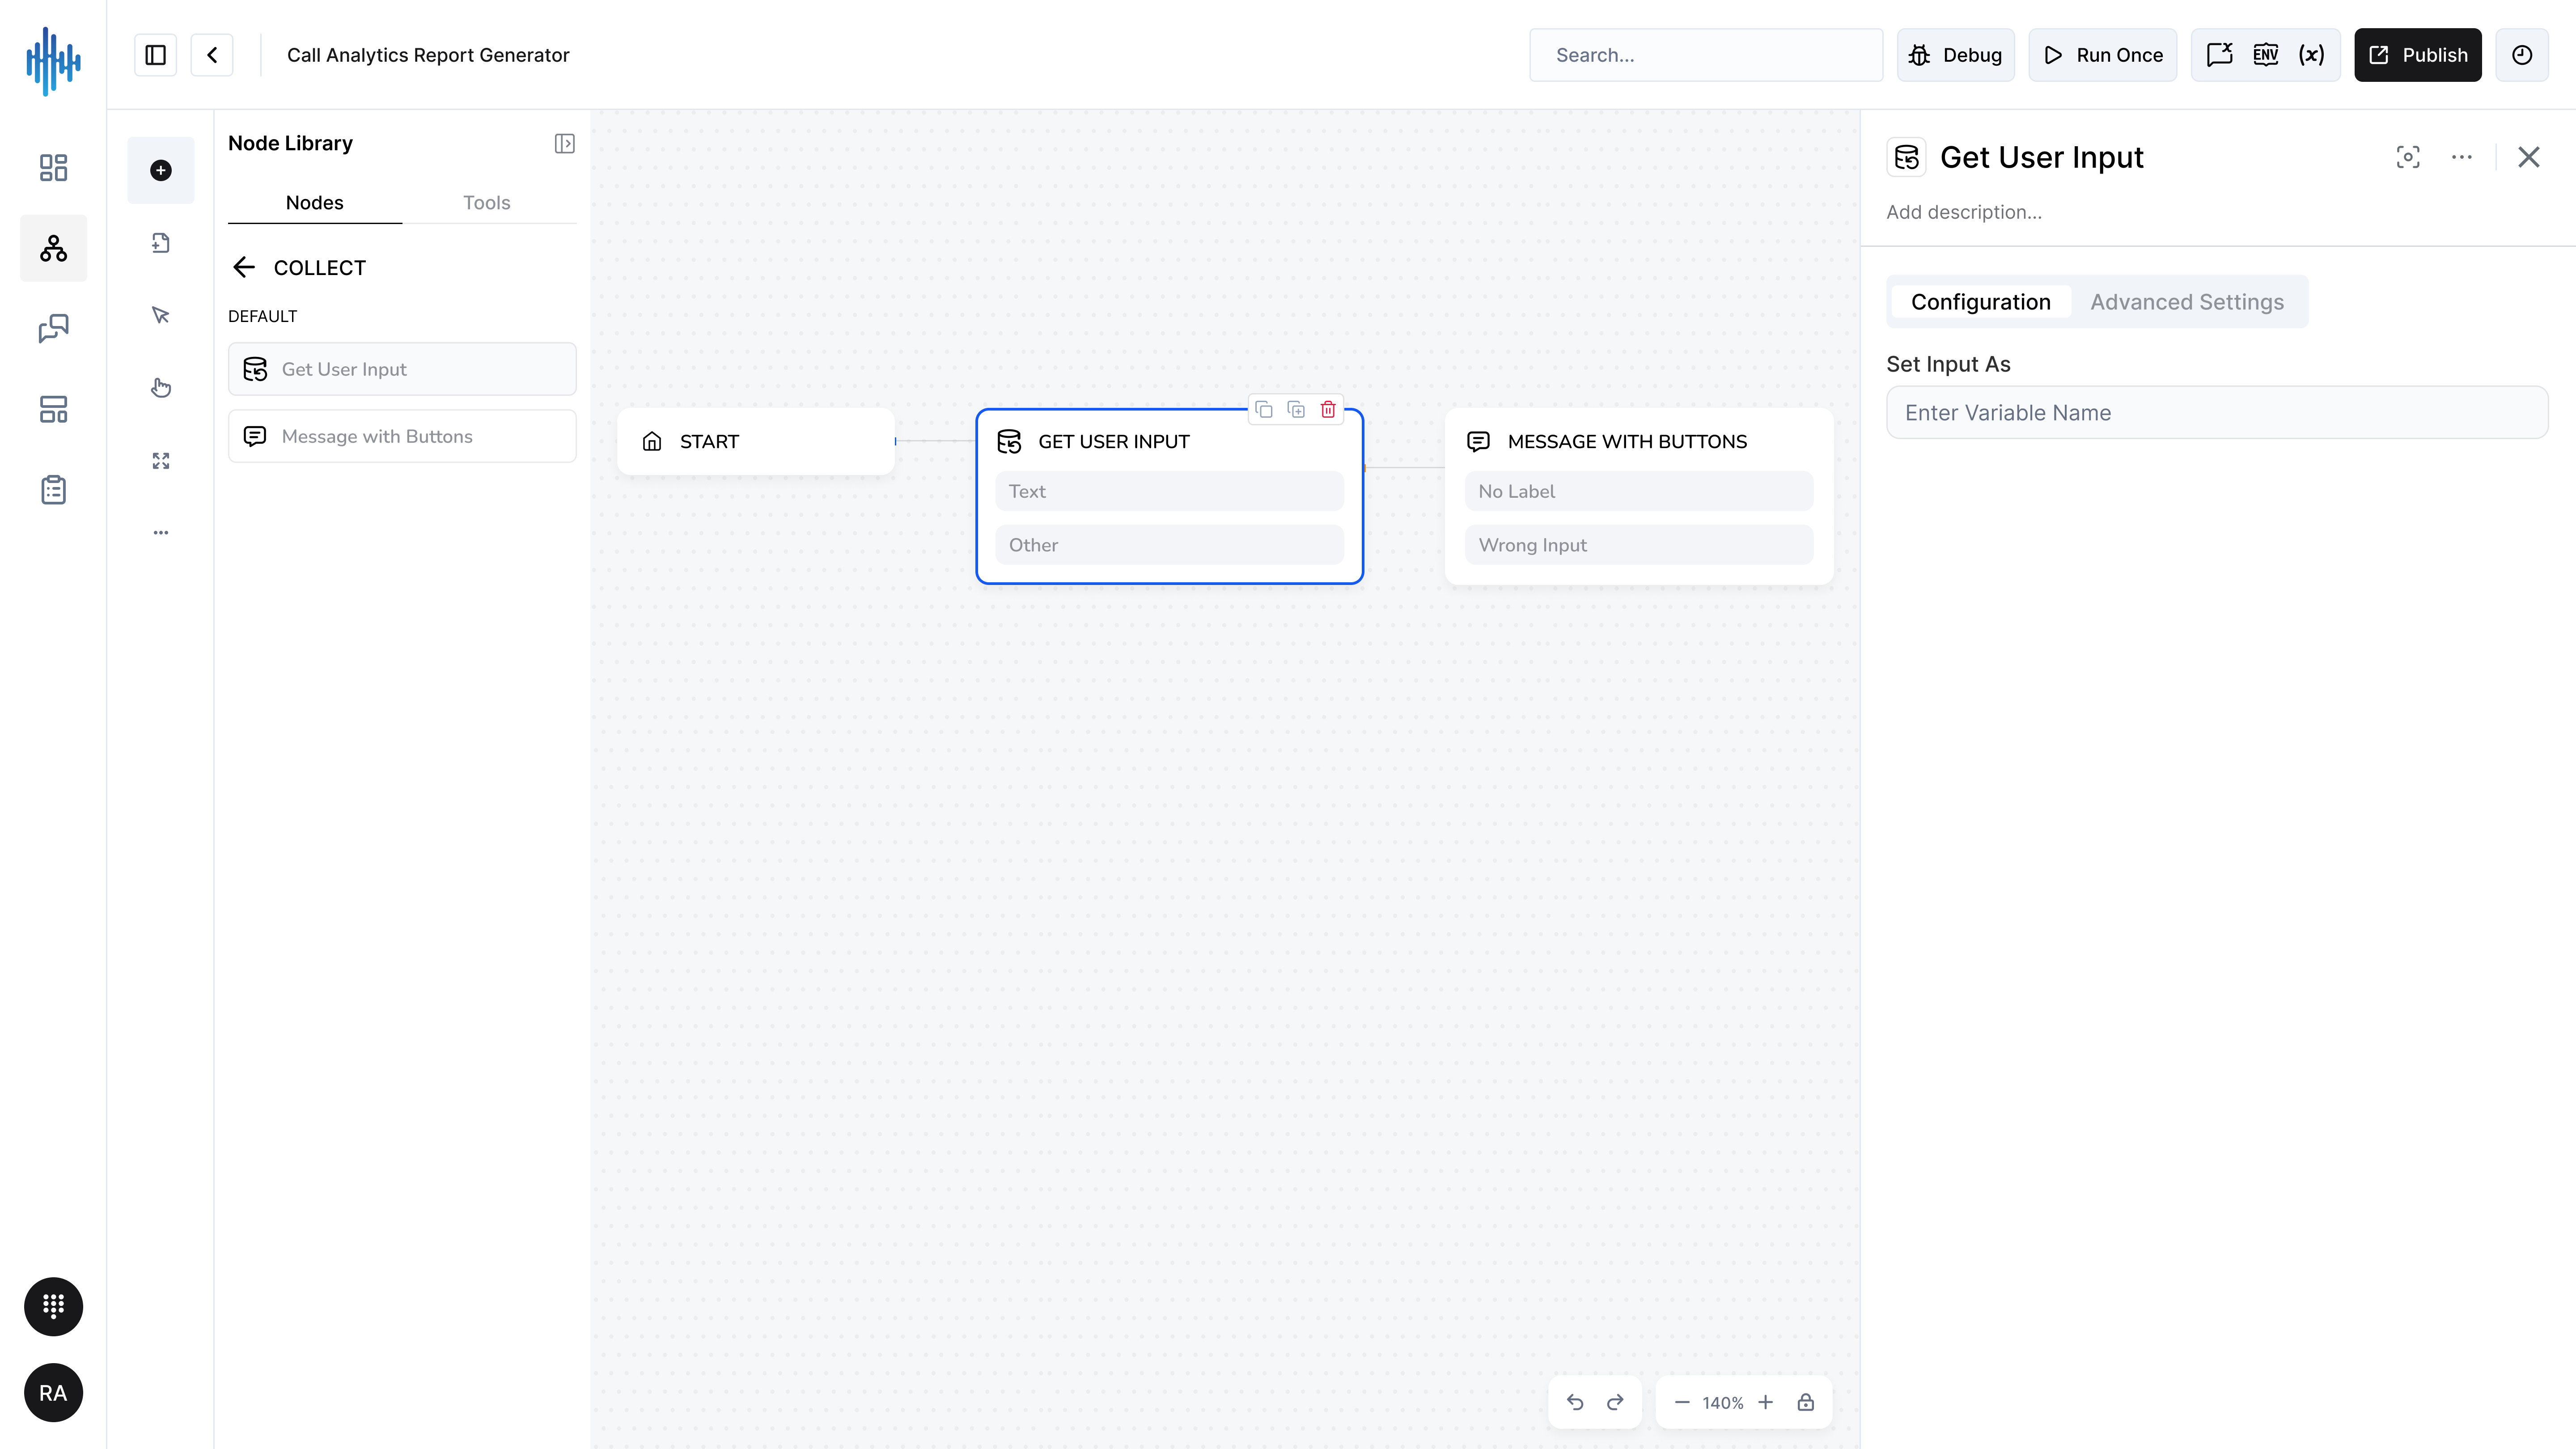
Purpose: Captures user input and stores it in a variable, with options to allow various media types.
When to Use:
- Collect text responses from users
- Accept file uploads (images, videos, audio, documents)
- Gather user information in forms
- Store user responses for processing
####Configuration Tab
Configuration Settings:
| Field | Description | Required |
|---|---|---|
| Set Input As | Variable name to store the user's input | ✅ Yes |
Setup Steps:
- Add Get User Input node to workflow
- Enter variable name in Set Input As field
- Switch to Advanced Settings tab to configure input types
- Connect to previous and next nodes
Advanced Settings Tab
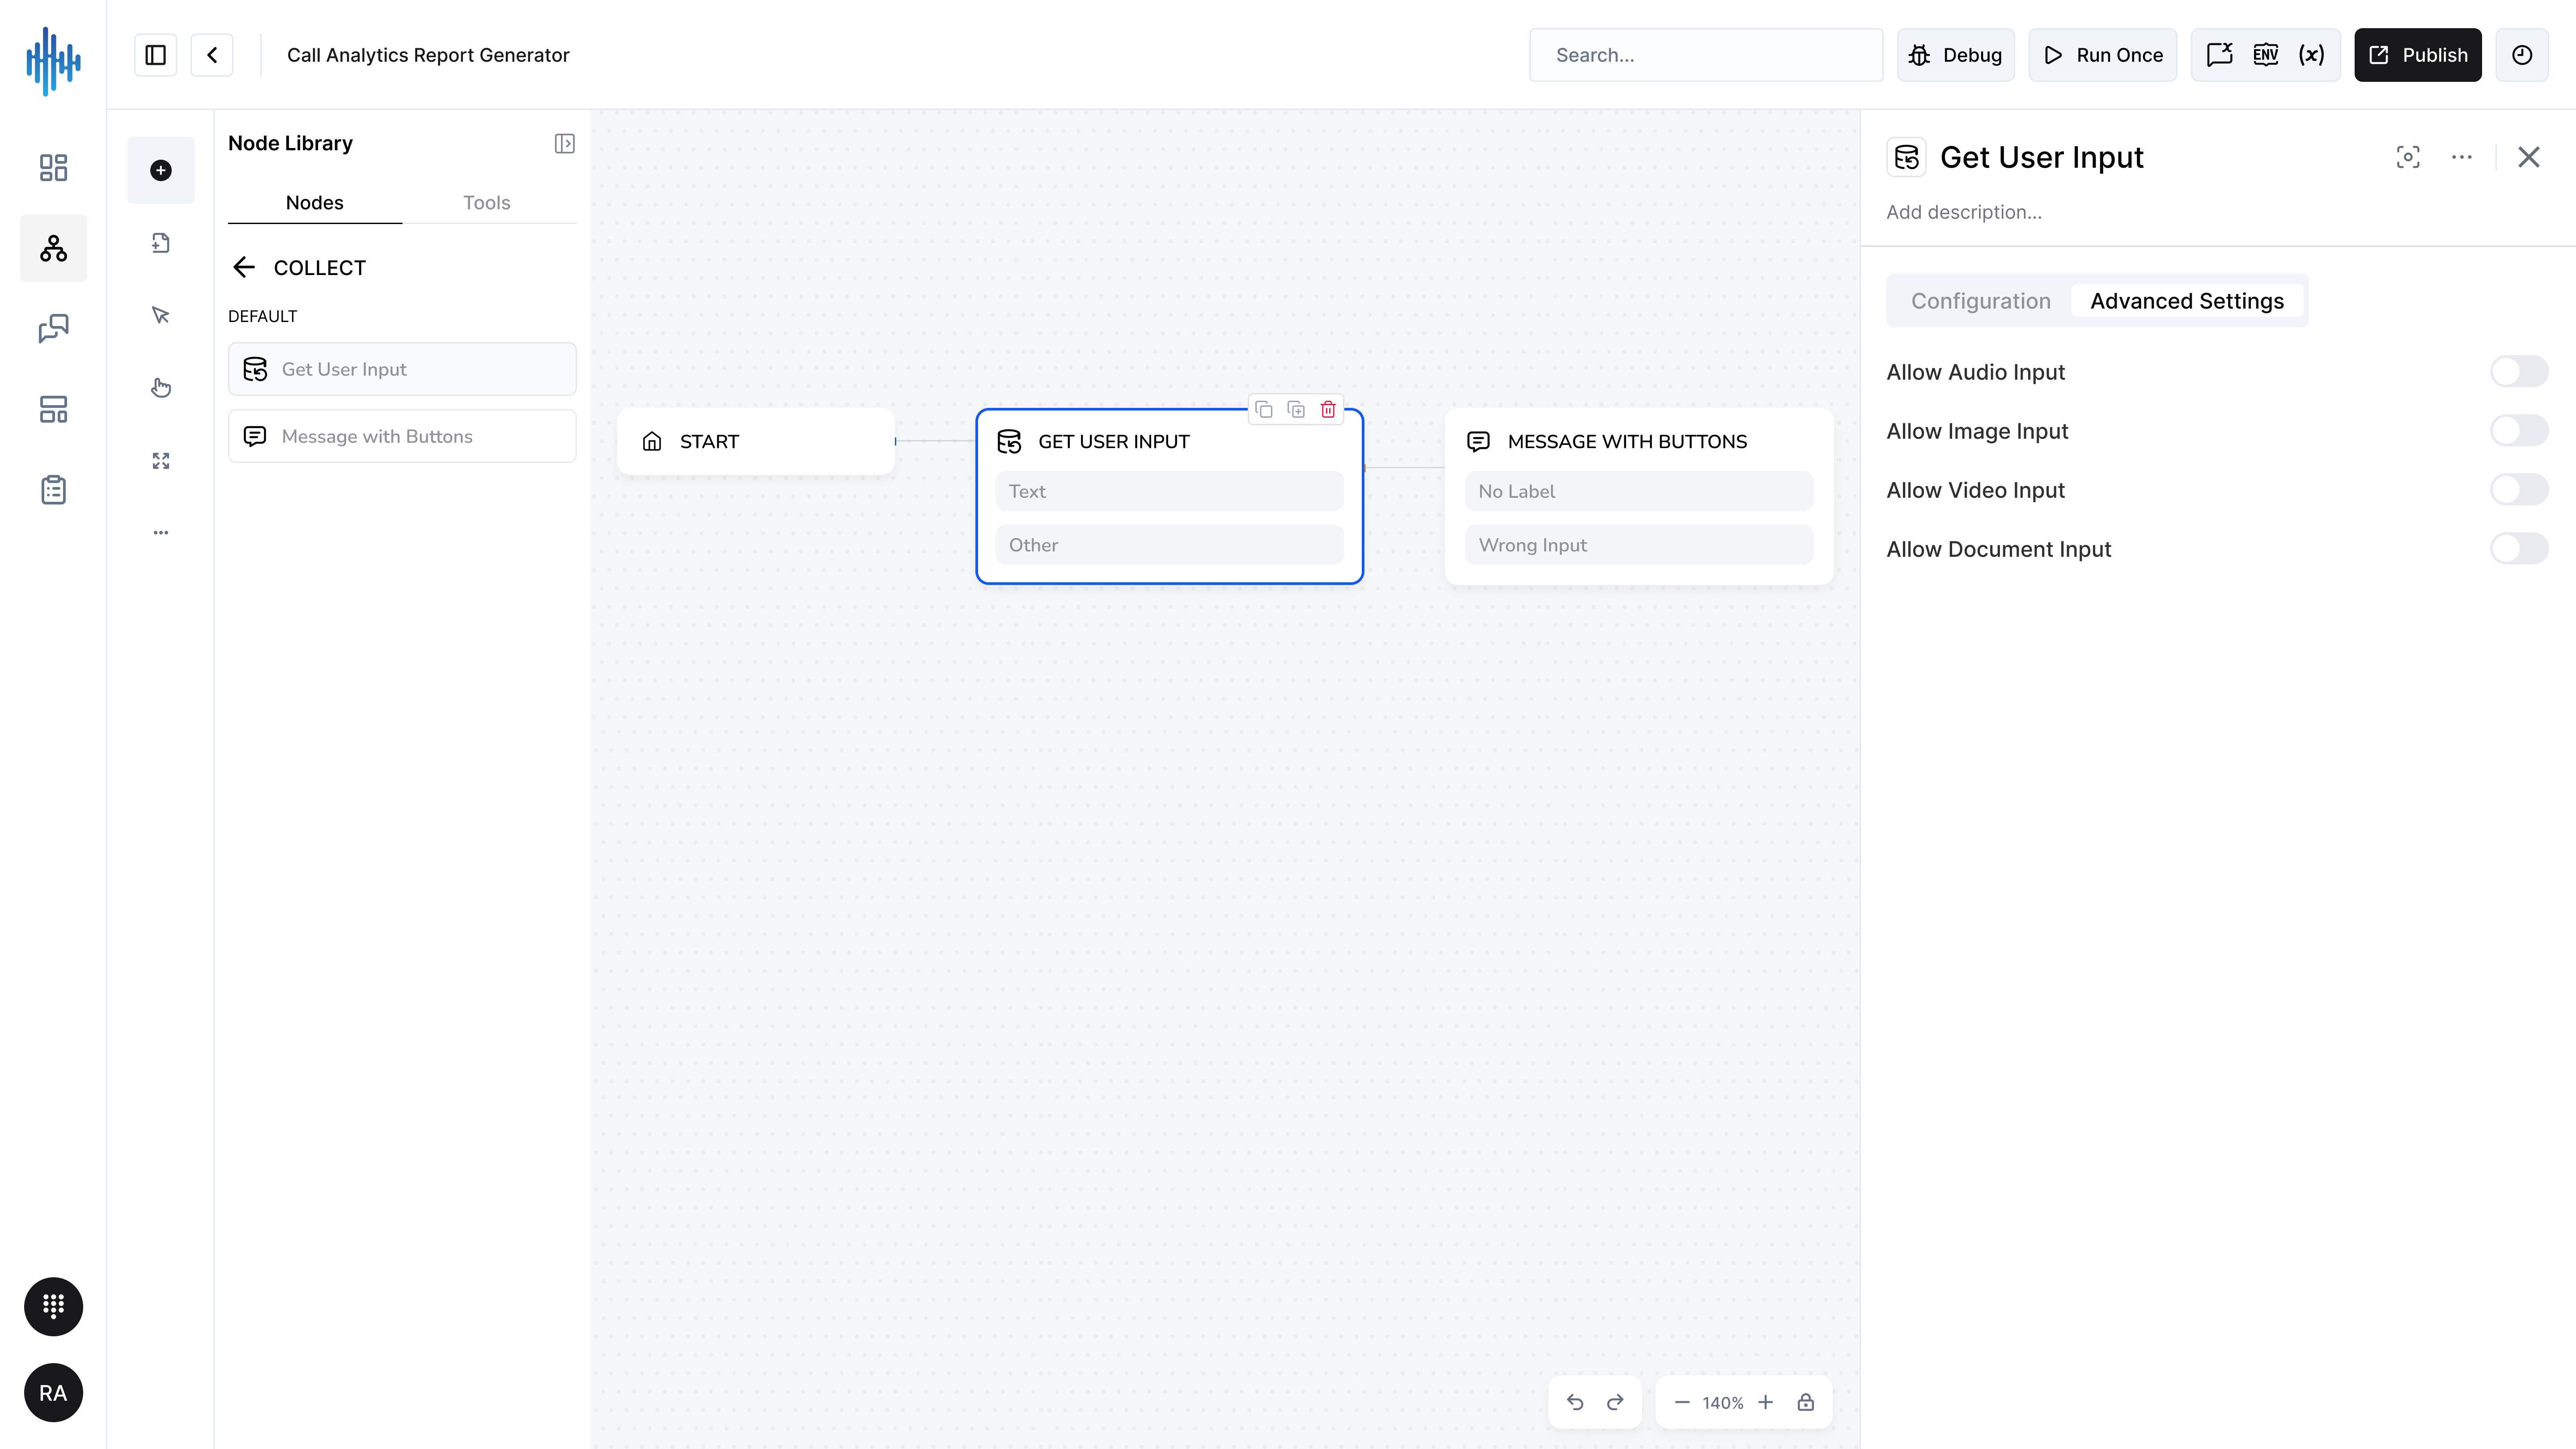
Media Input Options:
| Setting | Description | Default |
|---|---|---|
| Allow Audio Input | Accept audio files from users | Off |
| Allow Image Input | Accept image files from users | Off |
| Allow Video Input | Accept video files from users | Off |
| Allow Document Input | Accept document files from users | Off |
Setup Steps:
- Toggle each input type based on what you want to accept
- When enabled, users can upload files of that type
- Files are stored in the variable specified in Configuration tab
Best Practices:
✅ DO:
- Use descriptive variable names (e.g.,
user_email,customer_name) - Enable only necessary input types
- Validate input in subsequent nodes
- Provide clear instructions to users
❌ DON'T:
- Allow all file types unless necessary
- Use generic variable names
- Skip input validation
- Forget to handle empty inputs
Common Use Cases:
Collect Customer Name:
Send Message: "What's your name?"
↓
Get User Input (Set Input As: customer_name)
↓
Send Message: "Thanks, {{customer_name}}!"
Accept Document Upload:
Send Message: "Please upload your ID document"
↓
Get User Input (Allow Document Input: ON)
↓
Process document with AI or external service
Related Nodes:
- Message With Buttons - Collect input with predefined options
- Variables - Process collected input
Message With Buttons Node
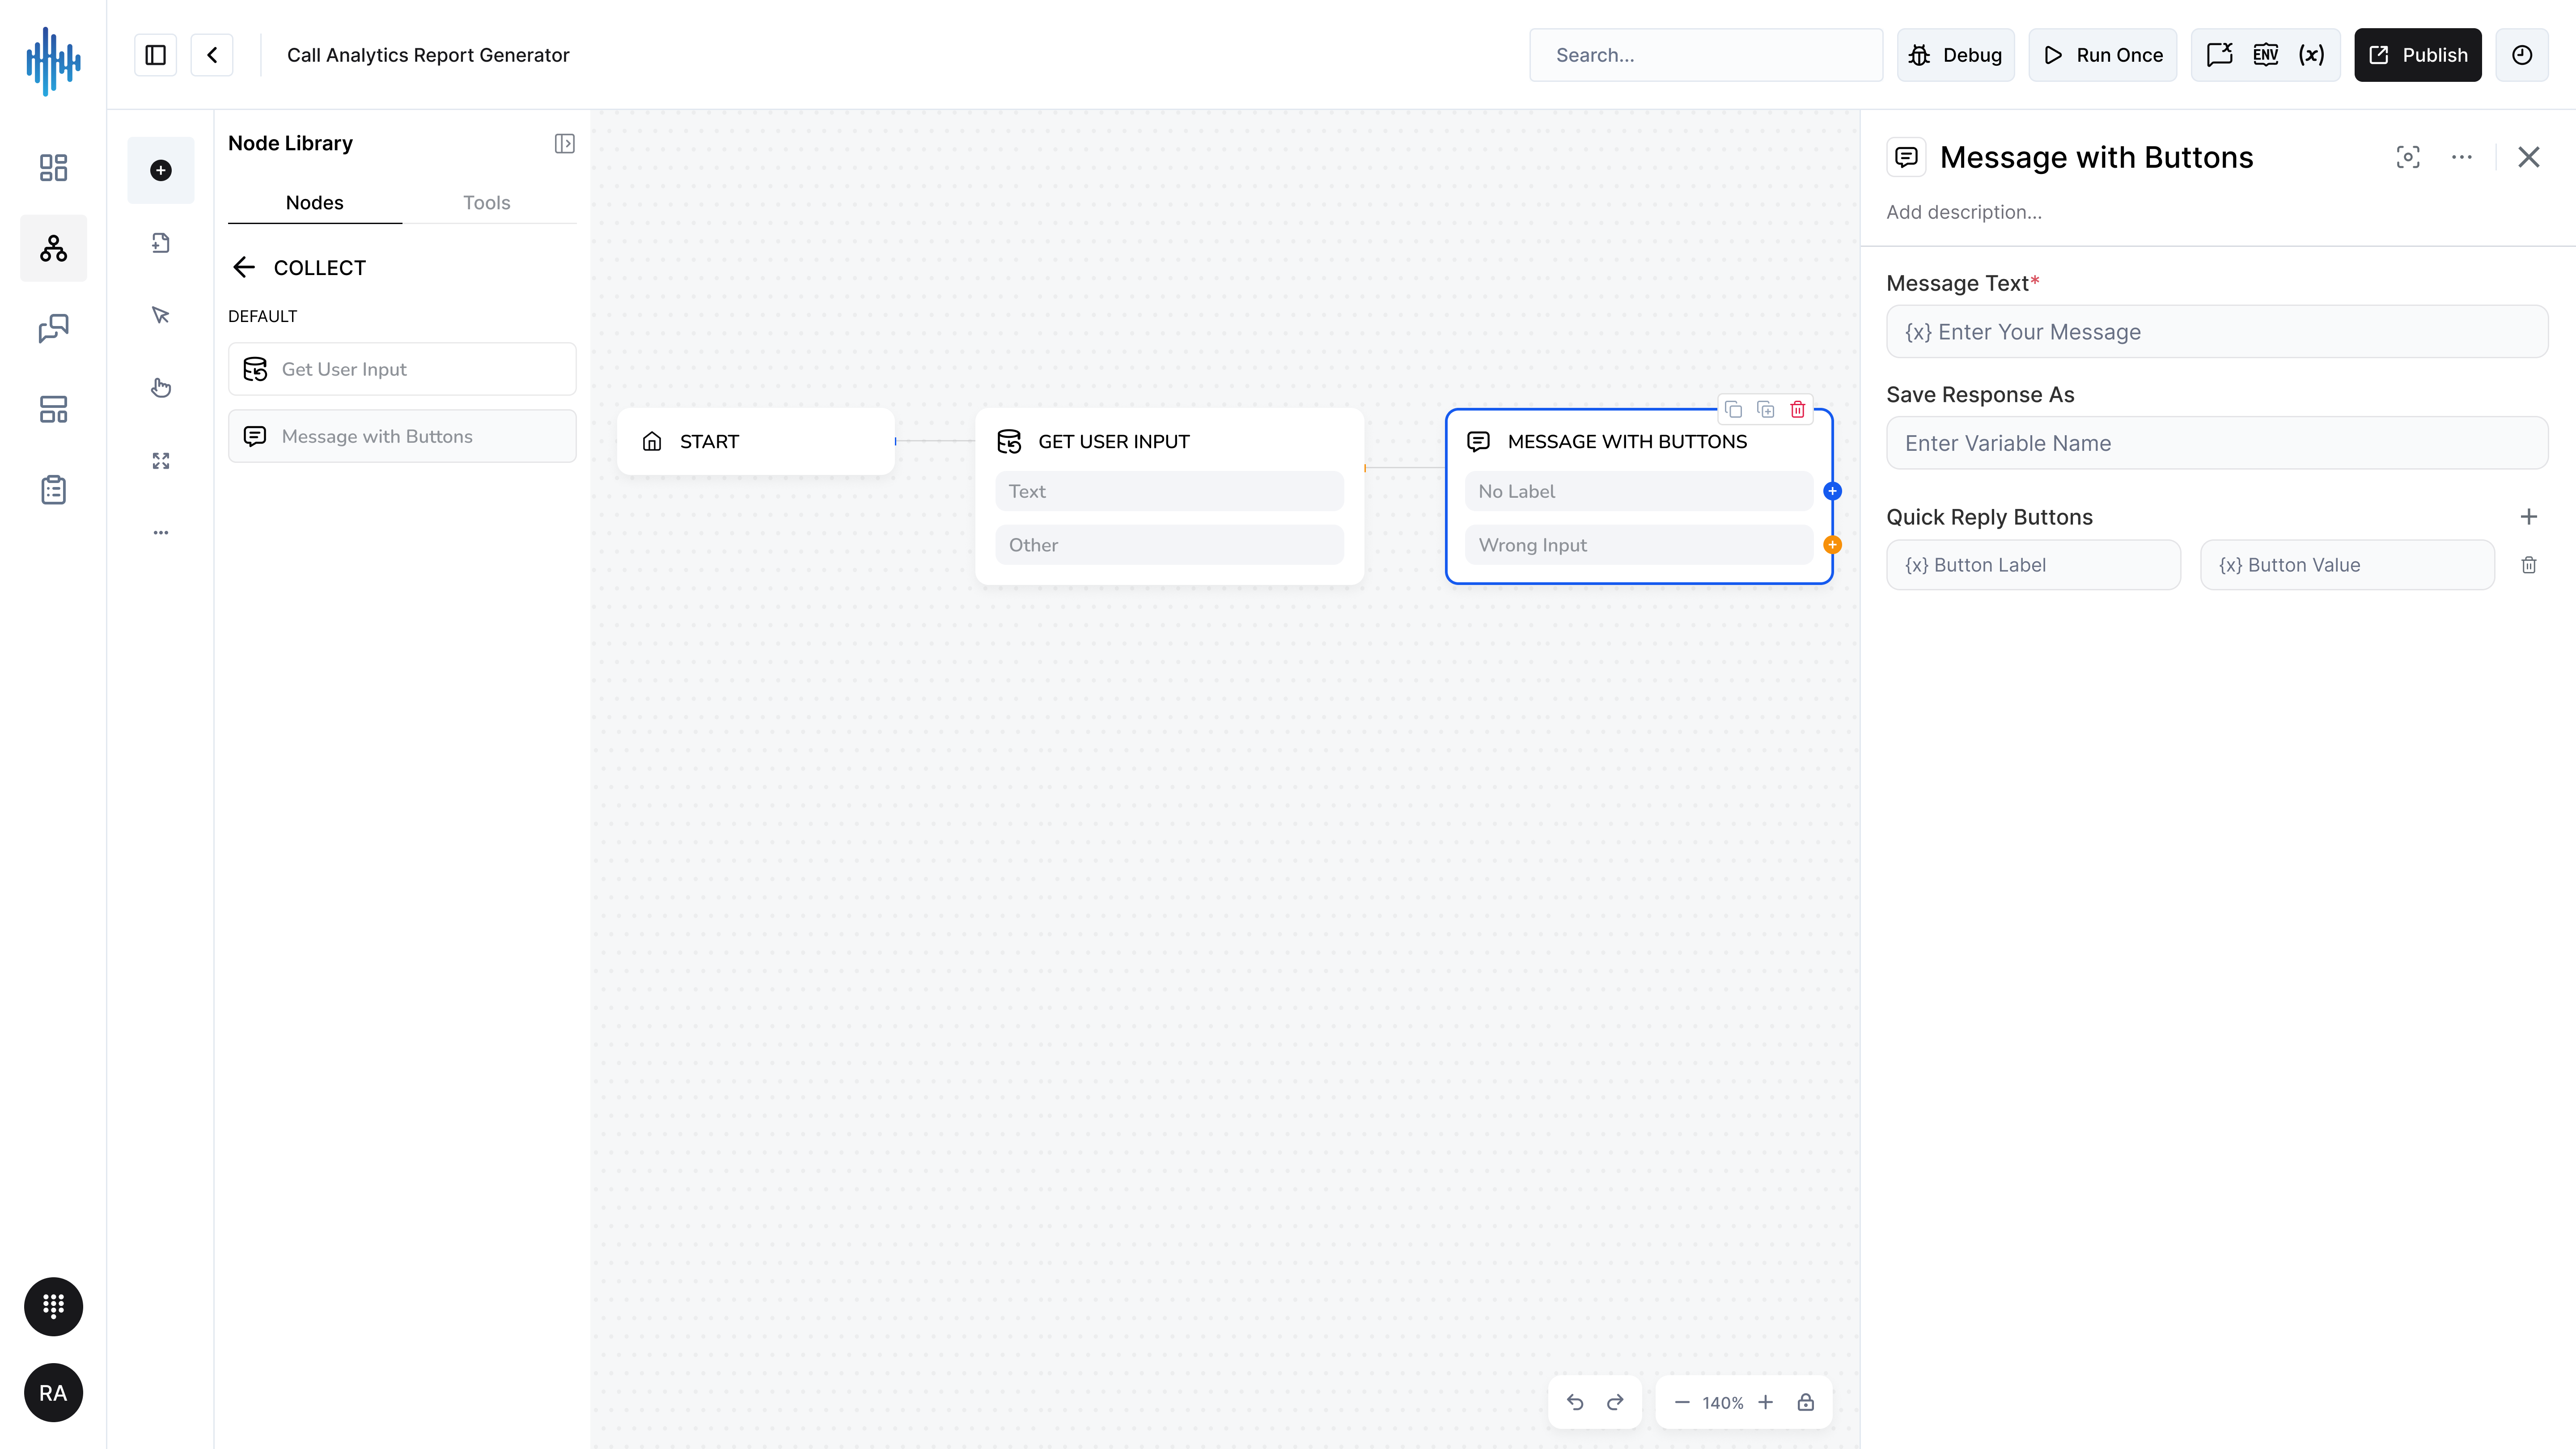
Purpose: Sends a message with quick reply buttons, allowing users to select from predefined options.
When to Use:
- Present multiple choice questions
- Offer menu selections
- Provide quick reply options
- Guide users through structured flows
Configuration Settings:
| Field | Description | Required |
|---|---|---|
| Message Text | The question or prompt to display | ✅ Yes |
| Save Response As | Variable to store selected button value | ✅ Yes |
| Quick Reply Buttons | Button labels and values | ✅ Yes |
Button Configuration:
Each button has:
- Button Label: Text shown to user
- Button Value: Value stored when clicked
Setup Steps:
- Add Message With Buttons node to workflow
- Enter your question in Message Text
- Specify variable name in Save Response As
- Add buttons:
- Enter Button Label (what user sees)
- Enter Button Value (what gets stored)
- Click "+" to add more buttons (recommended: 2-4 buttons)
Best Practices:
✅ DO:
- Keep button labels short and clear
- Limit to 3-4 buttons for best UX
- Use meaningful button values
- Provide clear message text
❌ DON'T:
- Create too many buttons (overwhelming)
- Use long button text
- Make button labels ambiguous
- Forget to save the response
Common Use Cases:
Yes/No Question:
Message: "Would you like to continue?"
Buttons:
- Label: "Yes" → Value: "yes"
- Label: "No" → Value: "no"
Save As: user_choice
Service Selection:
Message: "Which service do you need?"
Buttons:
- Label: "Billing" → Value: "billing"
- Label: "Technical" → Value: "technical"
- Label: "Account" → Value: "account"
Save As: service_type
Rating:
Message: "How was your experience?"
Buttons:
- Label: "⭐ Poor" → Value: "1"
- Label: "⭐⭐⭐ Good" → Value: "3"
- Label: "⭐⭐⭐⭐⭐ Excellent" → Value: "5"
Save As: rating
Related Nodes:
⚡ Logic
Quick Jump: ↑ Top | ← Collect | Built-in Tools →
Control workflow execution with conditional logic, variables, and decision-making nodes.
Condition Node
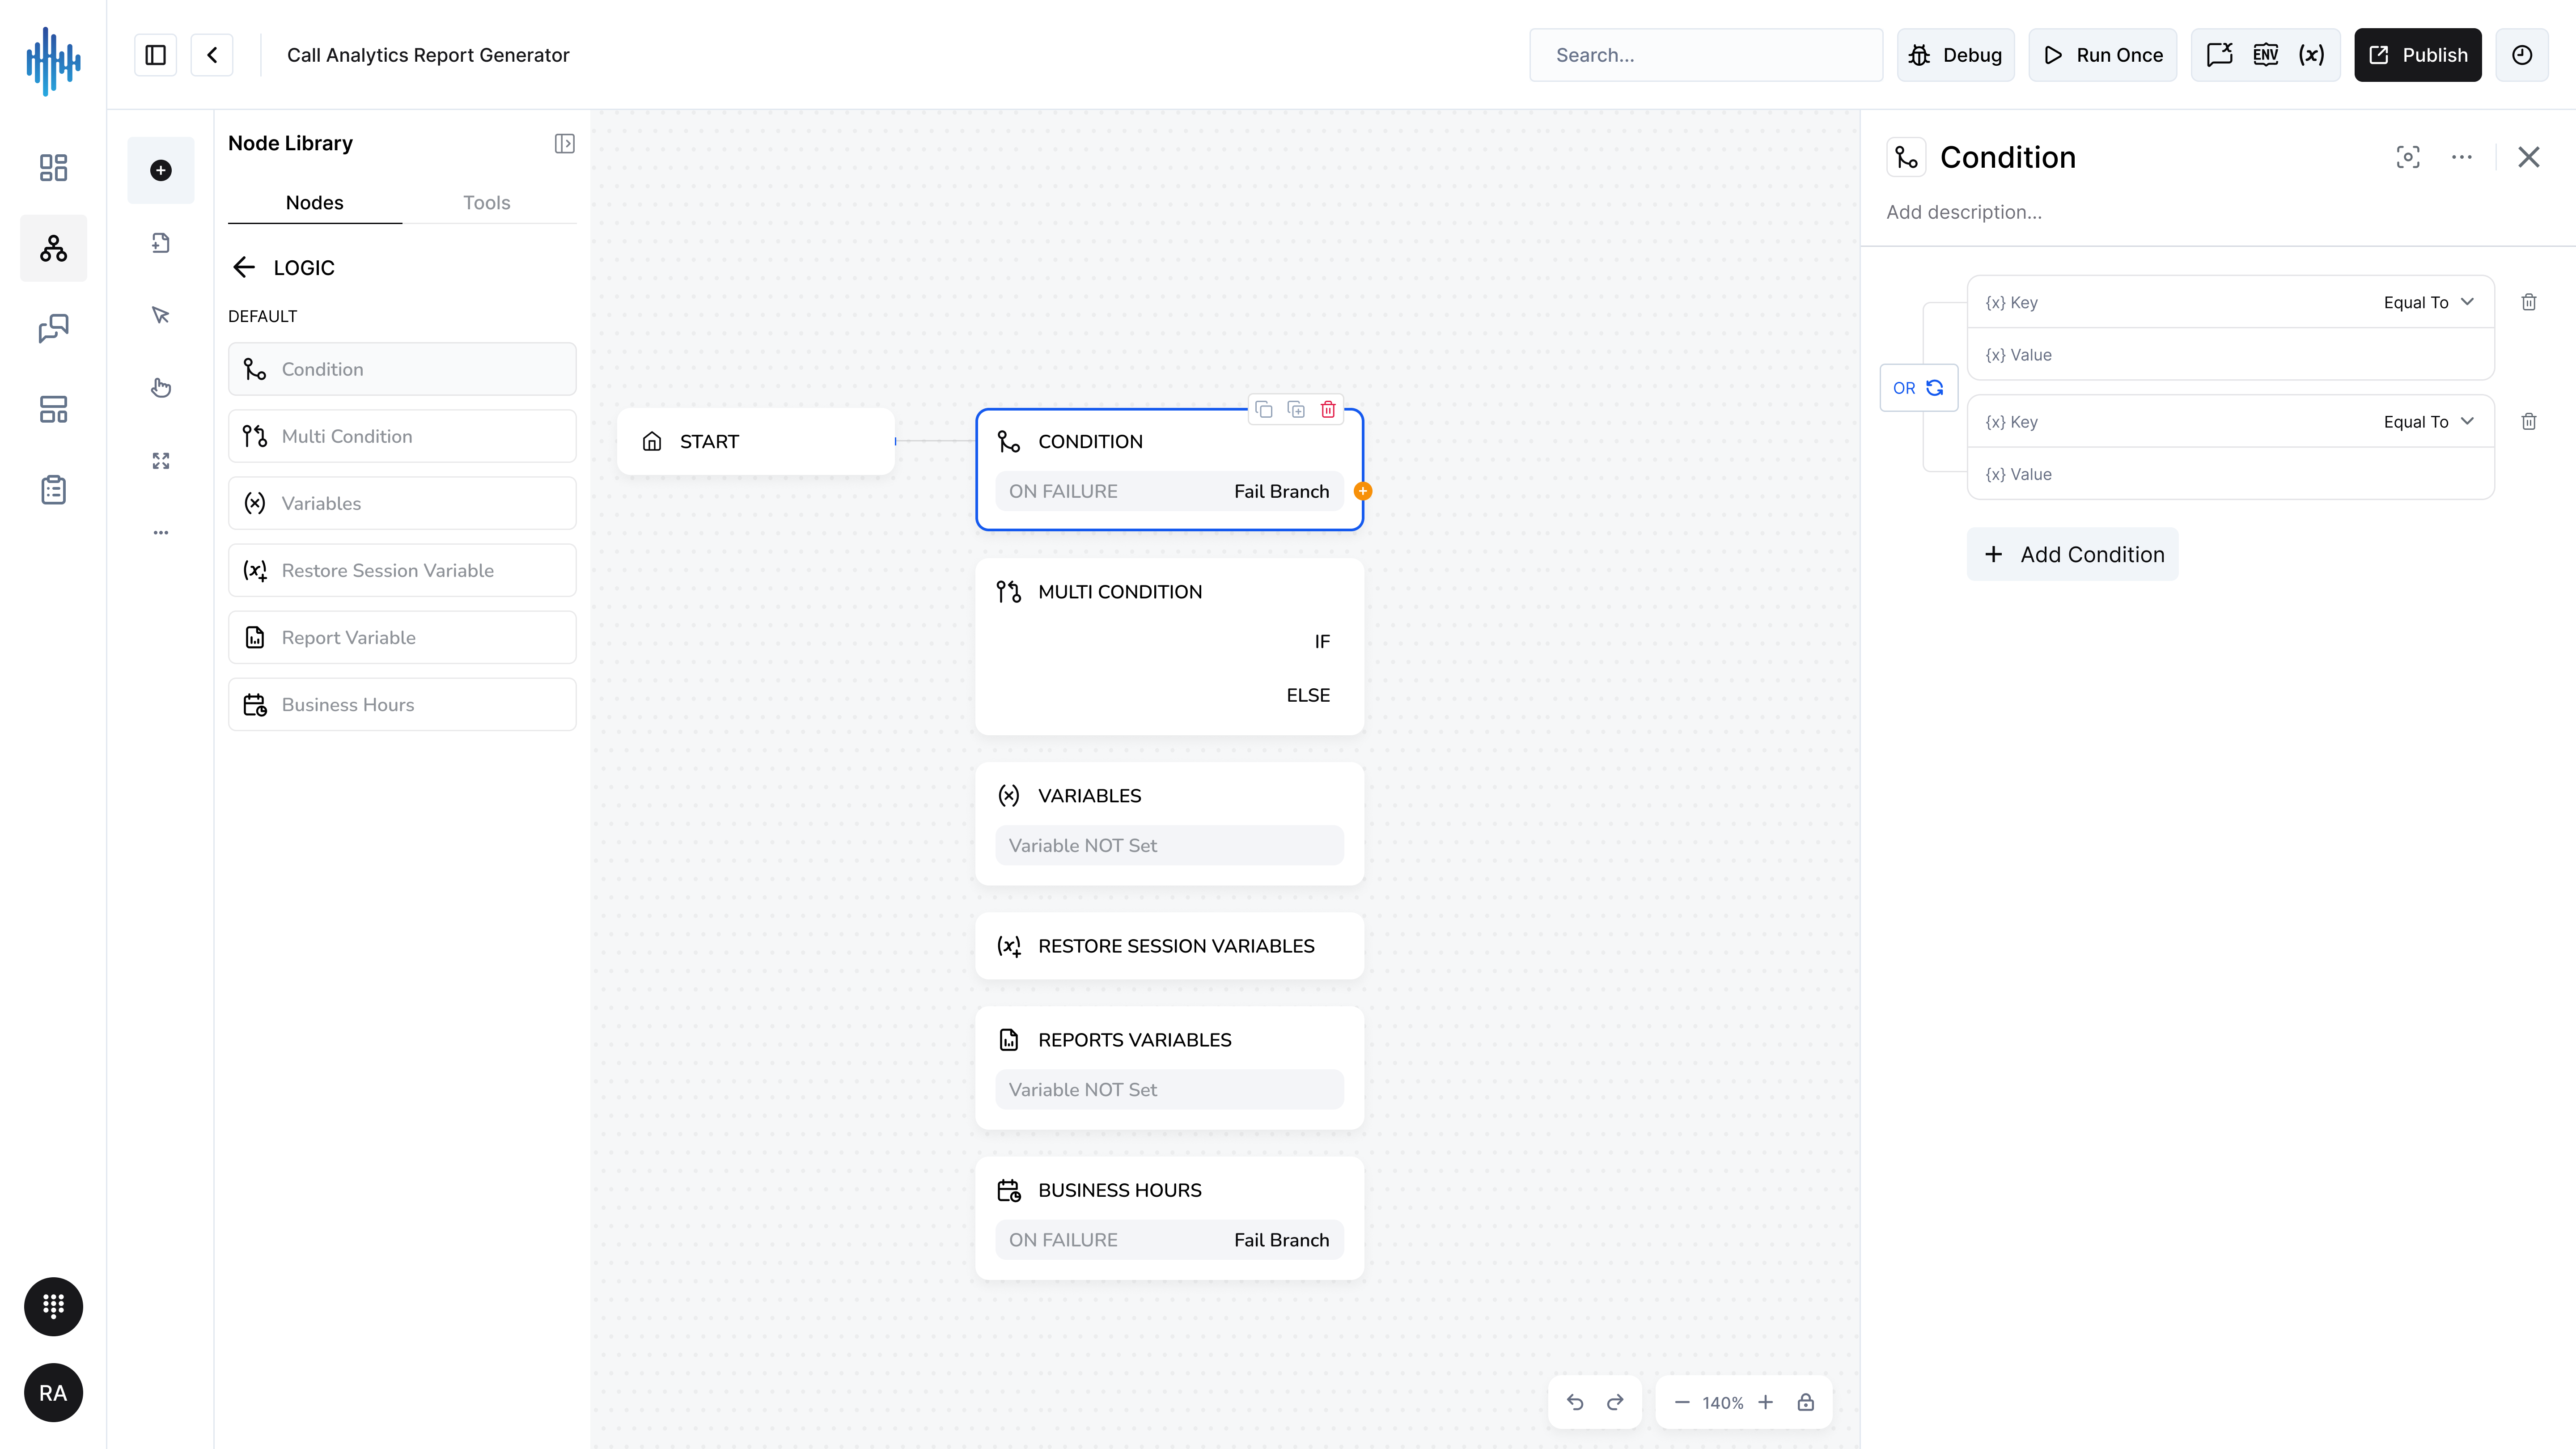
Purpose: Creates simple if/then logic to route workflow execution based on conditions.
When to Use:
- Route based on user input
- Check variable values
- Make binary decisions (yes/no, true/false)
- Validate data before proceeding
Configuration Settings:
| Field | Description | Required |
|---|---|---|
| Key | Variable or value to check | ✅ Yes |
| Condition | Comparison operator | ✅ Yes |
| Value | Value to compare against | ✅ Yes |
Available Conditions:
- Equal To - Exact match
- Not Equal To - Does not match
- Greater Than - Numeric comparison
- Less Than - Numeric comparison
- Contains - Text contains substring
- Starts With - Text begins with
- Ends With - Text ends with
- Is Empty - Field is blank
- Is Not Empty - Field has value
AND Logic:
Add multiple conditions with AND logic by clicking "+ Add Condition". All conditions must be true.
Setup Steps:
- Add Condition node to workflow
- Enter Key (variable to check, e.g.,
{{user_age}}) - Select Condition operator
- Enter Value to compare
- Add more conditions if needed (AND logic)
- Connect "ON FAILURE" and "Fail Branch" outputs
Output Paths:
- ON FAILURE → Condition is TRUE, continue main flow
- Fail Branch → Condition is FALSE, alternative path
Best Practices:
✅ DO:
- Use clear, descriptive variable names
- Test with different values
- Handle both success and failure paths
- Use appropriate comparison operators
❌ DON'T:
- Create overly complex conditions (use Multi Condition instead)
- Forget to connect failure branch
- Mix data types in comparisons
Common Use Cases:
Age Verification:
Key: {{user_age}}
Condition: Greater Than
Value: 18
Check User Response:
Key: {{user_choice}}
Condition: Equal To
Value: "yes"
Validate Email:
Key: {{user_email}}
Condition: Contains
Value: "@"
Related Nodes:
- Multi Condition - Multiple IF/ELIF/ELSE branches
- Variables - Set values to check
Multi Condition Node
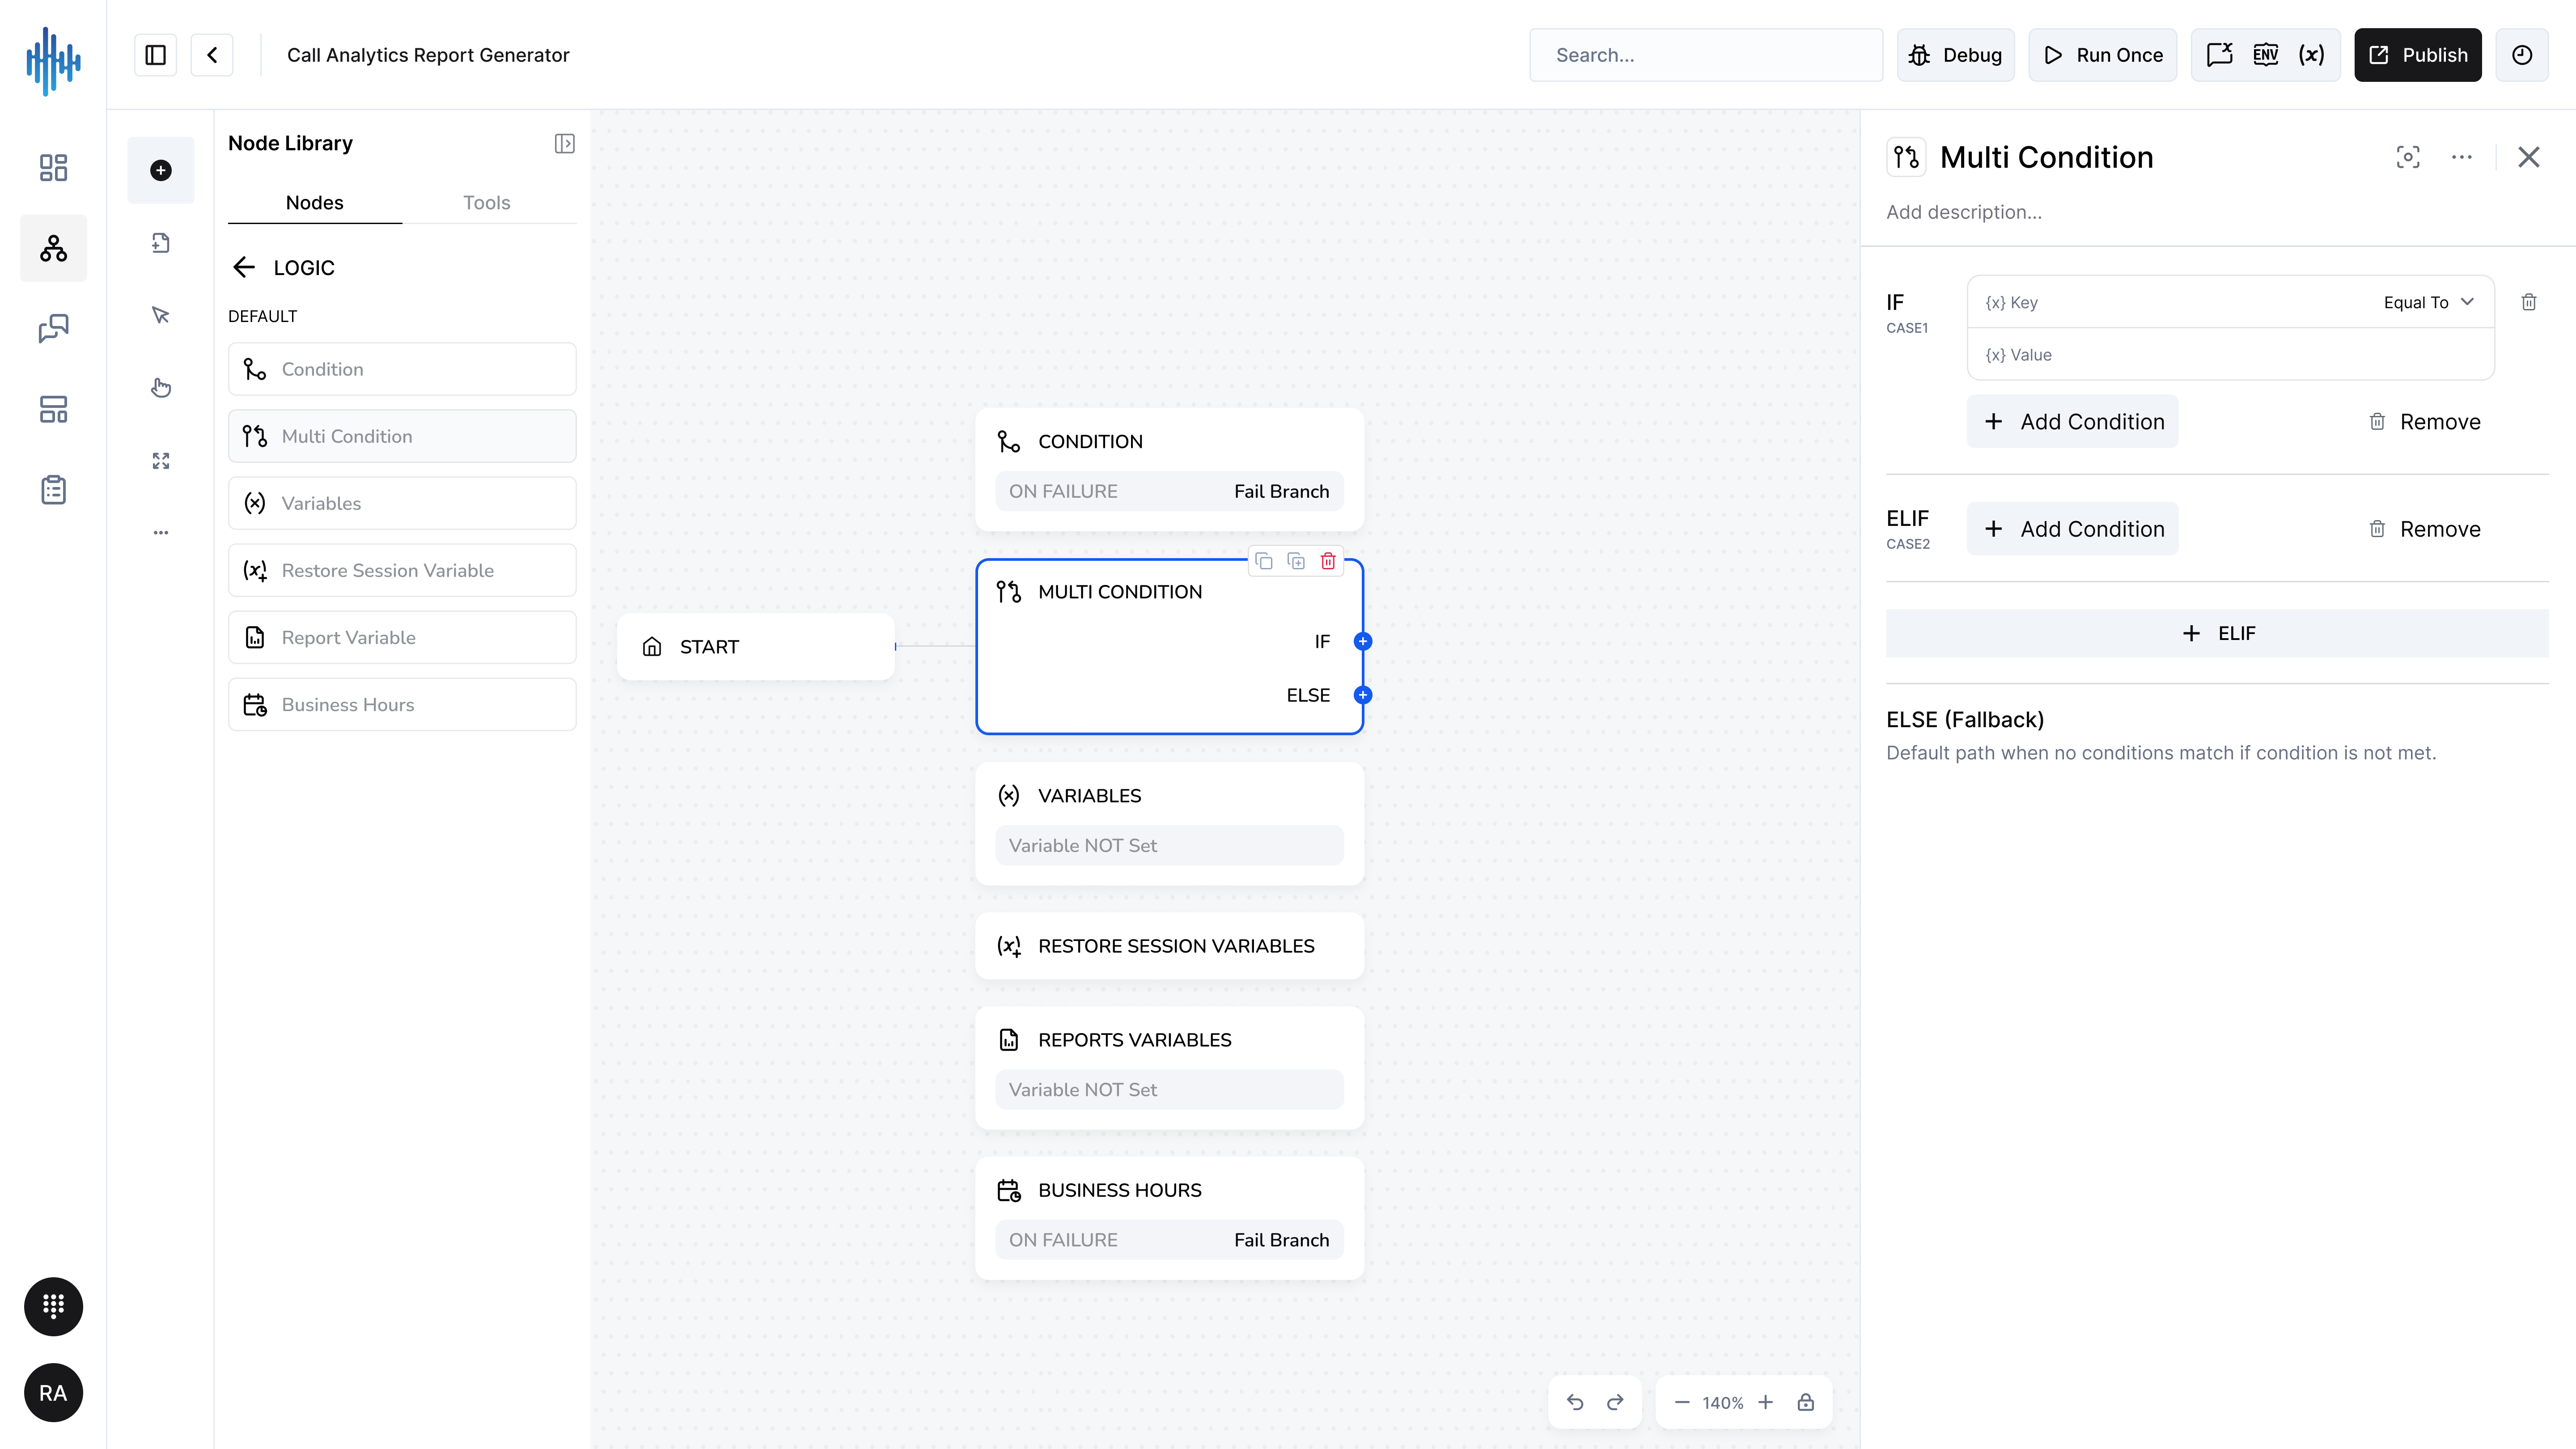
Purpose: Creates multiple conditional branches (IF/ELIF/ELSE) for complex decision-making.
When to Use:
- Route to multiple different paths
- Handle multiple scenarios
- Create switch-like logic
- Complex decision trees
Configuration Settings:
IF (Case 1):
- First condition to evaluate
- Add multiple conditions with AND logic
ELIF (Case 2):
- Second condition if first fails
- Evaluated only if IF is false
- Can add more ELIF cases
ELSE (Fallback):
- Default path when no conditions match
- Always executed if all conditions fail
Setup Steps:
- Add Multi Condition node to workflow
- Configure IF case:
- Enter Key, Condition, Value
- Add more conditions with "+ Add Condition"
- Configure ELIF cases:
- Click "+ ELIF" to add more cases
- Set conditions for each case
- ELSE path is automatic fallback
- Remove cases with "Remove" button if needed
Evaluation Order:
- IF condition evaluated first
- If false, ELIF conditions evaluated in order
- If all false, ELSE path is taken
Best Practices:
✅ DO:
- Order cases from most specific to most general
- Always handle the ELSE case
- Keep conditions clear and simple
- Test all paths
❌ DON'T:
- Create overlapping conditions
- Make too many ELIF cases (limit to 5-6)
- Forget about the fallback path
Common Use Cases:
Priority Routing:
IF: {{priority}} Equal To "urgent" → Route to urgent team
ELIF: {{priority}} Equal To "high" → Route to priority queue
ELIF: {{priority}} Equal To "normal" → Route to standard queue
ELSE → Route to general queue
Score-Based Actions:
IF: {{score}} Greater Than 90 → Send premium offer
ELIF: {{score}} Greater Than 70 → Send standard offer
ELIF: {{score}} Greater Than 50 → Send basic offer
ELSE → Send general information
Related Nodes:
Variables Node
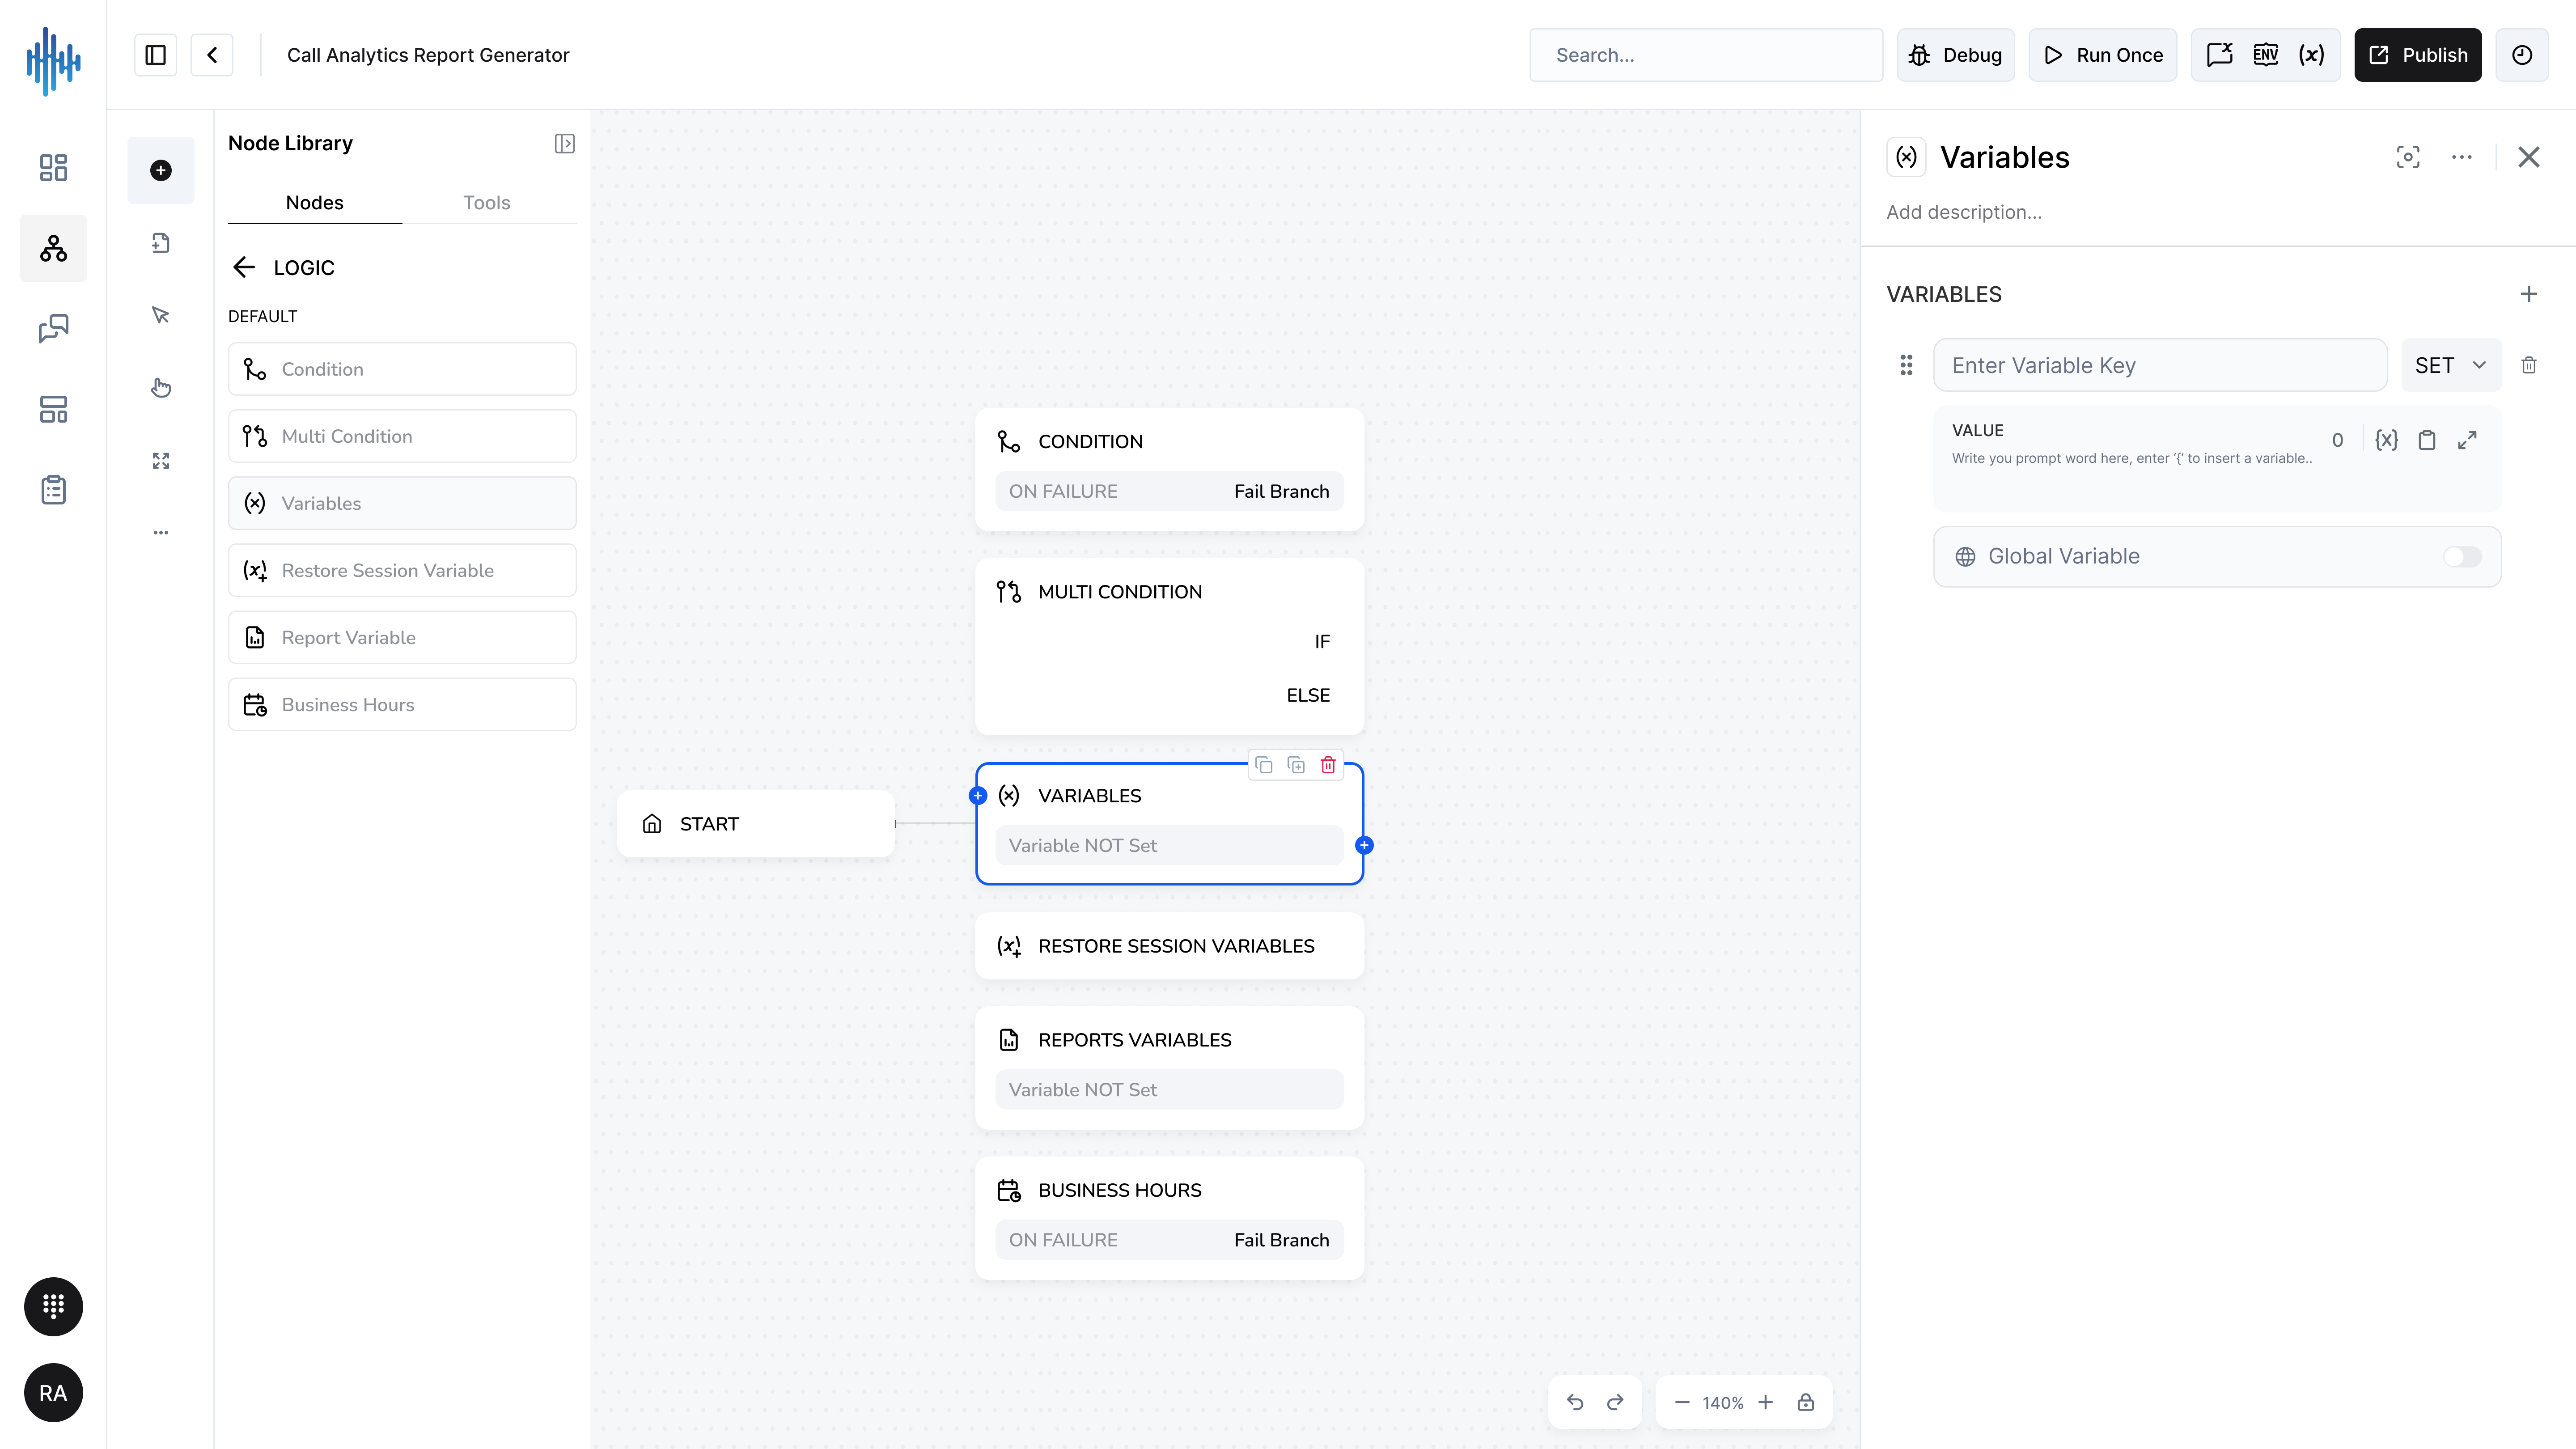
Purpose: Set, update, or modify variable values during workflow execution.
When to Use:
- Store calculated values
- Initialize variables
- Update existing variables
- Transform data
- Set default values
Configuration Settings:
| Field | Description | Required |
|---|---|---|
| Variable Key | Variable name to set | ✅ Yes |
| Value | Value to assign to variable | ✅ Yes |
| SET/ADD/SUBTRACT | Operation type | ✅ Yes |
Operations:
- SET: Assign or replace value
- ADD: Add to existing number (numeric only)
- SUBTRACT: Subtract from existing number (numeric only)
Setup Steps:
- Add Variables node to workflow
- Enter Variable Key (name)
- Enter Value (can use variables with
{{}}) - Select operation (SET/ADD/SUBTRACT)
- Click "+" to add more variables
Value Types:
- Static text:
"Hello"orHello - Numbers:
42or3.14 - Variables:
{{user_name}} - Expressions:
{{first_name}} {{last_name}}
Best Practices:
✅ DO:
- Use descriptive variable names
- Initialize variables before use
- Use SET for text, ADD/SUBTRACT for numbers
- Document complex calculations
❌ DON'T:
- Use ADD/SUBTRACT on text values
- Overwrite important variables accidentally
- Create variables you don't use
Common Use Cases:
Initialize Counter:
Key: attempt_count
Value: 0
Operation: SET
Concatenate Names:
Key: full_name
Value: {{first_name}} {{last_name}}
Operation: SET
Increment Counter:
Key: attempt_count
Value: 1
Operation: ADD
Calculate Total:
Key: total_price
Value: {{item_price}} + {{tax}}
Operation: SET
Related Nodes:
- Report Variables - Display variable values
- Condition - Check variable values
Report Variables Node
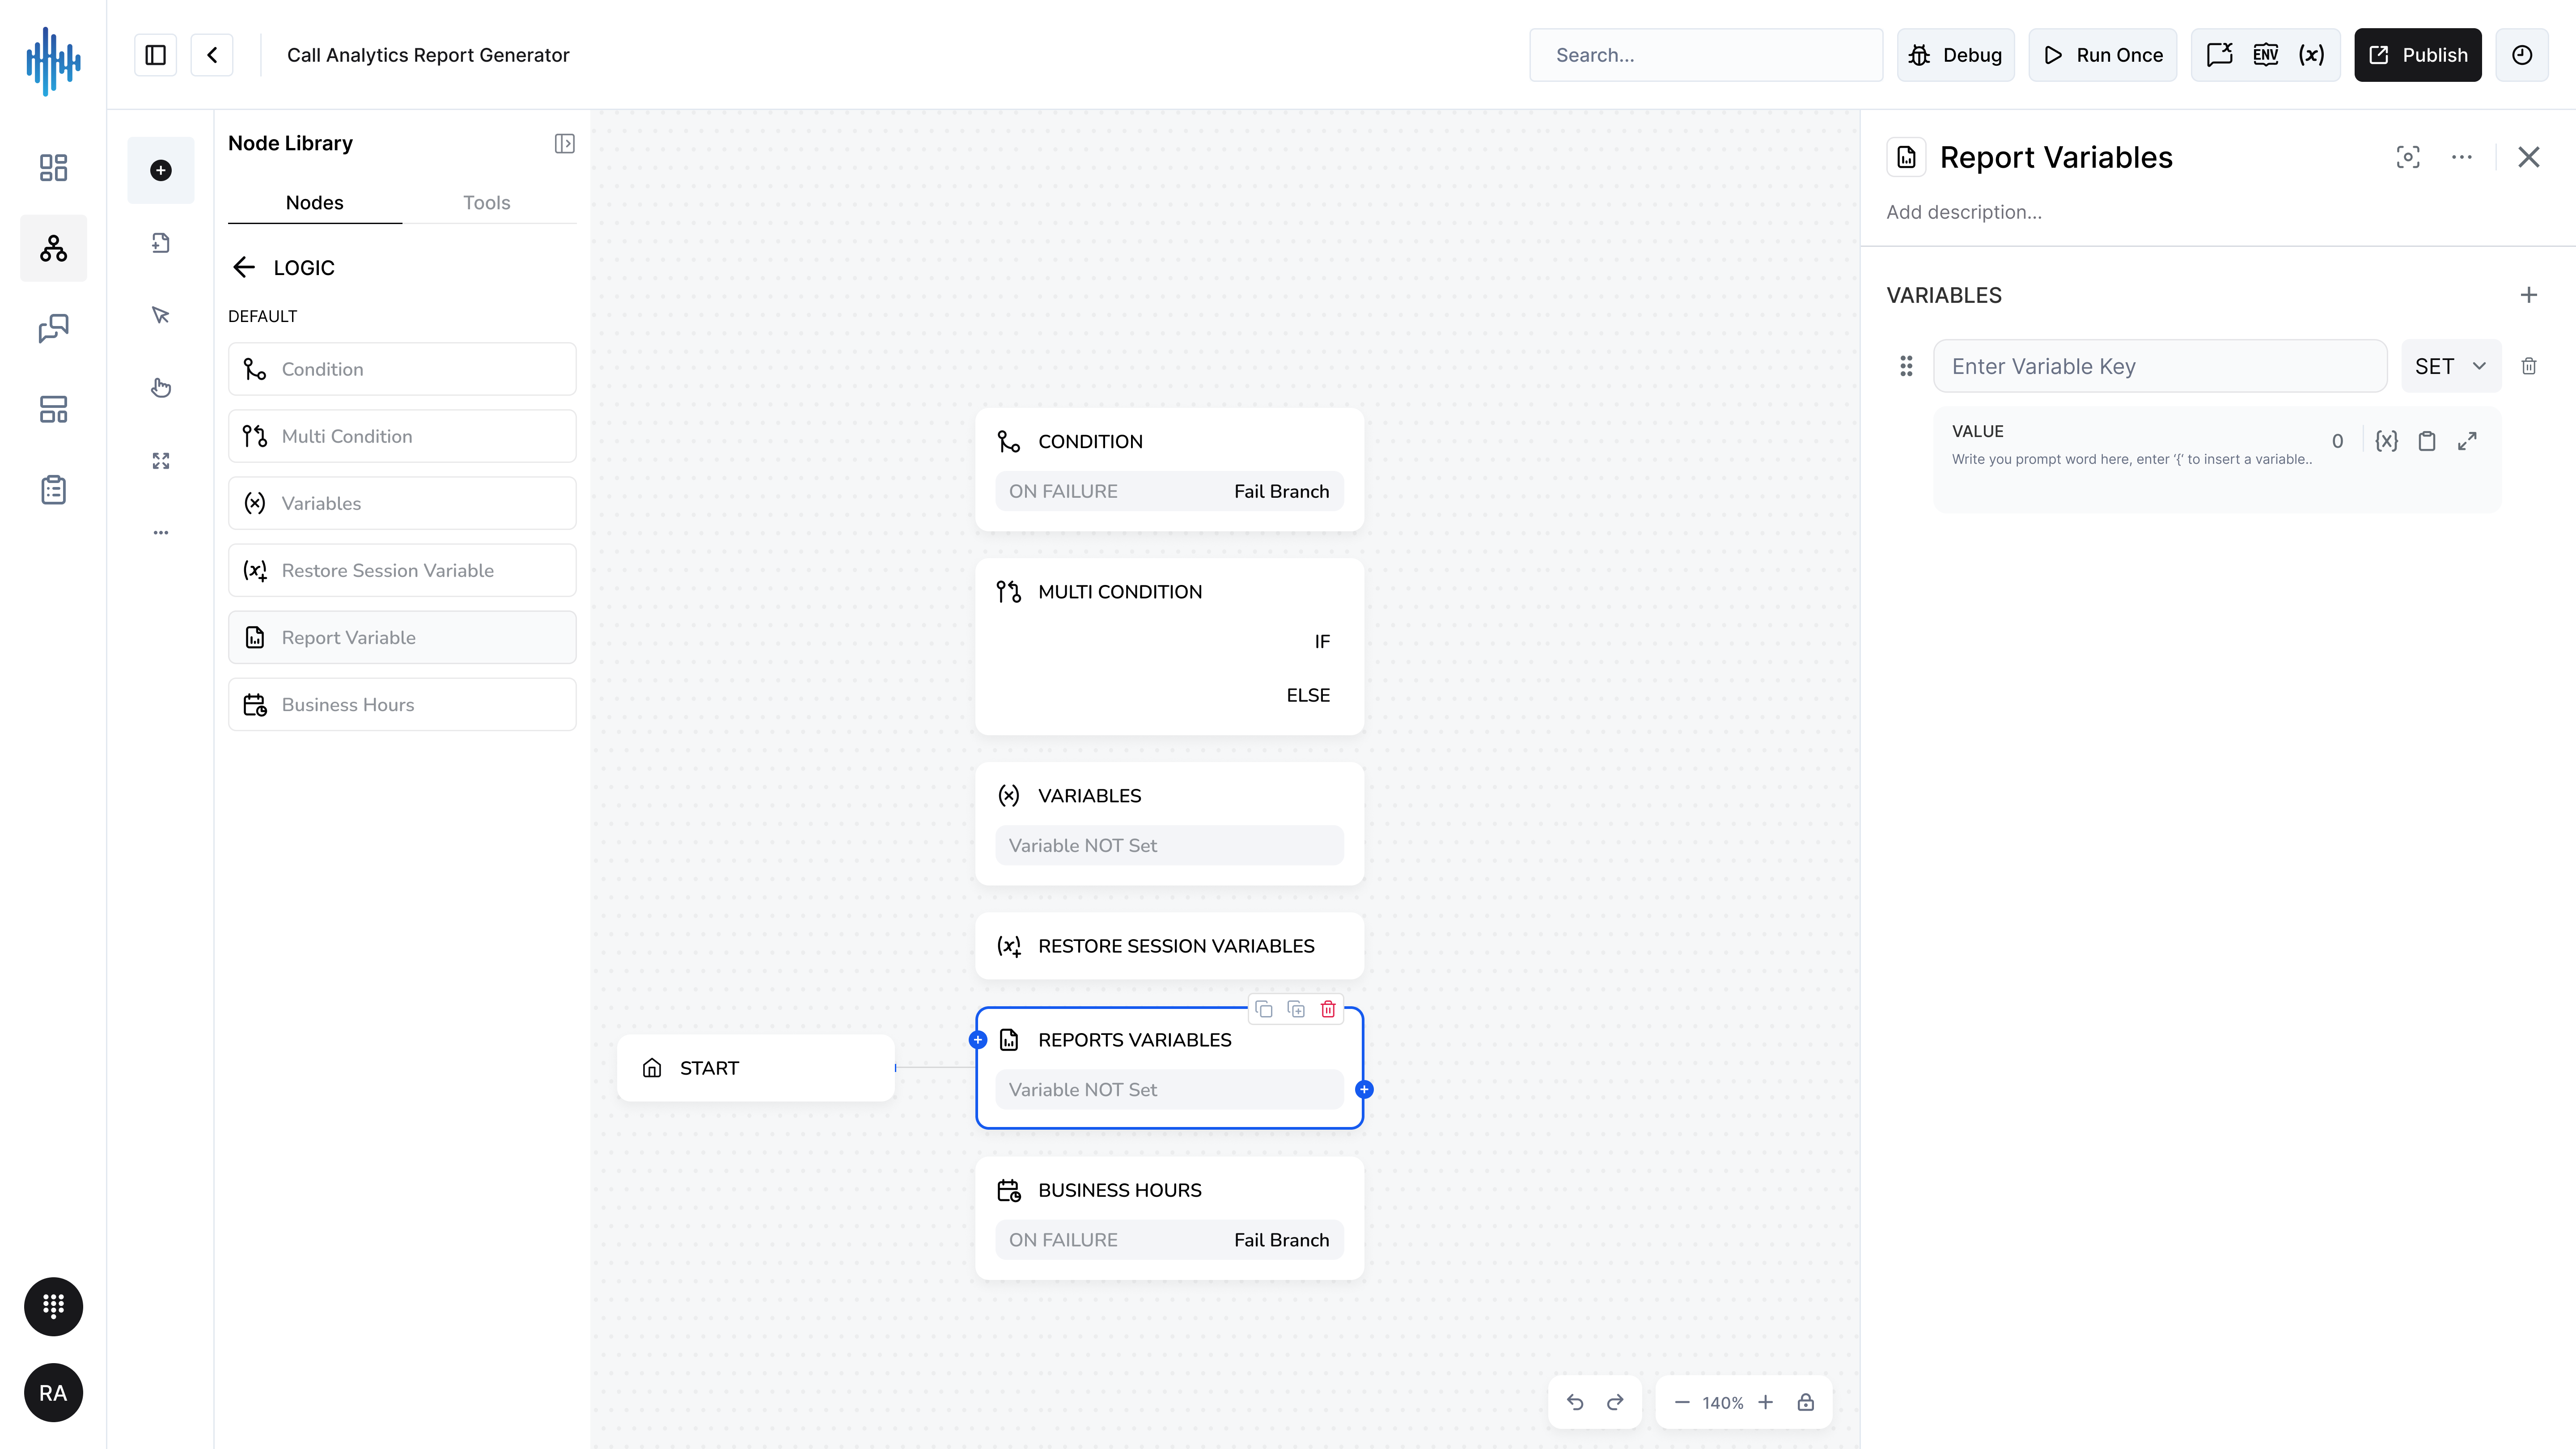
Purpose: Displays or logs variable values for debugging and monitoring purposes.
When to Use:
- Debug workflows
- Log variable states
- Monitor data flow
- Troubleshoot issues
- Verify calculations
Configuration:
This node automatically displays all current variables in the execution logs. No configuration required.
Setup Steps:
- Add Report Variables node at debug points
- Run workflow
- Check execution logs to see variable values
- Remove or disable in production
Best Practices:
✅ DO:
- Use during development and testing
- Place at decision points
- Review logs after testing
- Remove before production deployment
❌ DON'T:
- Leave in production (performance impact)
- Use for sensitive data logging
- Rely on for critical logic
Common Use Cases:
Debug Condition Logic:
Variables Node (set values)
↓
Report Variables (check values)
↓
Condition Node (test logic)
Verify Calculations:
Calculate values
↓
Report Variables (verify math)
↓
Proceed with workflow
Business Hours Node
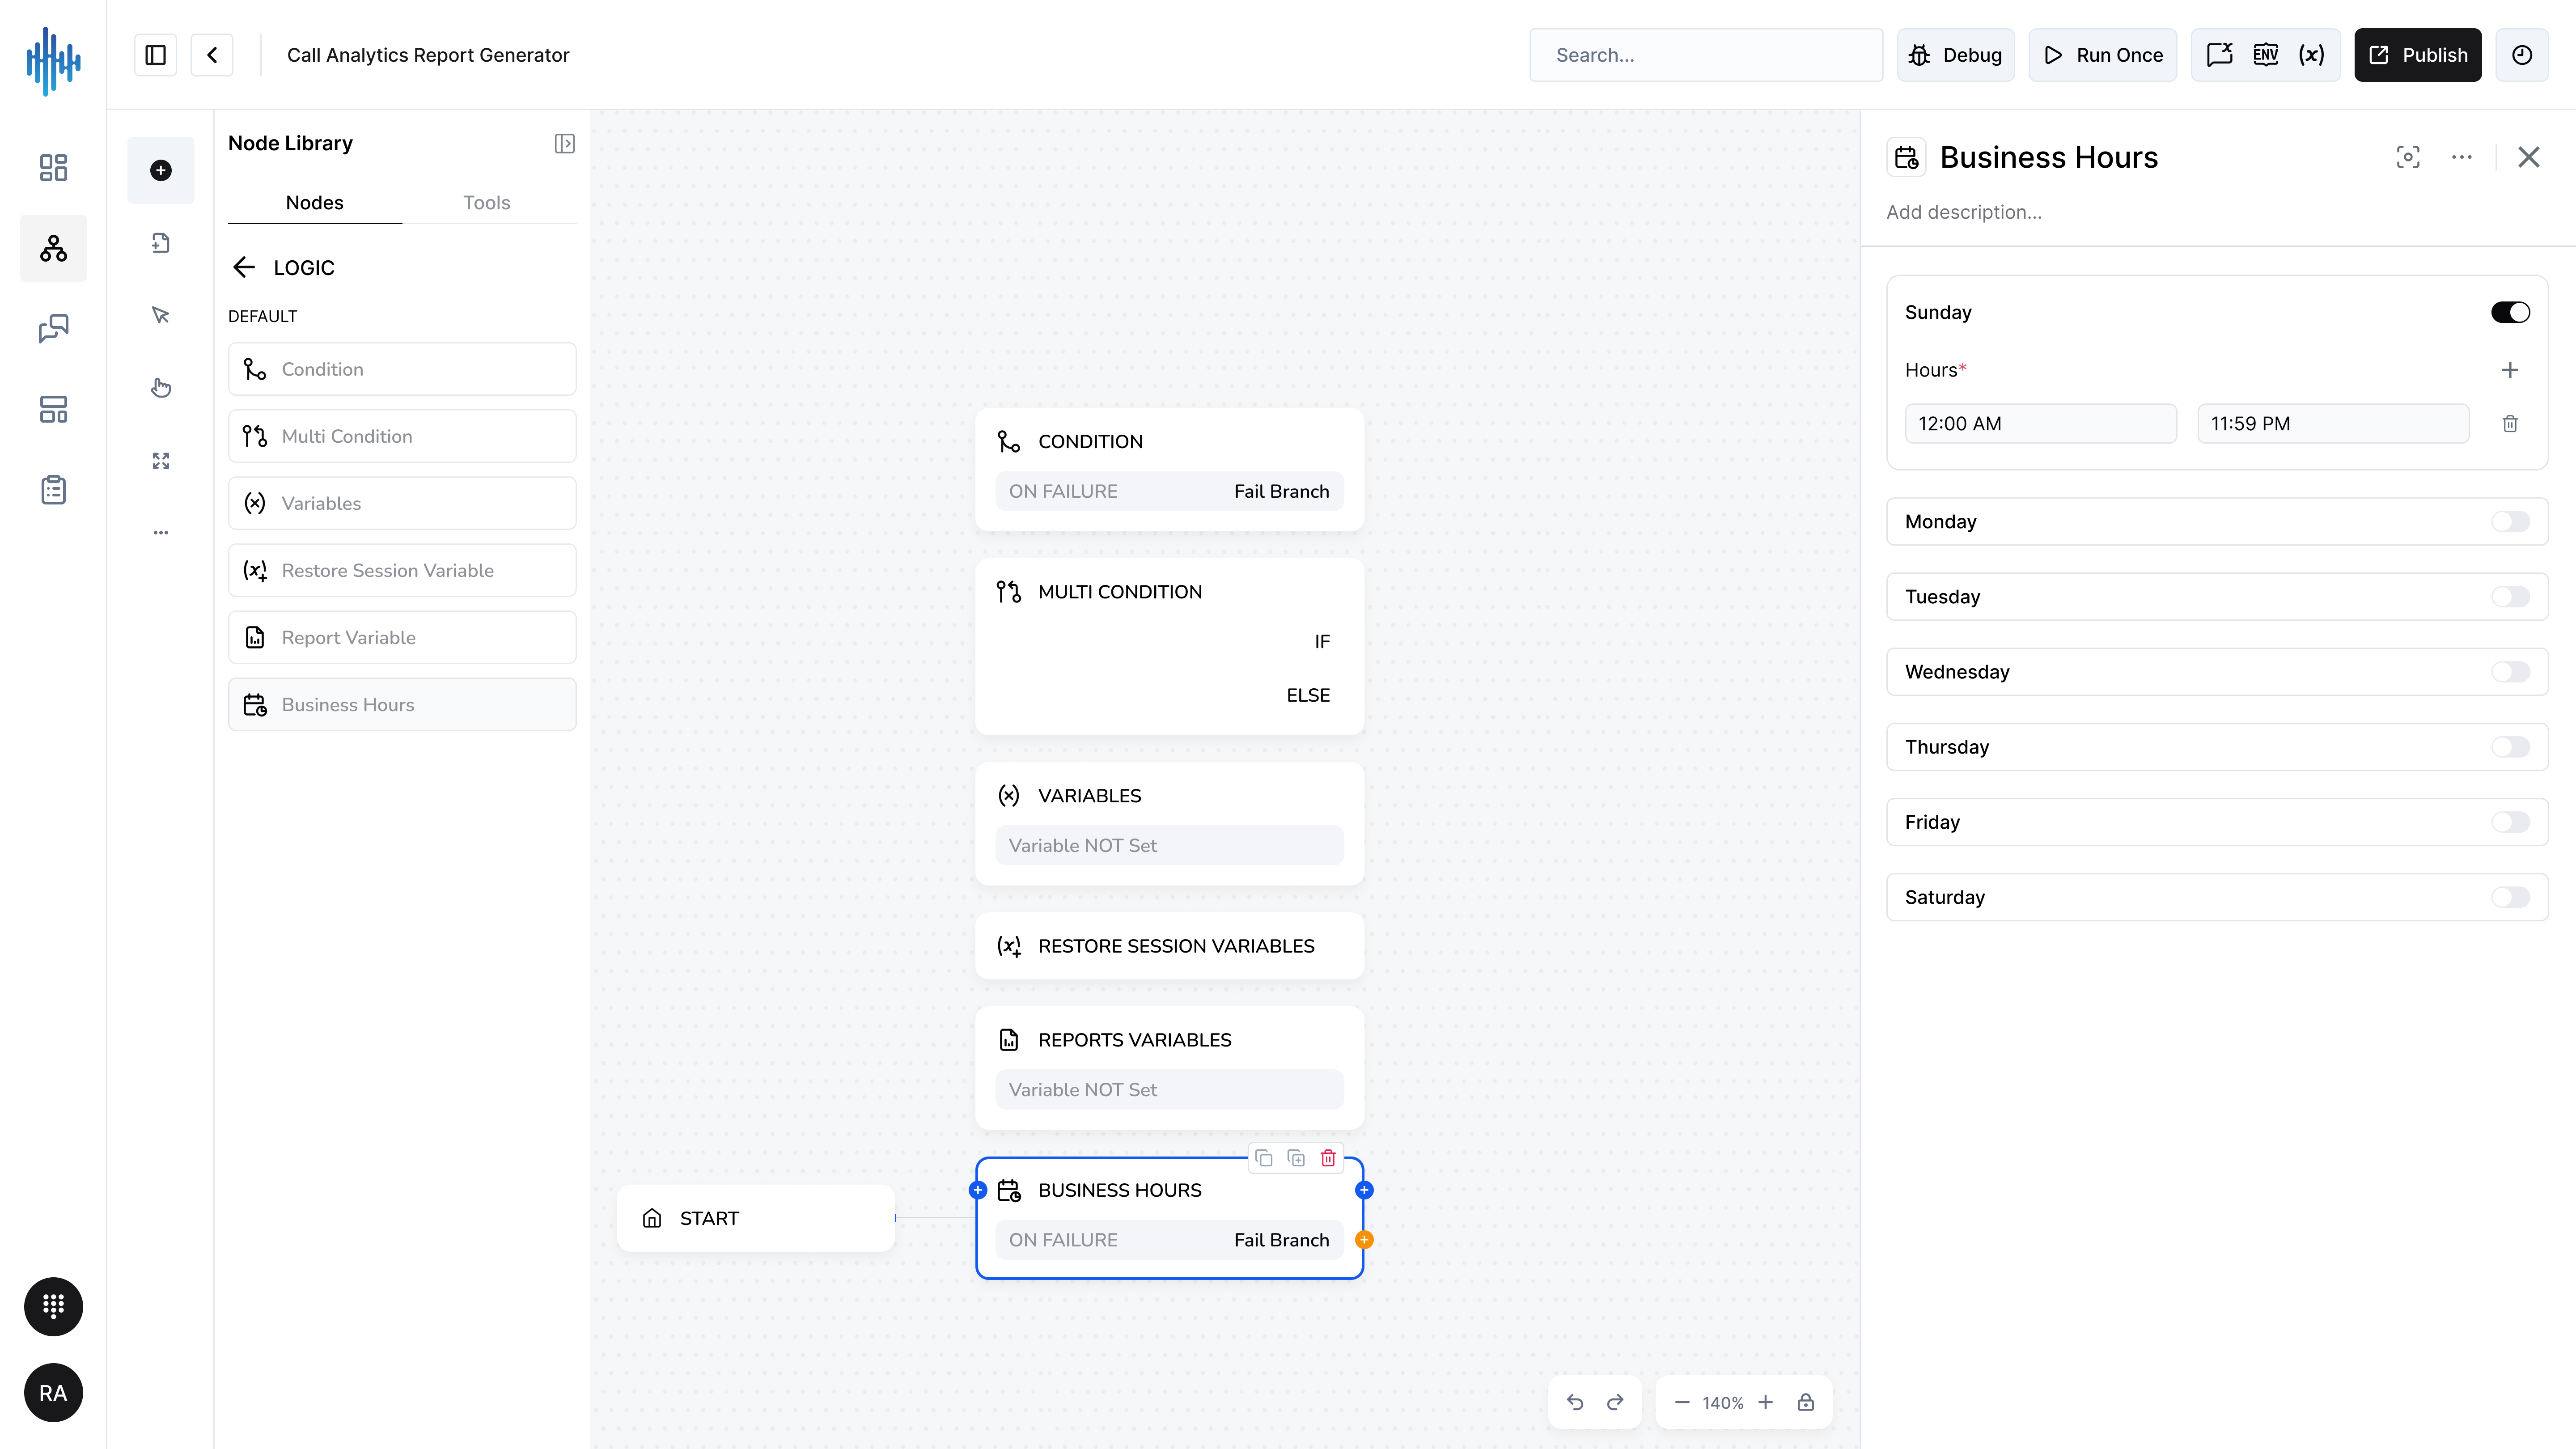
Purpose: Checks if current time falls within configured business hours and routes accordingly.
When to Use:
- Route to agents only during business hours
- Send auto-replies after hours
- Apply time-based logic
- Schedule-aware workflows
Configuration Settings:
Configure hours for each day of the week:
| Day | Enabled | Hours |
|---|---|---|
| Monday | Toggle | Start Time - End Time |
| Tuesday | Toggle | Start Time - End Time |
| Wednesday | Toggle | Start Time - End Time |
| Thursday | Toggle | Start Time - End Time |
| Friday | Toggle | Start Time - End Time |
| Saturday | Toggle | Start Time - End Time |
| Sunday | Toggle | Start Time - End Time |
Setup Steps:
- Add Business Hours node to workflow
- For each day:
- Toggle ON if business is open
- Set Start Time (e.g., 12:00 AM)
- Set End Time (e.g., 11:59 PM)
- Click "+" to add multiple time slots per day
- Connect "ON FAILURE" (within hours) and "Fail Branch" (outside hours)
Output Paths:
- ON FAILURE → Current time IS within business hours
- Fail Branch → Current time is OUTSIDE business hours
Best Practices:
✅ DO:
- Set accurate time zones
- Account for holidays separately
- Test before deploying
- Provide clear after-hours messages
❌ DON'T:
- Forget to set all days
- Overlook time zone differences
- Ignore holidays
Common Use Cases:
Route to Agents:
Business Hours Check
↓
Within Hours: → Human Handoff
Outside Hours: → Send auto-reply, log ticket
Time-Based Pricing:
Business Hours Check
↓
Within Hours: → Standard pricing
Outside Hours: → After-hours surcharge
Related Nodes:
- Condition - Additional time-based checks
- Human Handoff - Transfer during business hours
🛠️ Built-in Tools
Quick Jump: ↑ Top | ← Logic | Loop →
Utility nodes for API calls, delays, workflow control, and data processing.
HTTP Request Node
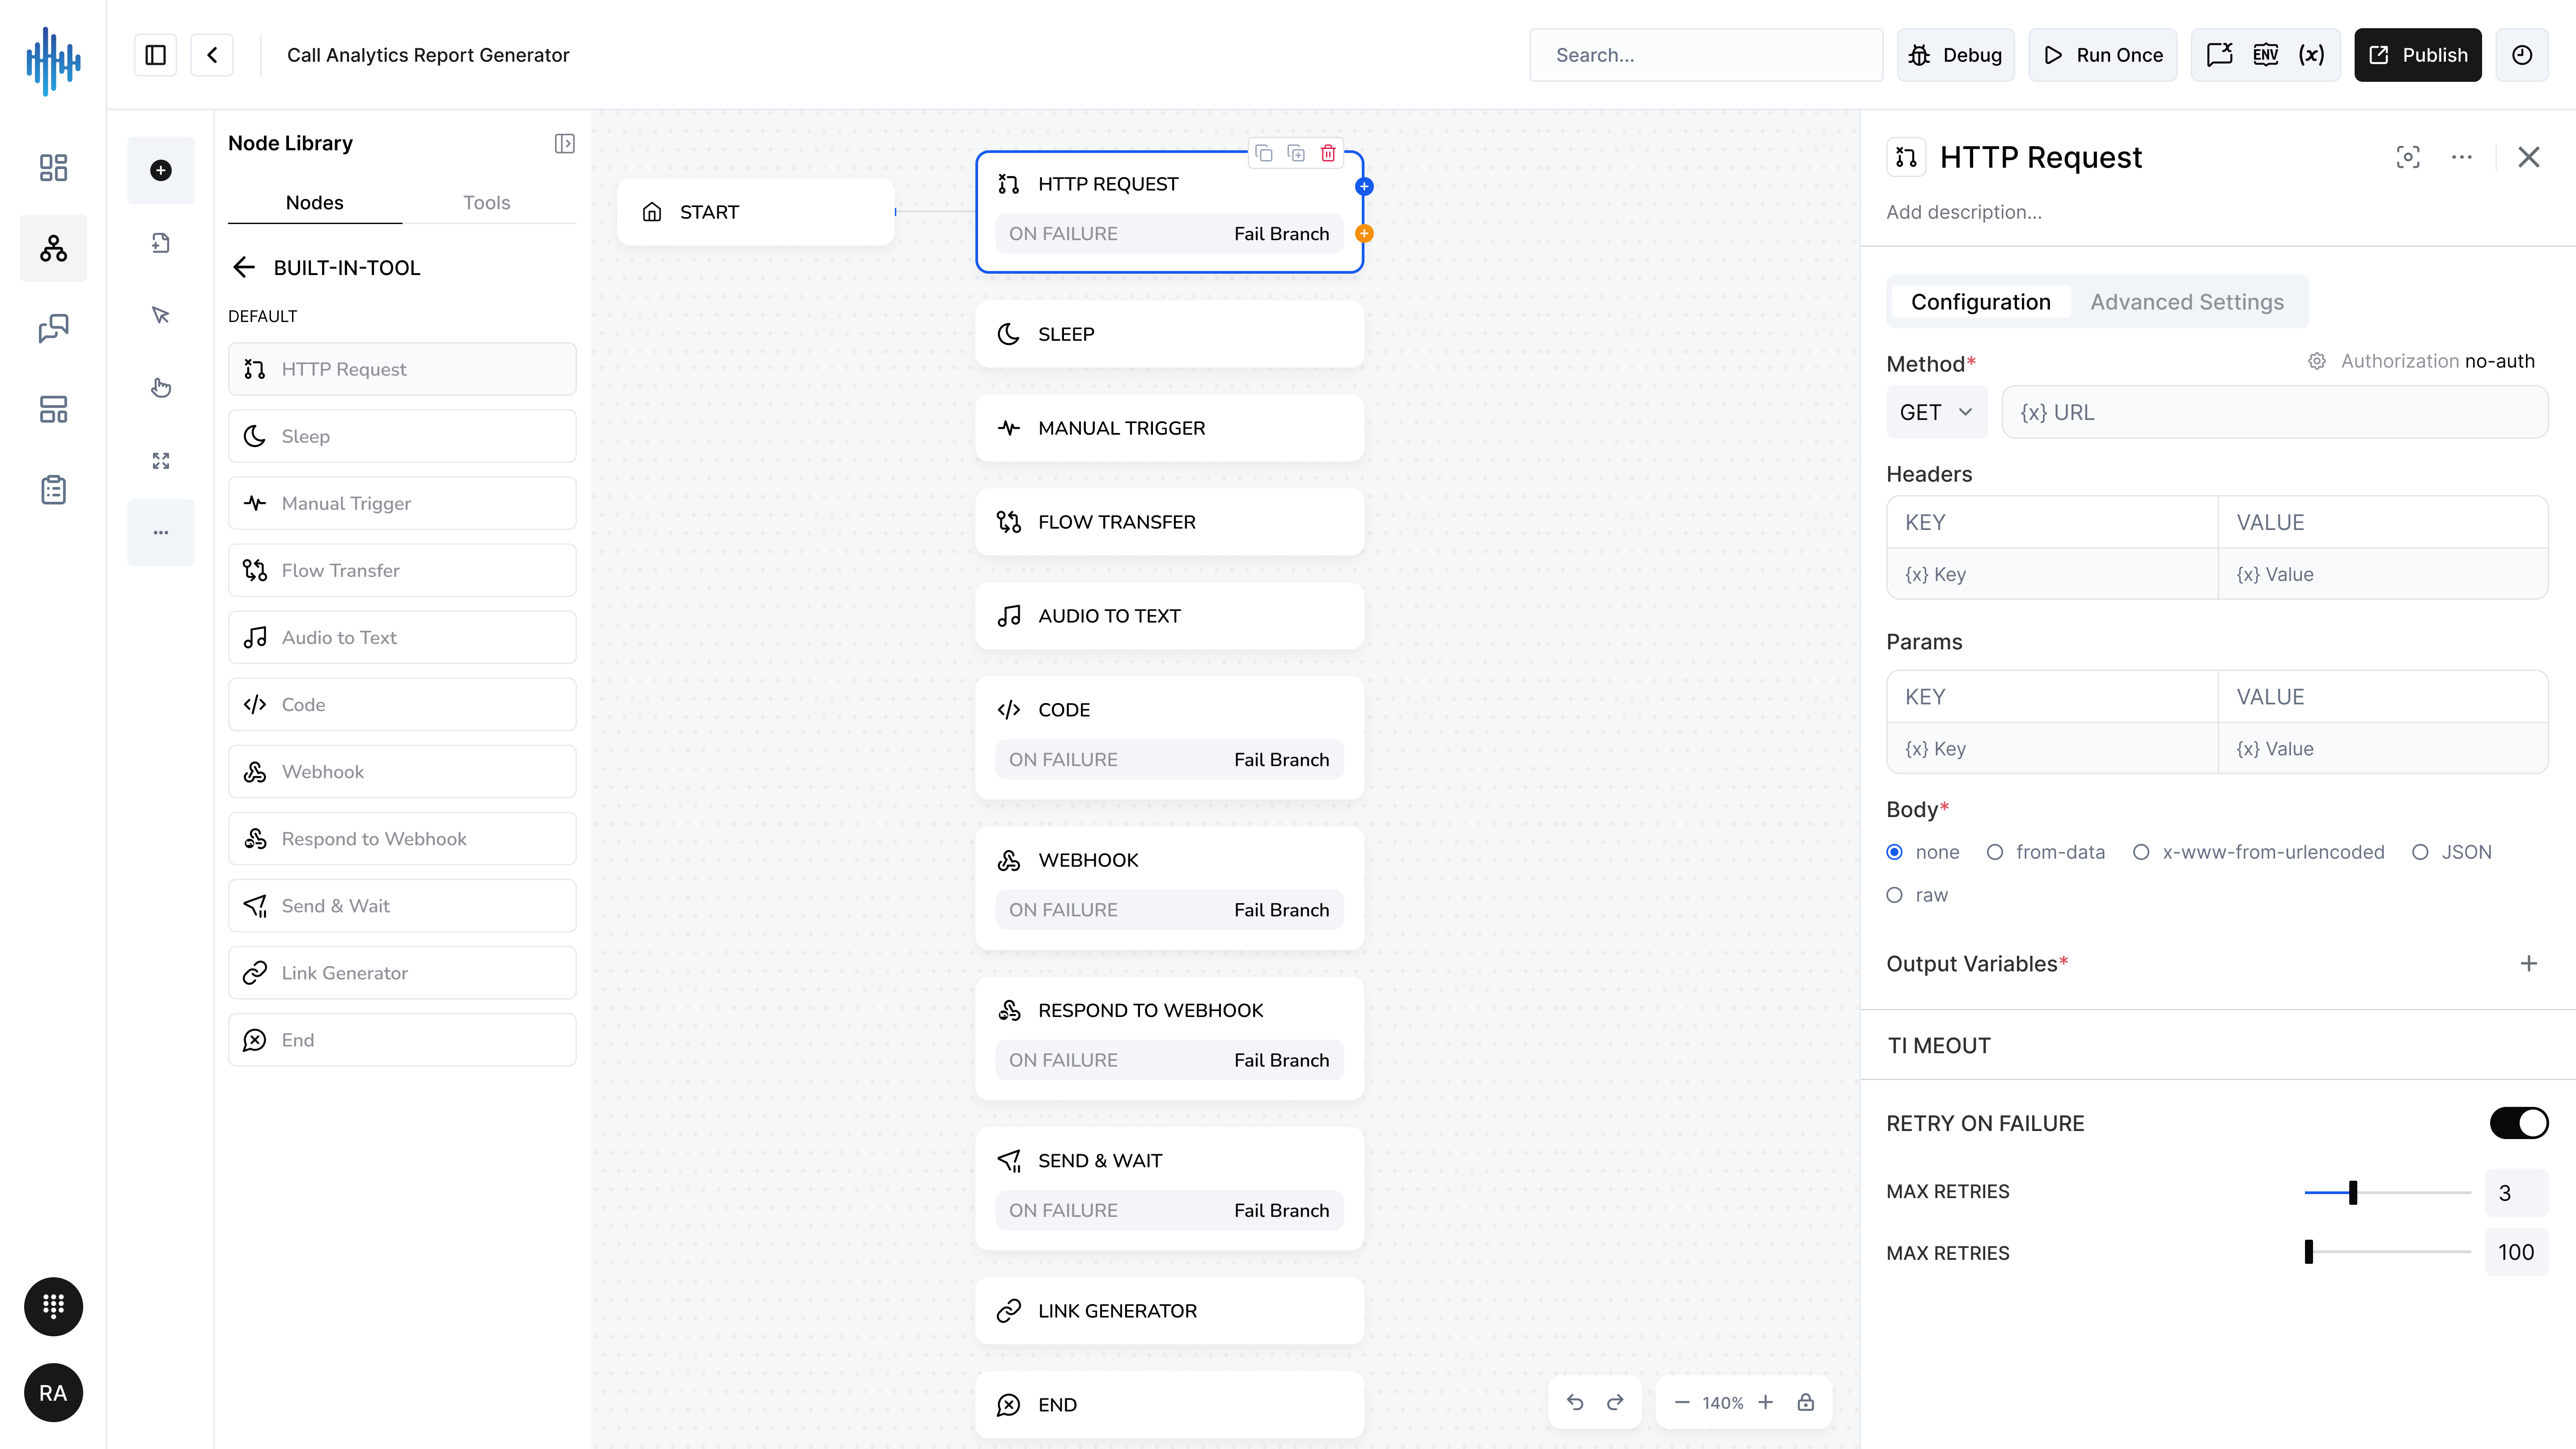
Purpose: Makes HTTP API calls to external services and processes responses.
When to Use:
- Call external APIs
- Fetch data from web services
- Send data to external systems
- Integrate with third-party services
- Webhook calls
Configuration Tab
Request Settings:
| Field | Description | Required |
|---|---|---|
| Method | HTTP method (GET, POST, PUT, DELETE, PATCH) | ✅ Yes |
| URL | API endpoint URL | ✅ Yes |
| Authorization | Authentication method (no-auth, API key, Bearer, etc.) | ❌ No |
| Headers | HTTP headers (Key-Value pairs) | ❌ No |
| Params | URL query parameters (Key-Value pairs) | ❌ No |
| Body | Request body content | ❌ No |
Body Types:
- none: No request body
- form-data: Form data format
- x-www-form-urlencoded: URL encoded format
- JSON: JSON payload
- raw: Raw text/data
Output Variables:
Map response data to variables for use in workflow.
Advanced Settings:
| Setting | Description | Default |
|---|---|---|
| TIMEOUT | Maximum wait time for response | 30s |
| RETRY ON FAILURE | Retry failed requests | Off |
| MAX RETRIES | Number of retry attempts | 3 |
| RETRY INTERVAL | Time between retries (ms) | 100 |
Setup Steps:
- Add HTTP Request node to workflow
- Select HTTP Method (GET, POST, etc.)
- Enter API URL
- Configure Authorization if needed
- Add Headers (Content-Type, etc.)
- Add Params for query string
- Configure Body if sending data
- Map Output Variables
- Configure retry settings in Advanced
Best Practices:
✅ DO:
- Set appropriate timeouts
- Enable retry for critical calls
- Validate responses
- Handle error cases
- Store API keys securely
❌ DON'T:
- Hardcode sensitive credentials
- Skip error handling
- Make unnecessary API calls
- Ignore rate limits
Common Use Cases:
Fetch User Data:
Method: GET
URL: https://api.example.com/users/{{user_id}}
Headers: Authorization: Bearer {{api_key}}
Send Notification:
Method: POST
URL: https://api.example.com/notify
Body (JSON):
{
  "message": "{{notification_text}}",
  "user": "{{user_id}}"
}
Sleep Node
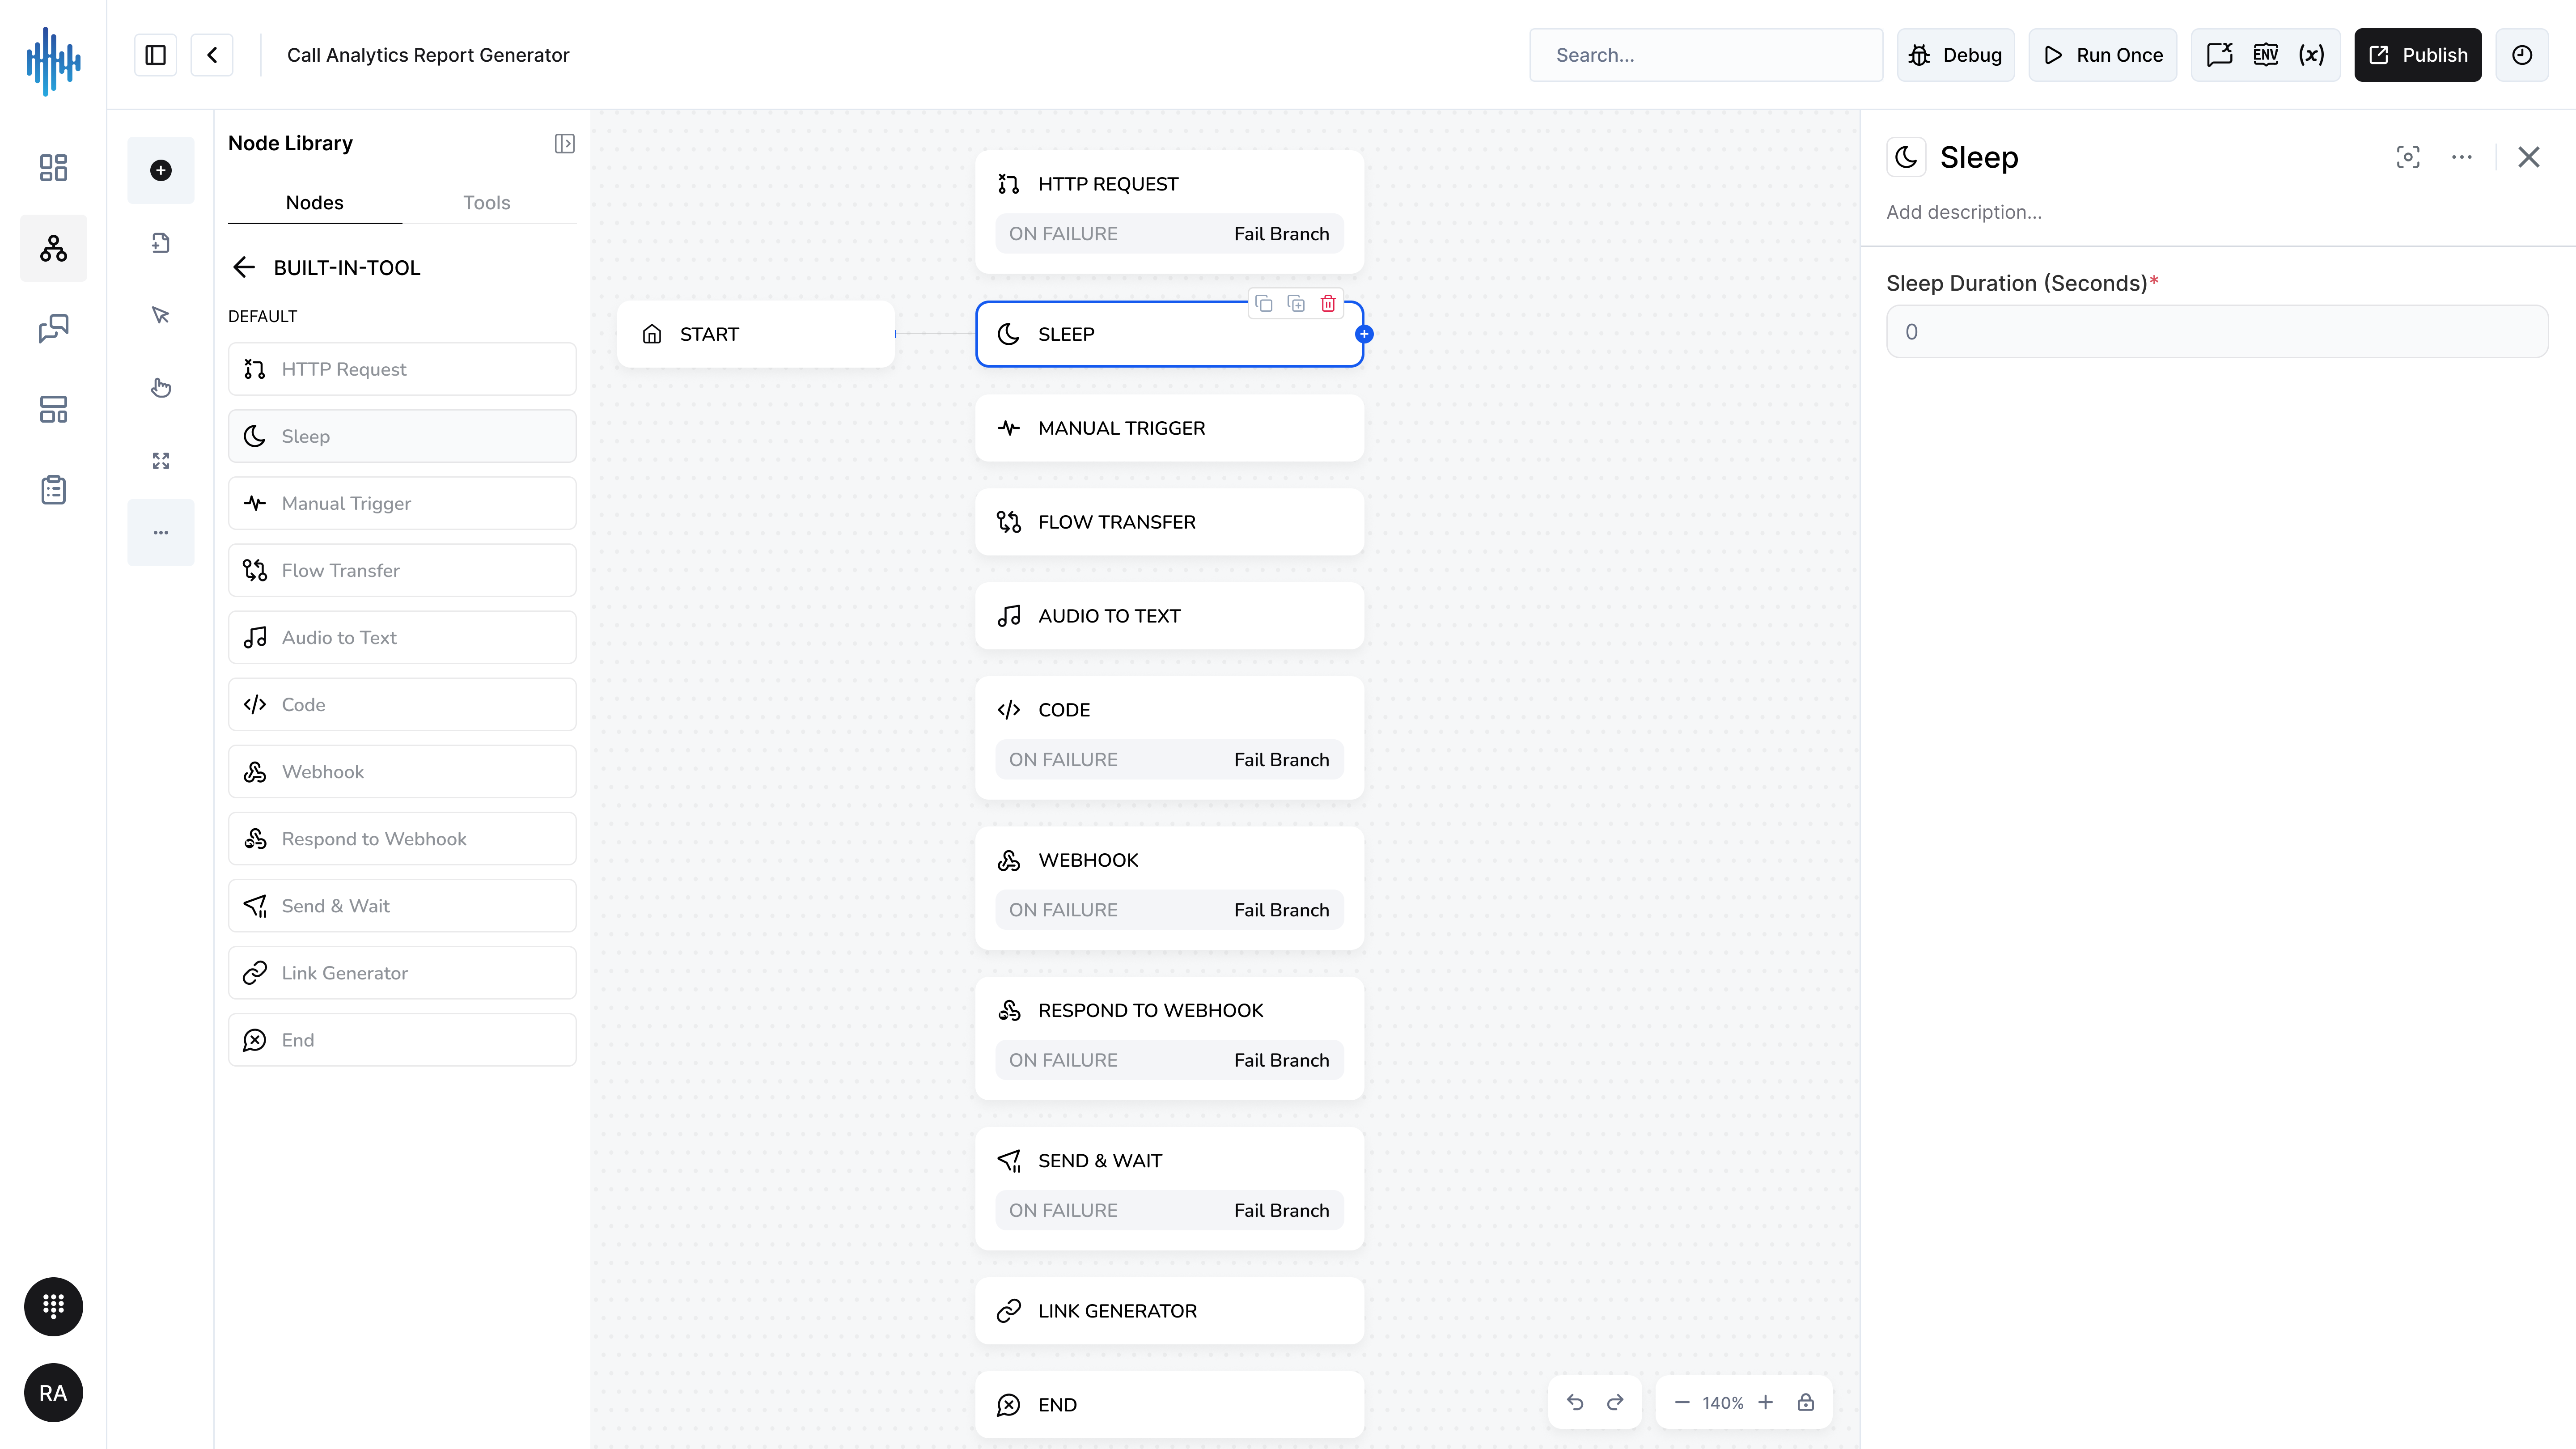
Purpose: Pauses workflow execution for a specified duration.
When to Use:
- Wait for external processes
- Add delays between actions
- Throttle API calls
- Implement retry delays
- Wait for user actions
Configuration Settings:
| Field | Description | Required |
|---|---|---|
| Sleep Duration (Seconds) | Time to pause in seconds | ✅ Yes |
Setup Steps:
- Add Sleep node to workflow
- Enter duration in seconds
- Connect to previous and next nodes
- Workflow pauses before continuing
Best Practices:
✅ DO:
- Use for necessary delays only
- Keep delays reasonable (under 60 seconds)
- Document why delay is needed
- Consider user experience
❌ DON'T:
- Use long delays in user-facing flows
- Replace with sleep when polling is needed
- Block critical workflows
Common Use Cases:
API Rate Limiting:
HTTP Request
↓
Sleep (2 seconds)
↓
Another HTTP Request
Retry Delay:
API Call Failed
↓
Sleep (5 seconds)
↓
Retry API Call
Manual Trigger Node
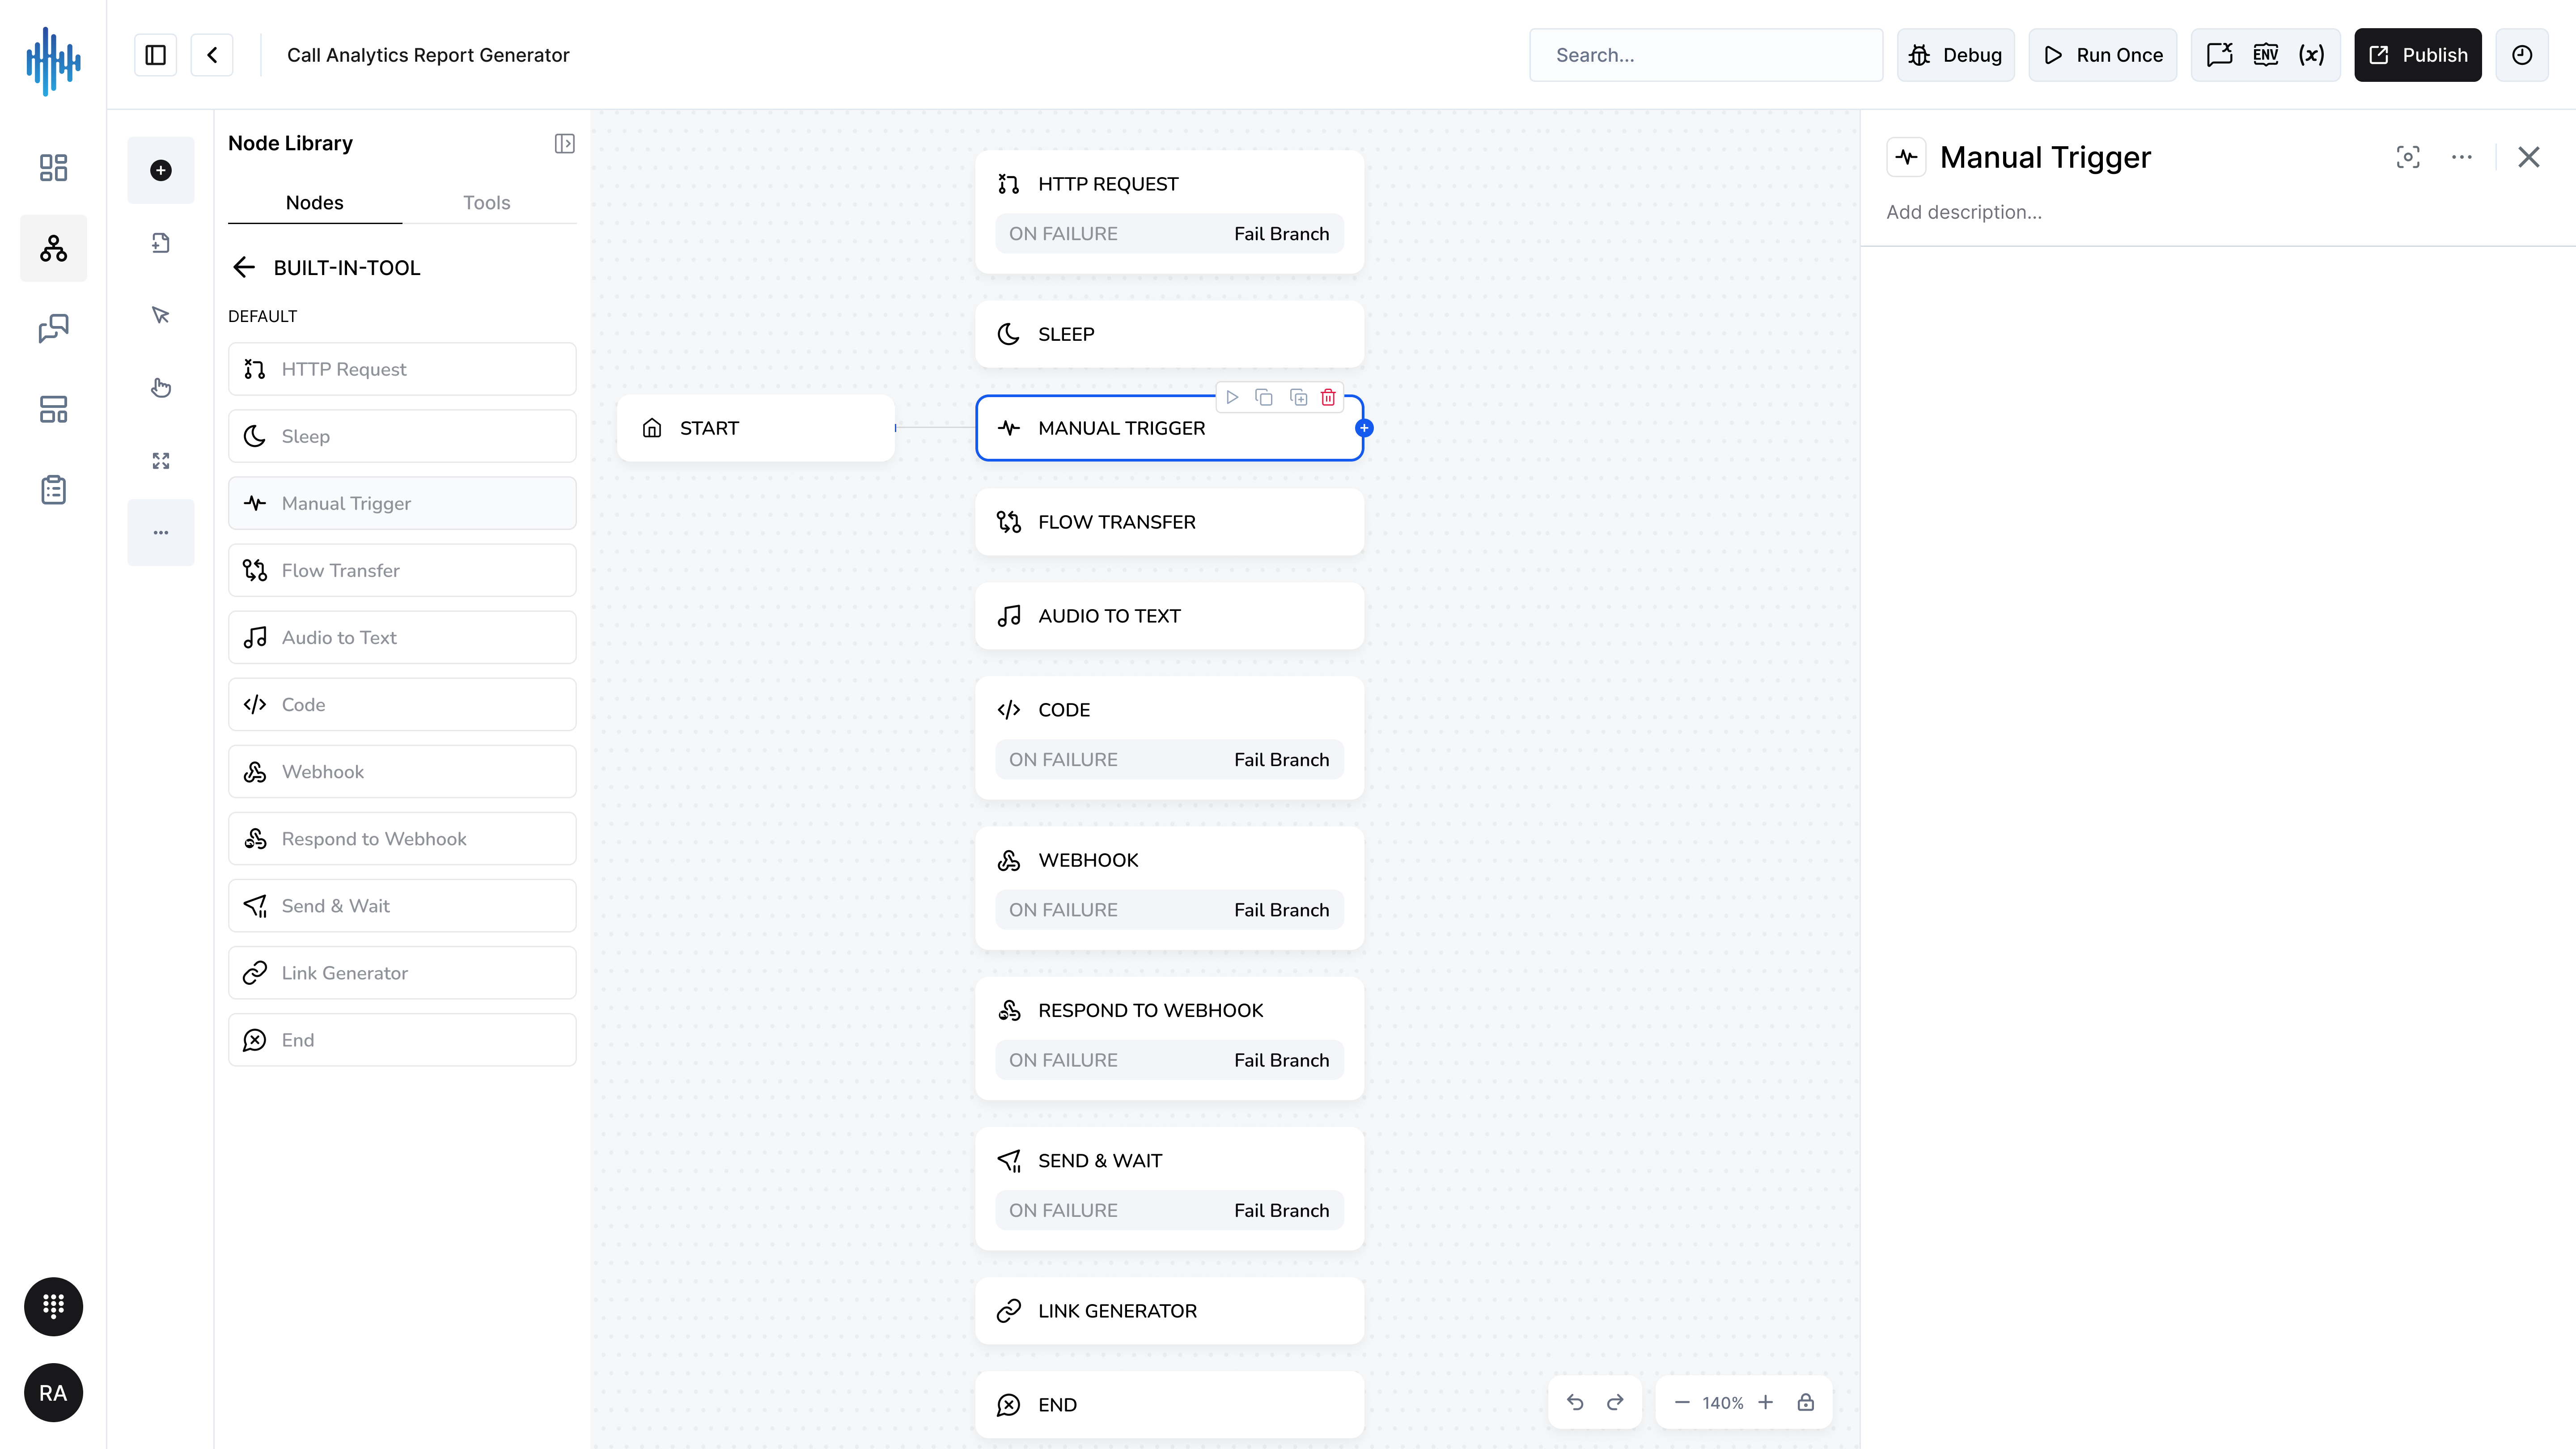
Purpose: Requires manual action to continue workflow execution, useful for testing and approval workflows.
When to Use:
- Test workflows step-by-step
- Require human approval
- Debug workflow execution
- Pause for manual intervention
- Approval gates
Configuration:
No configuration needed. Workflow pauses until manually triggered.
Setup Steps:
- Add Manual Trigger node where pause is needed
- Run workflow
- Workflow stops at this node
- Manually trigger to continue execution
Best Practices:
✅ DO:
- Use for testing and debugging
- Document approval requirements
- Remove from production if not needed
- Set up notifications for approvers
❌ DON'T:
- Leave in automated production flows
- Use as permanent solution without reason
- Forget to trigger during testing
Common Use Cases:
Approval Workflow:
Submit Request
↓
Manual Trigger (Manager Approval)
↓
Process Approved Request
Testing:
Step 1
↓
Manual Trigger (Verify Step 1)
↓
Step 2
↓
Manual Trigger (Verify Step 2)
Flow Transfer Node
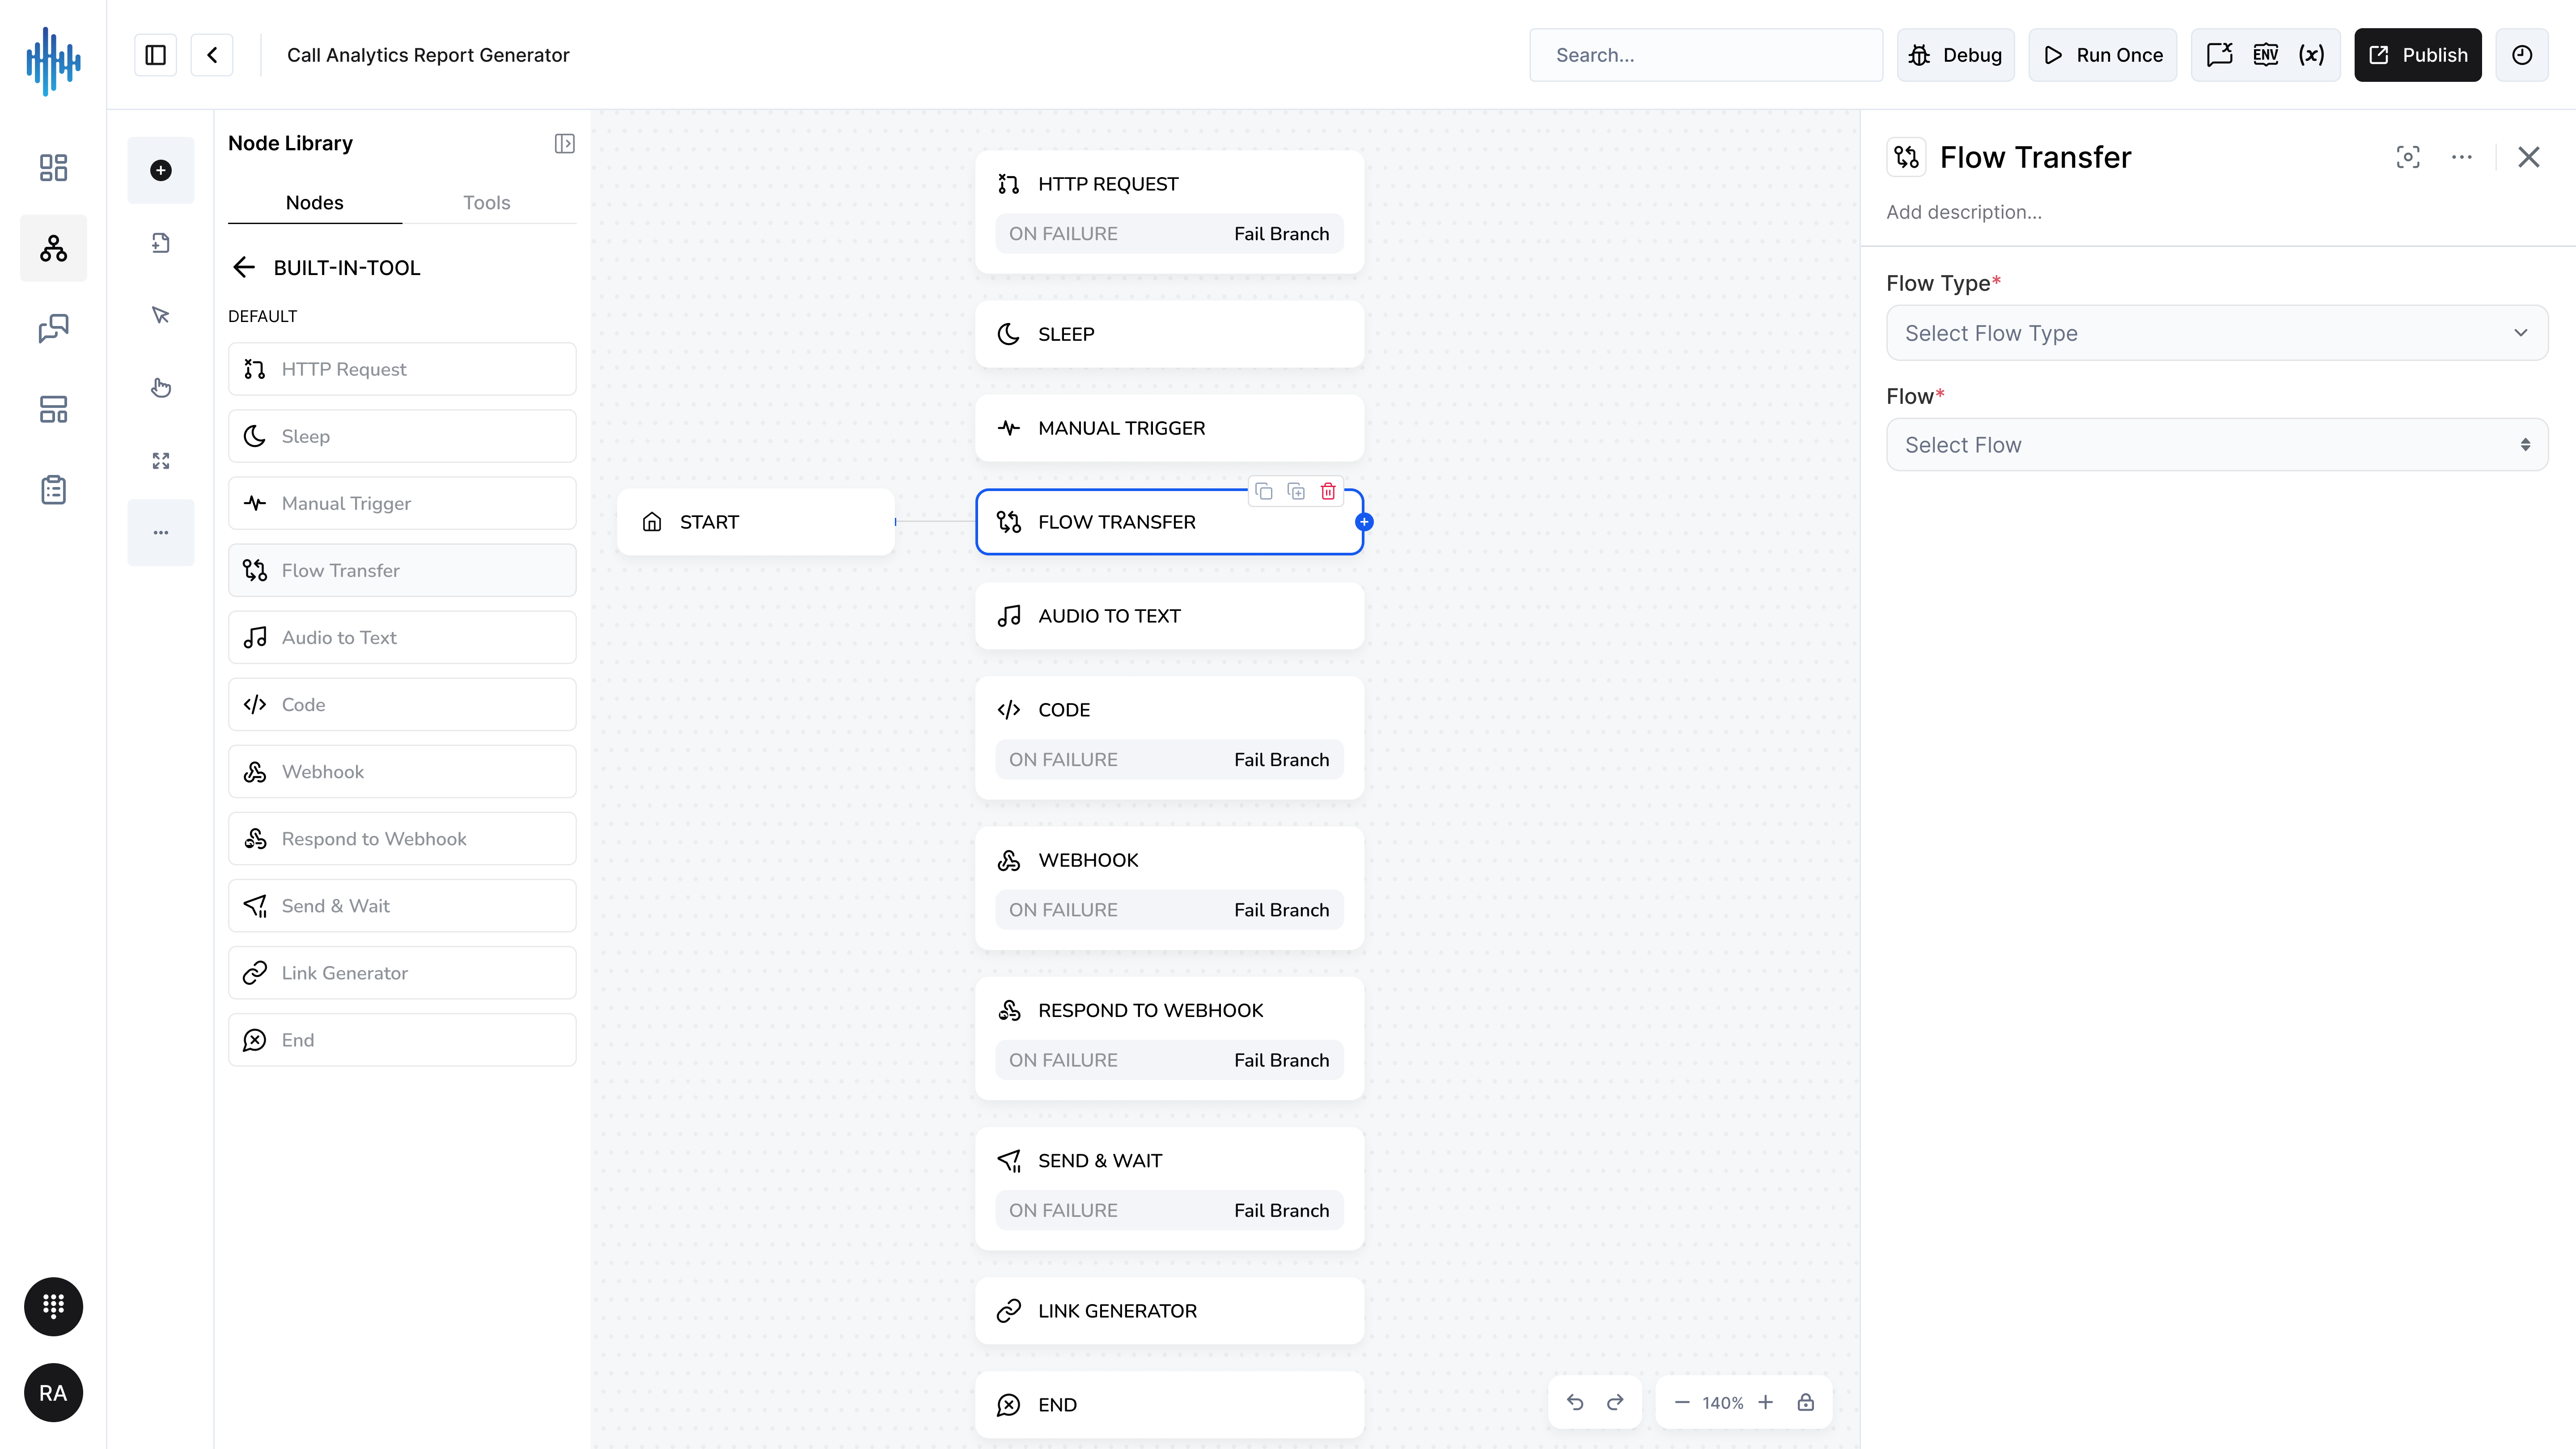
Purpose: Transfers execution to another workflow, enabling modular workflow design.
When to Use:
- Call reusable workflows
- Modularize complex workflows
- Share common logic
- Organize workflows by function
- Create sub-workflows
Configuration Settings:
| Field | Description | Required |
|---|---|---|
| Flow Type | Type of workflow to call | ✅ Yes |
| Flow | Specific workflow to transfer to | ✅ Yes |
Setup Steps:
- Add Flow Transfer node to workflow
- Select Flow Type from dropdown
- Select target Flow from dropdown
- Execution transfers to selected workflow
- Can return or end in transferred workflow
Best Practices:
✅ DO:
- Create reusable workflows
- Name workflows clearly
- Document workflow relationships
- Test transfer logic
❌ DON'T:
- Create circular transfers
- Transfer unnecessarily
- Lose track of execution flow
Common Use Cases:
Reusable Validation:
Main Workflow
↓
Flow Transfer → Validation Workflow
↓
Return to Main Workflow
Module Organization:
Entry Point Workflow
↓
Flow Transfer → Processing Workflow
↓
Flow Transfer → Notification Workflow
Audio To Text Node
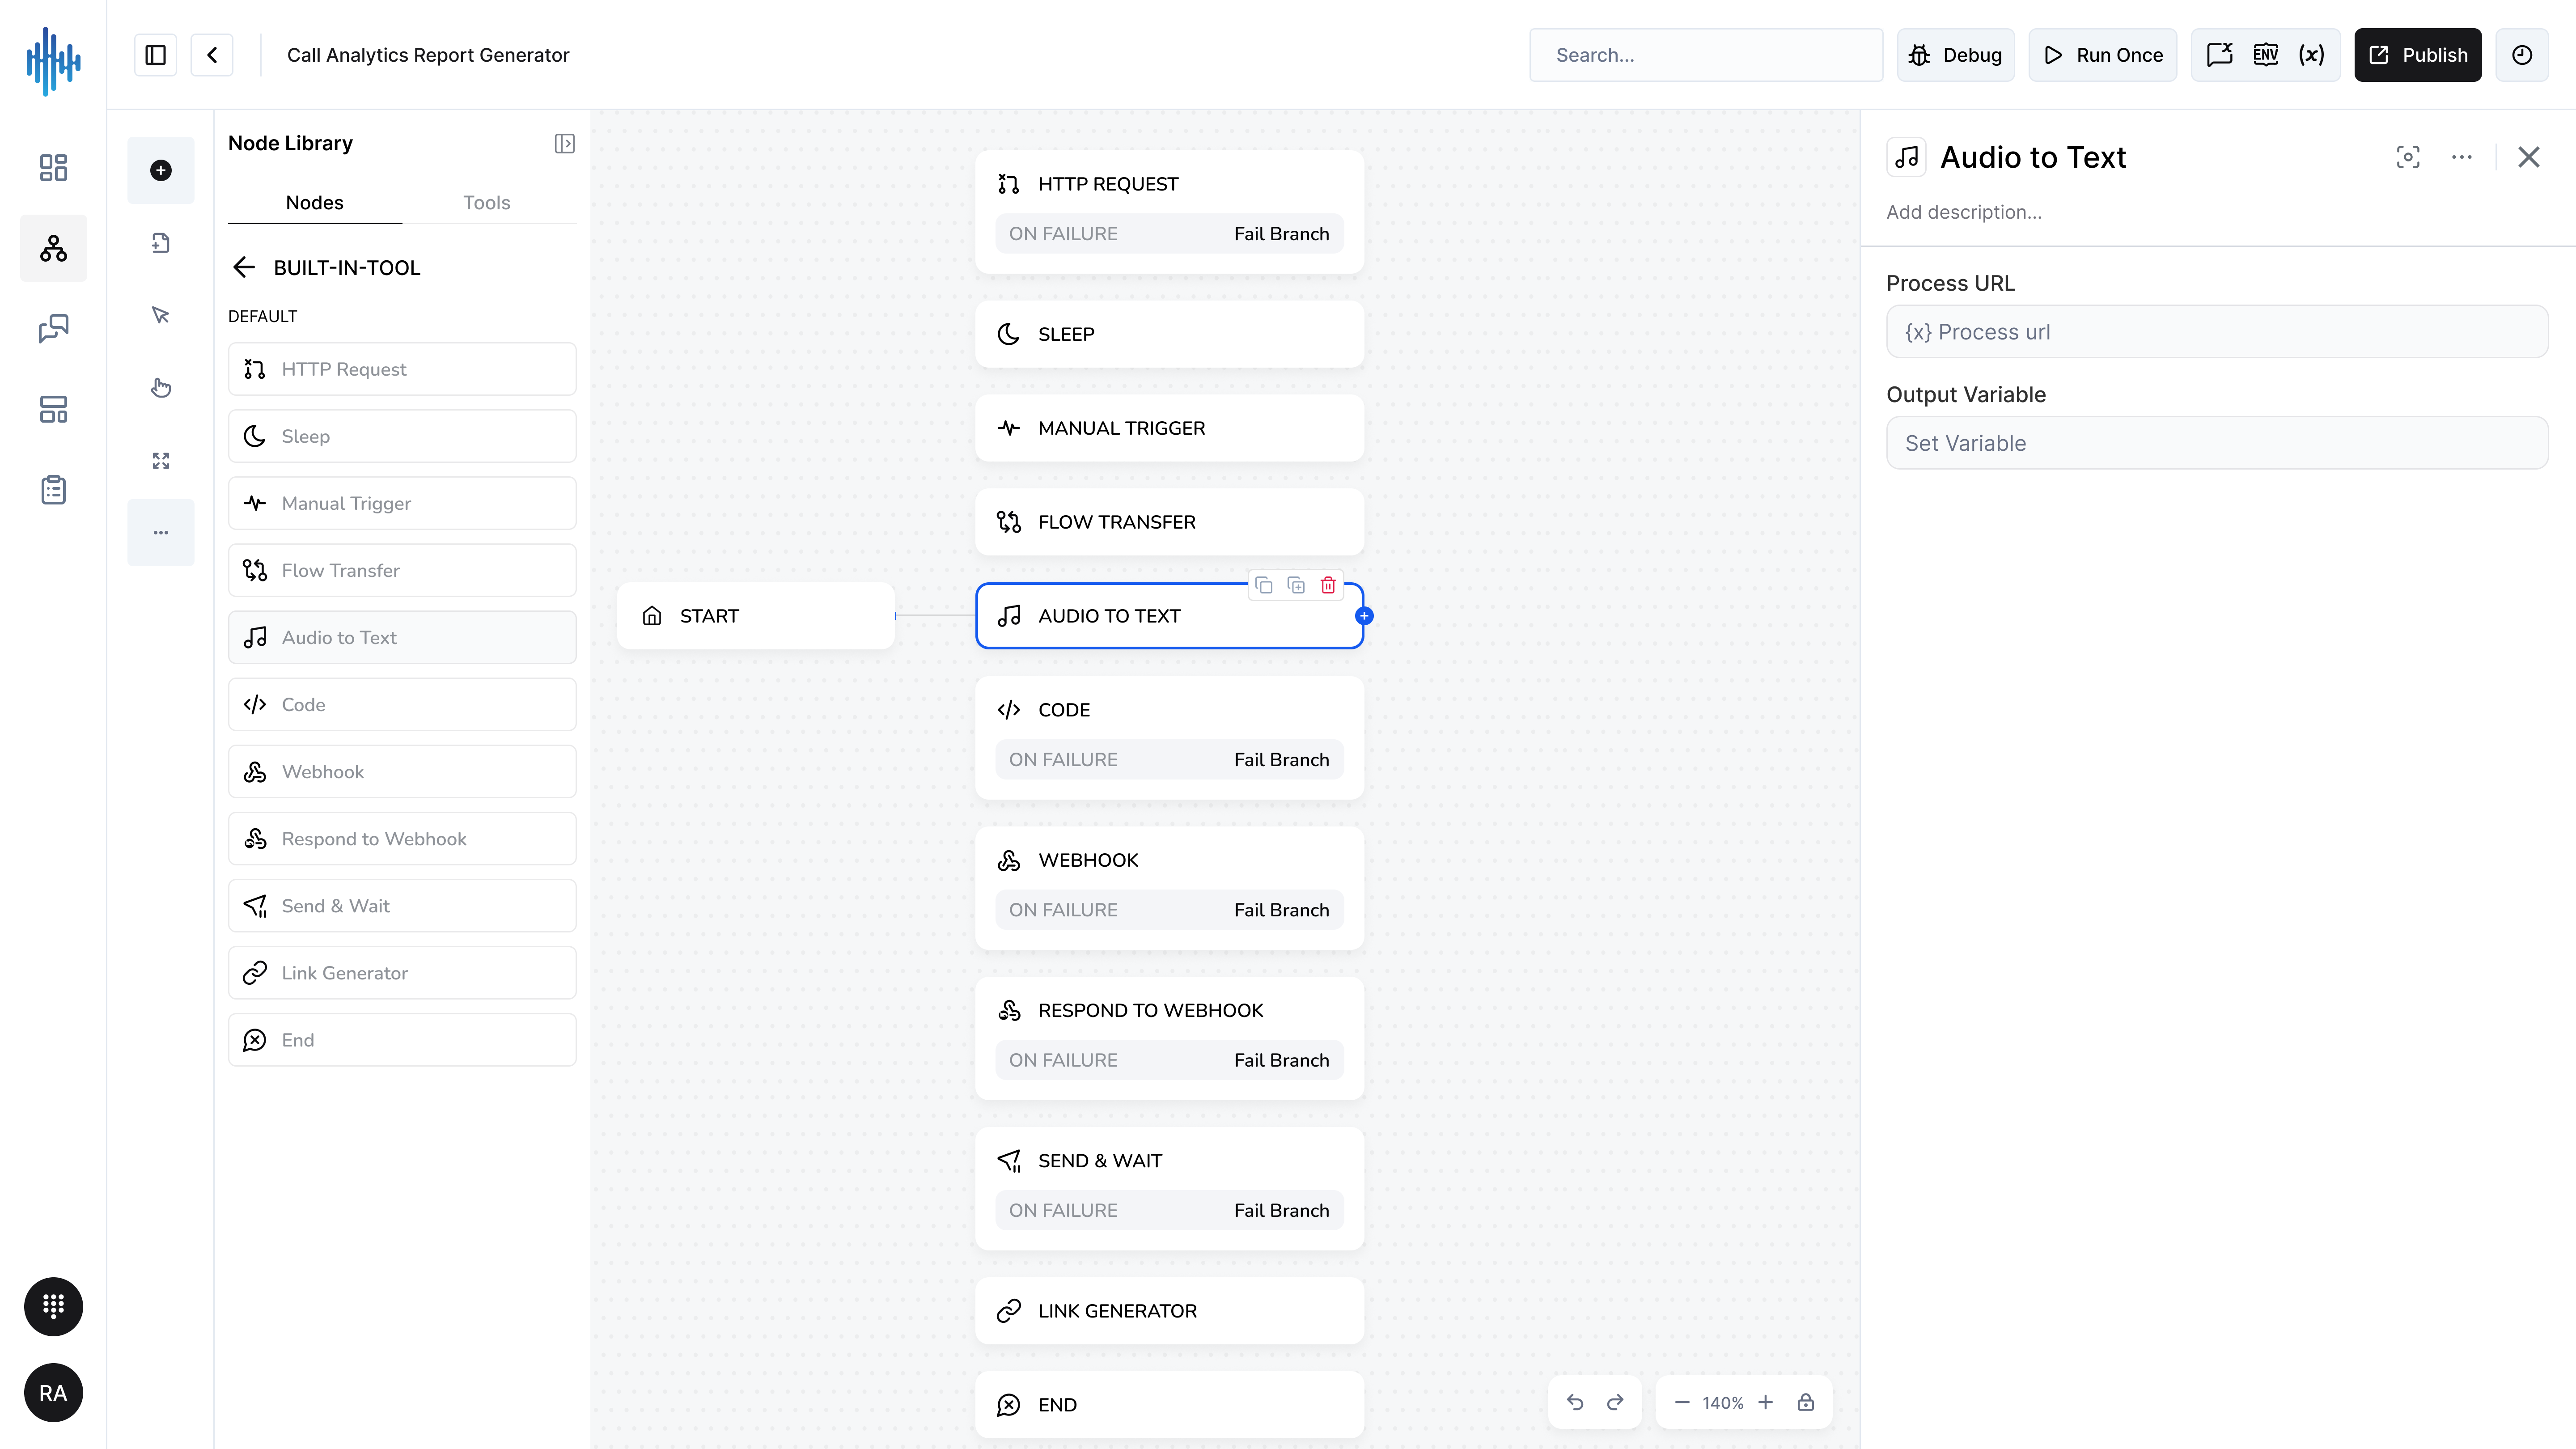
Purpose: Converts audio files to text using speech-to-text technology.
When to Use:
- Transcribe voice messages
- Process audio inputs
- Convert voice to text for analysis
- Enable voice-based workflows
Configuration Settings:
| Field | Description | Required |
|---|---|---|
| Process URL | URL of audio file to transcribe | ✅ Yes |
| Output Variable | Variable to store transcribed text | ❌ No |
Setup Steps:
- Add Audio To Text node to workflow
- Enter Process URL (audio file URL or variable)
- Set Output Variable to store result
- Audio is transcribed and stored in variable
Supported Audio Formats:
- MP3
- WAV
- OGG
- Other common audio formats
Best Practices:
✅ DO:
- Use clear audio recordings
- Check audio quality
- Handle transcription errors
- Store results for reference
❌ DON'T:
- Process very long audio files
- Skip error handling
- Assume 100% accuracy
Common Use Cases:
Voice Message Processing:
Receive Voice Message
↓
Audio To Text (transcribe)
↓
AI Agent (analyze text)
↓
Respond
Code Node
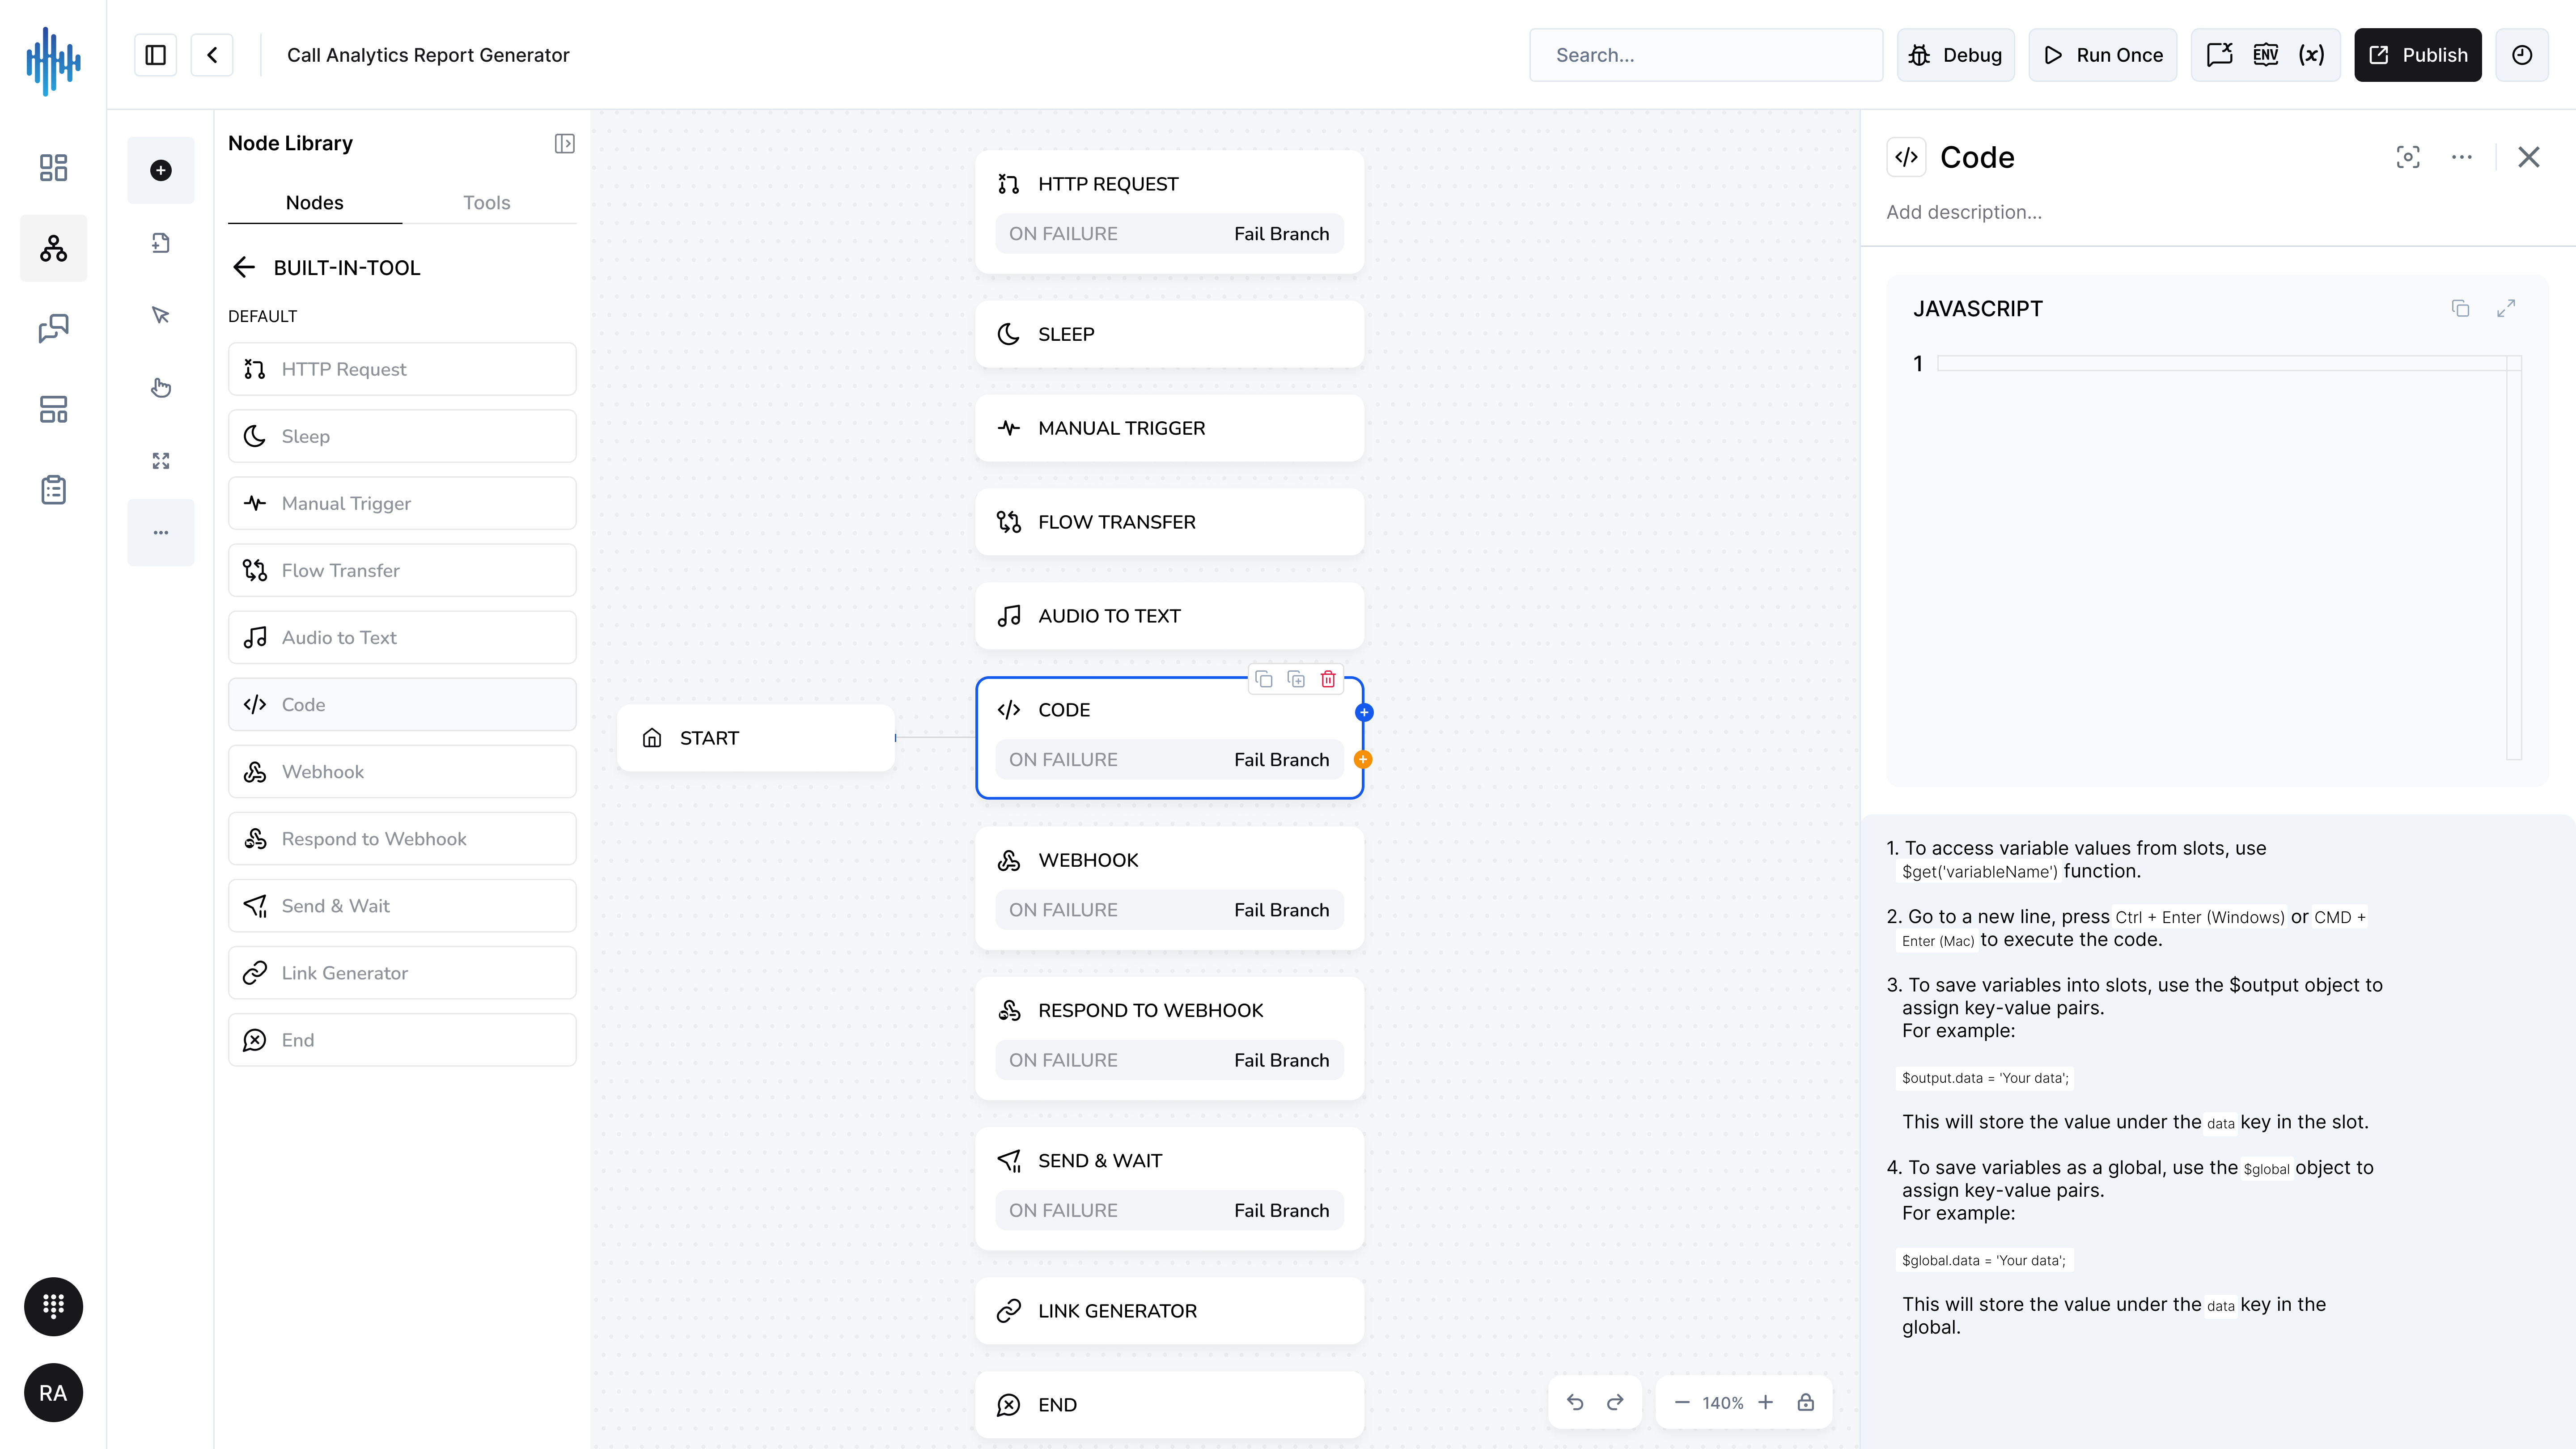
Purpose: Execute custom JavaScript code for advanced data processing and transformations.
When to Use:
- Complex data transformations
- Custom calculations
- Advanced logic not available in other nodes
- Data parsing and formatting
- Custom integrations
Configuration:
JavaScript Code Editor:
Write JavaScript code with access to:
- Workflow variables via
{{ }}syntax - Standard JavaScript functions
- JSON parsing and manipulation
- Math operations
- String operations
Built-in Instructions:
- Access variable values using
{{ }}syntax - Parse JSON with
JSON.parse() - Save results to
$outputobject:$output.data = 'value'
Example:
// Access variable values
$output.data = 'Your data';

// This stores the value under the 'data' key
Setup Steps:
- Add Code node to workflow
- Write JavaScript in editor
- Access variables with
{{variable_name}} - Store results in
$outputobject - Use
$outputvalues in subsequent nodes
Best Practices:
✅ DO:
- Keep code simple and readable
- Add comments
- Handle errors with try/catch
- Test thoroughly
- Use for complex logic only
❌ DON'T:
- Write overly complex code
- Skip error handling
- Use when simpler nodes suffice
- Forget to save to
$output
Common Use Cases:
Parse JSON:
const data = JSON.parse('{{api_response}}');
$output.name = data.user.name;
$output.email = data.user.email;
Calculate Total:
const subtotal = parseFloat('{{subtotal}}');
const tax = subtotal * 0.08;
const total = subtotal + tax;

$output.tax = tax.toFixed(2);
$output.total = total.toFixed(2);
Format Date:
const date = new Date('{{timestamp}}');
$output.formatted_date = date.toLocaleDateString();
$output.formatted_time = date.toLocaleTimeString();
Link Generator Node
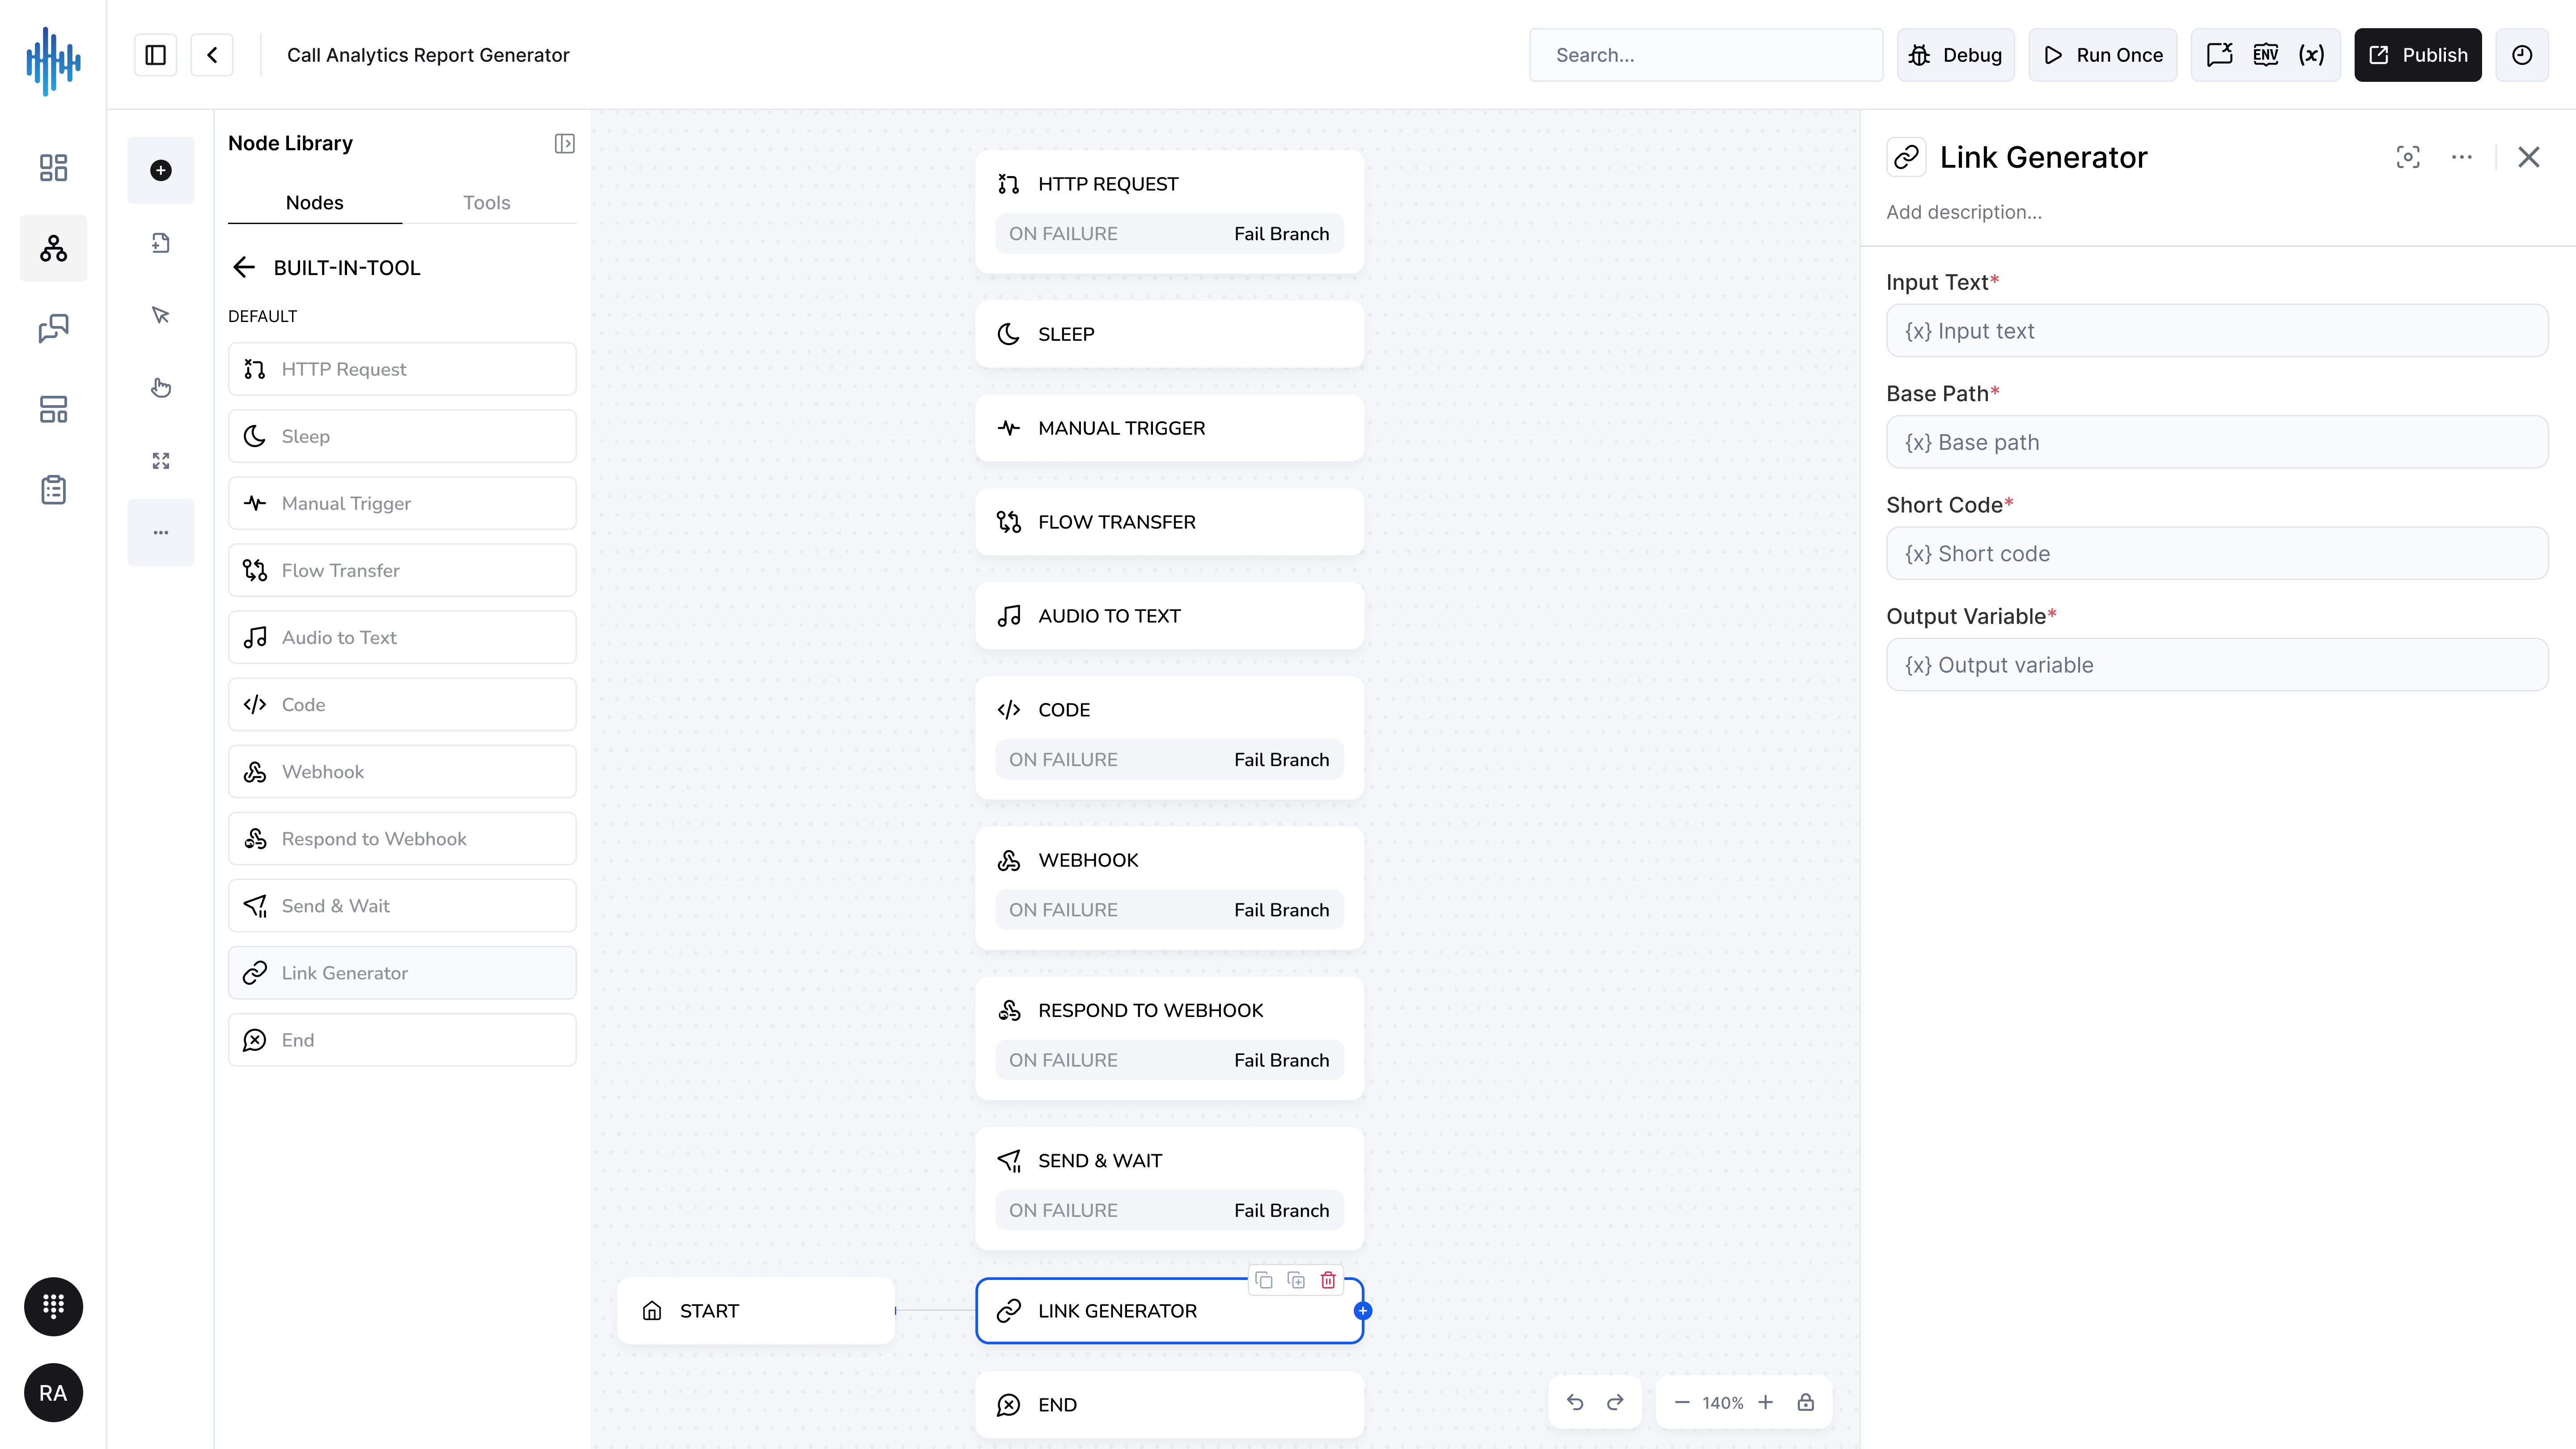
Purpose: Creates shortened URLs or tracked links from long URLs.
When to Use:
- Shorten long URLs
- Create trackable links
- Generate branded links
- Simplify URL sharing
Configuration Settings:
| Field | Description | Required |
|---|---|---|
| Input Text | Long URL to shorten | ✅ Yes |
| Base Path | Base URL for short link | ❌ No |
| Short Code | Custom short code | ❌ No |
| Output Variable | Variable to store shortened URL | ✅ Yes |
Setup Steps:
- Add Link Generator node to workflow
- Enter long URL in Input Text
- Set Base Path if using custom domain
- Set Short Code for custom short URL
- Set Output Variable to store result
Best Practices:
✅ DO:
- Use descriptive short codes
- Track link clicks
- Use HTTPS
- Test generated links
❌ DON'T:
- Create duplicate short codes
- Use special characters in codes
- Forget to set output variable
Common Use Cases:
Shorten Long URL:
Input: https://example.com/very/long/path/to/content?param1=value¶m2=value
Output: https://short.link/abc123
Branded Link:
Base Path: https://yourbrand.com
Short Code: summer-sale
Output: https://yourbrand.com/summer-sale
End Node
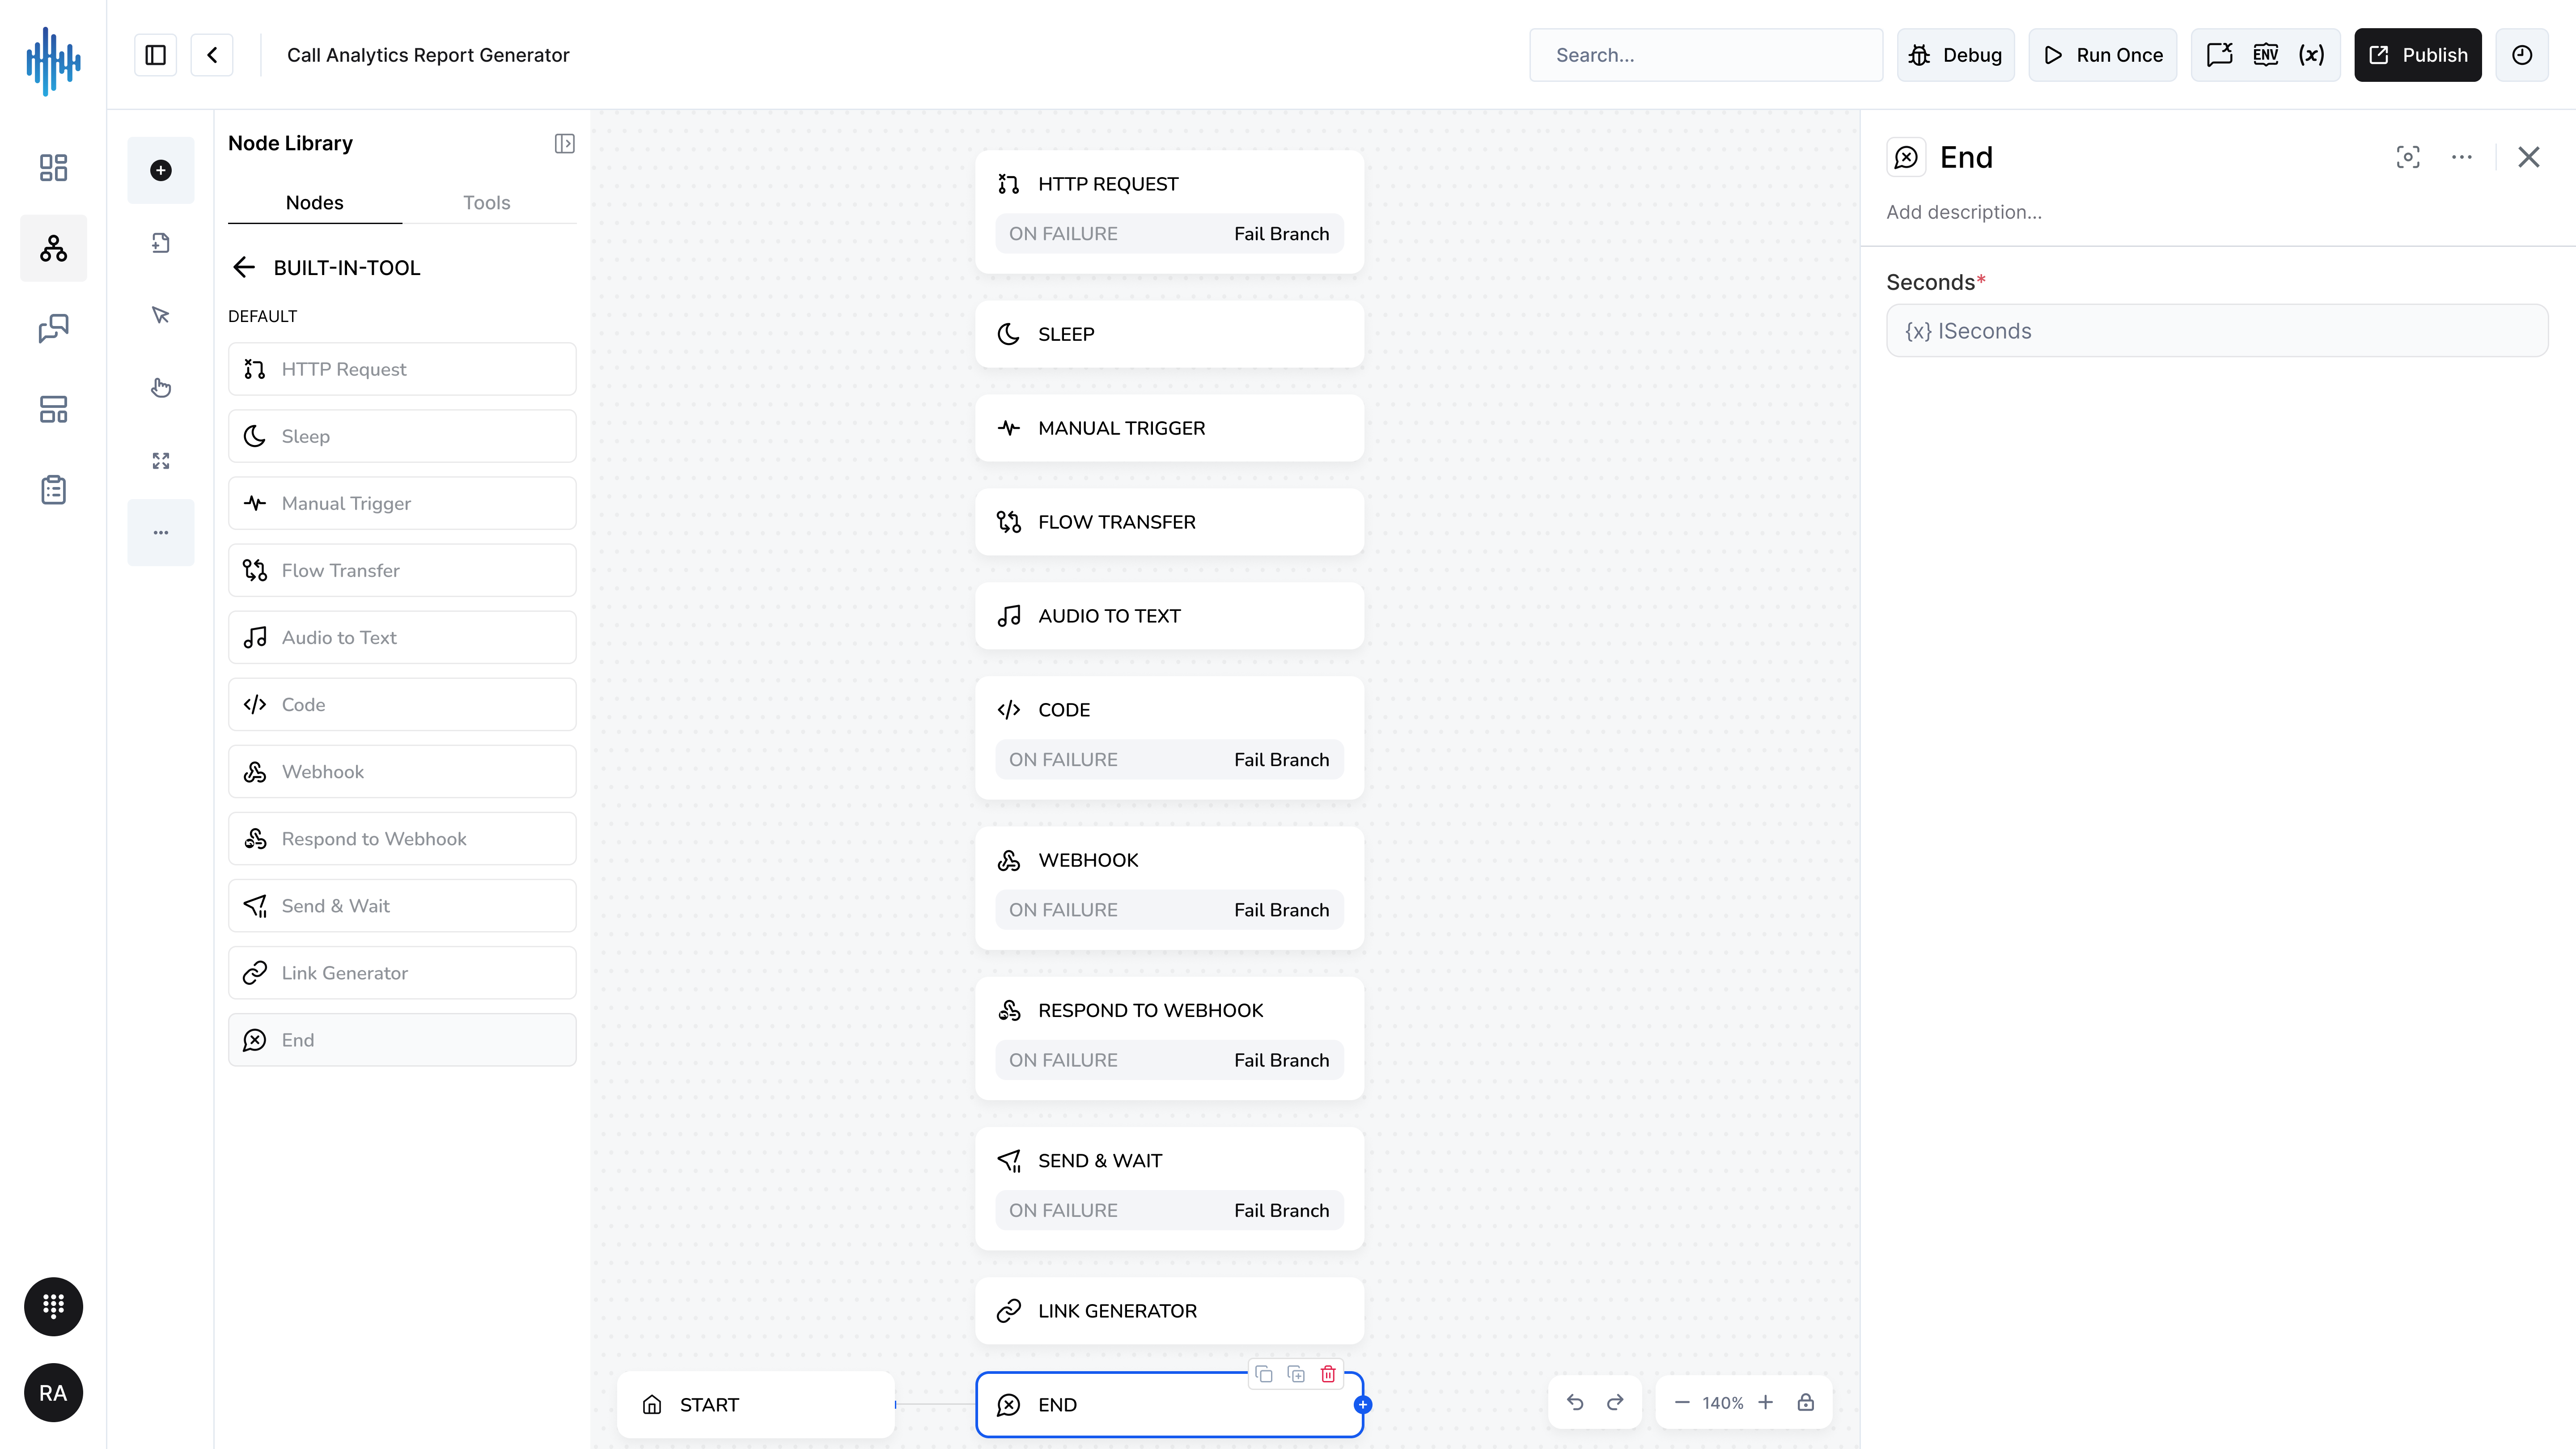
Purpose: Terminates workflow execution after a specified delay.
When to Use:
- Gracefully end workflows
- Close conversations after resolution
- Add delay before ending
- Clean up workflow
Configuration Settings:
| Field | Description | Required |
|---|---|---|
| Seconds | Delay before ending (in seconds) | ✅ Yes |
Setup Steps:
- Add End node where workflow should terminate
- Set delay in Seconds field
- Workflow ends after delay
Best Practices:
✅ DO:
- Use at logical endpoints
- Add brief delay for final messages
- Clean up before ending
❌ DON'T:
- End workflows abruptly
- Use long delays before ending
- Leave workflows hanging
Common Use Cases:
Graceful Closure:
Send Thank You Message
↓
End (5 seconds delay)
Quick End:
Complete Transaction
↓
End (0 seconds)
🔄 Loop
Quick Jump: ↑ Top | ← Built-in Tools
Iterate over data, repeat actions, and control loop execution.
Loop Node
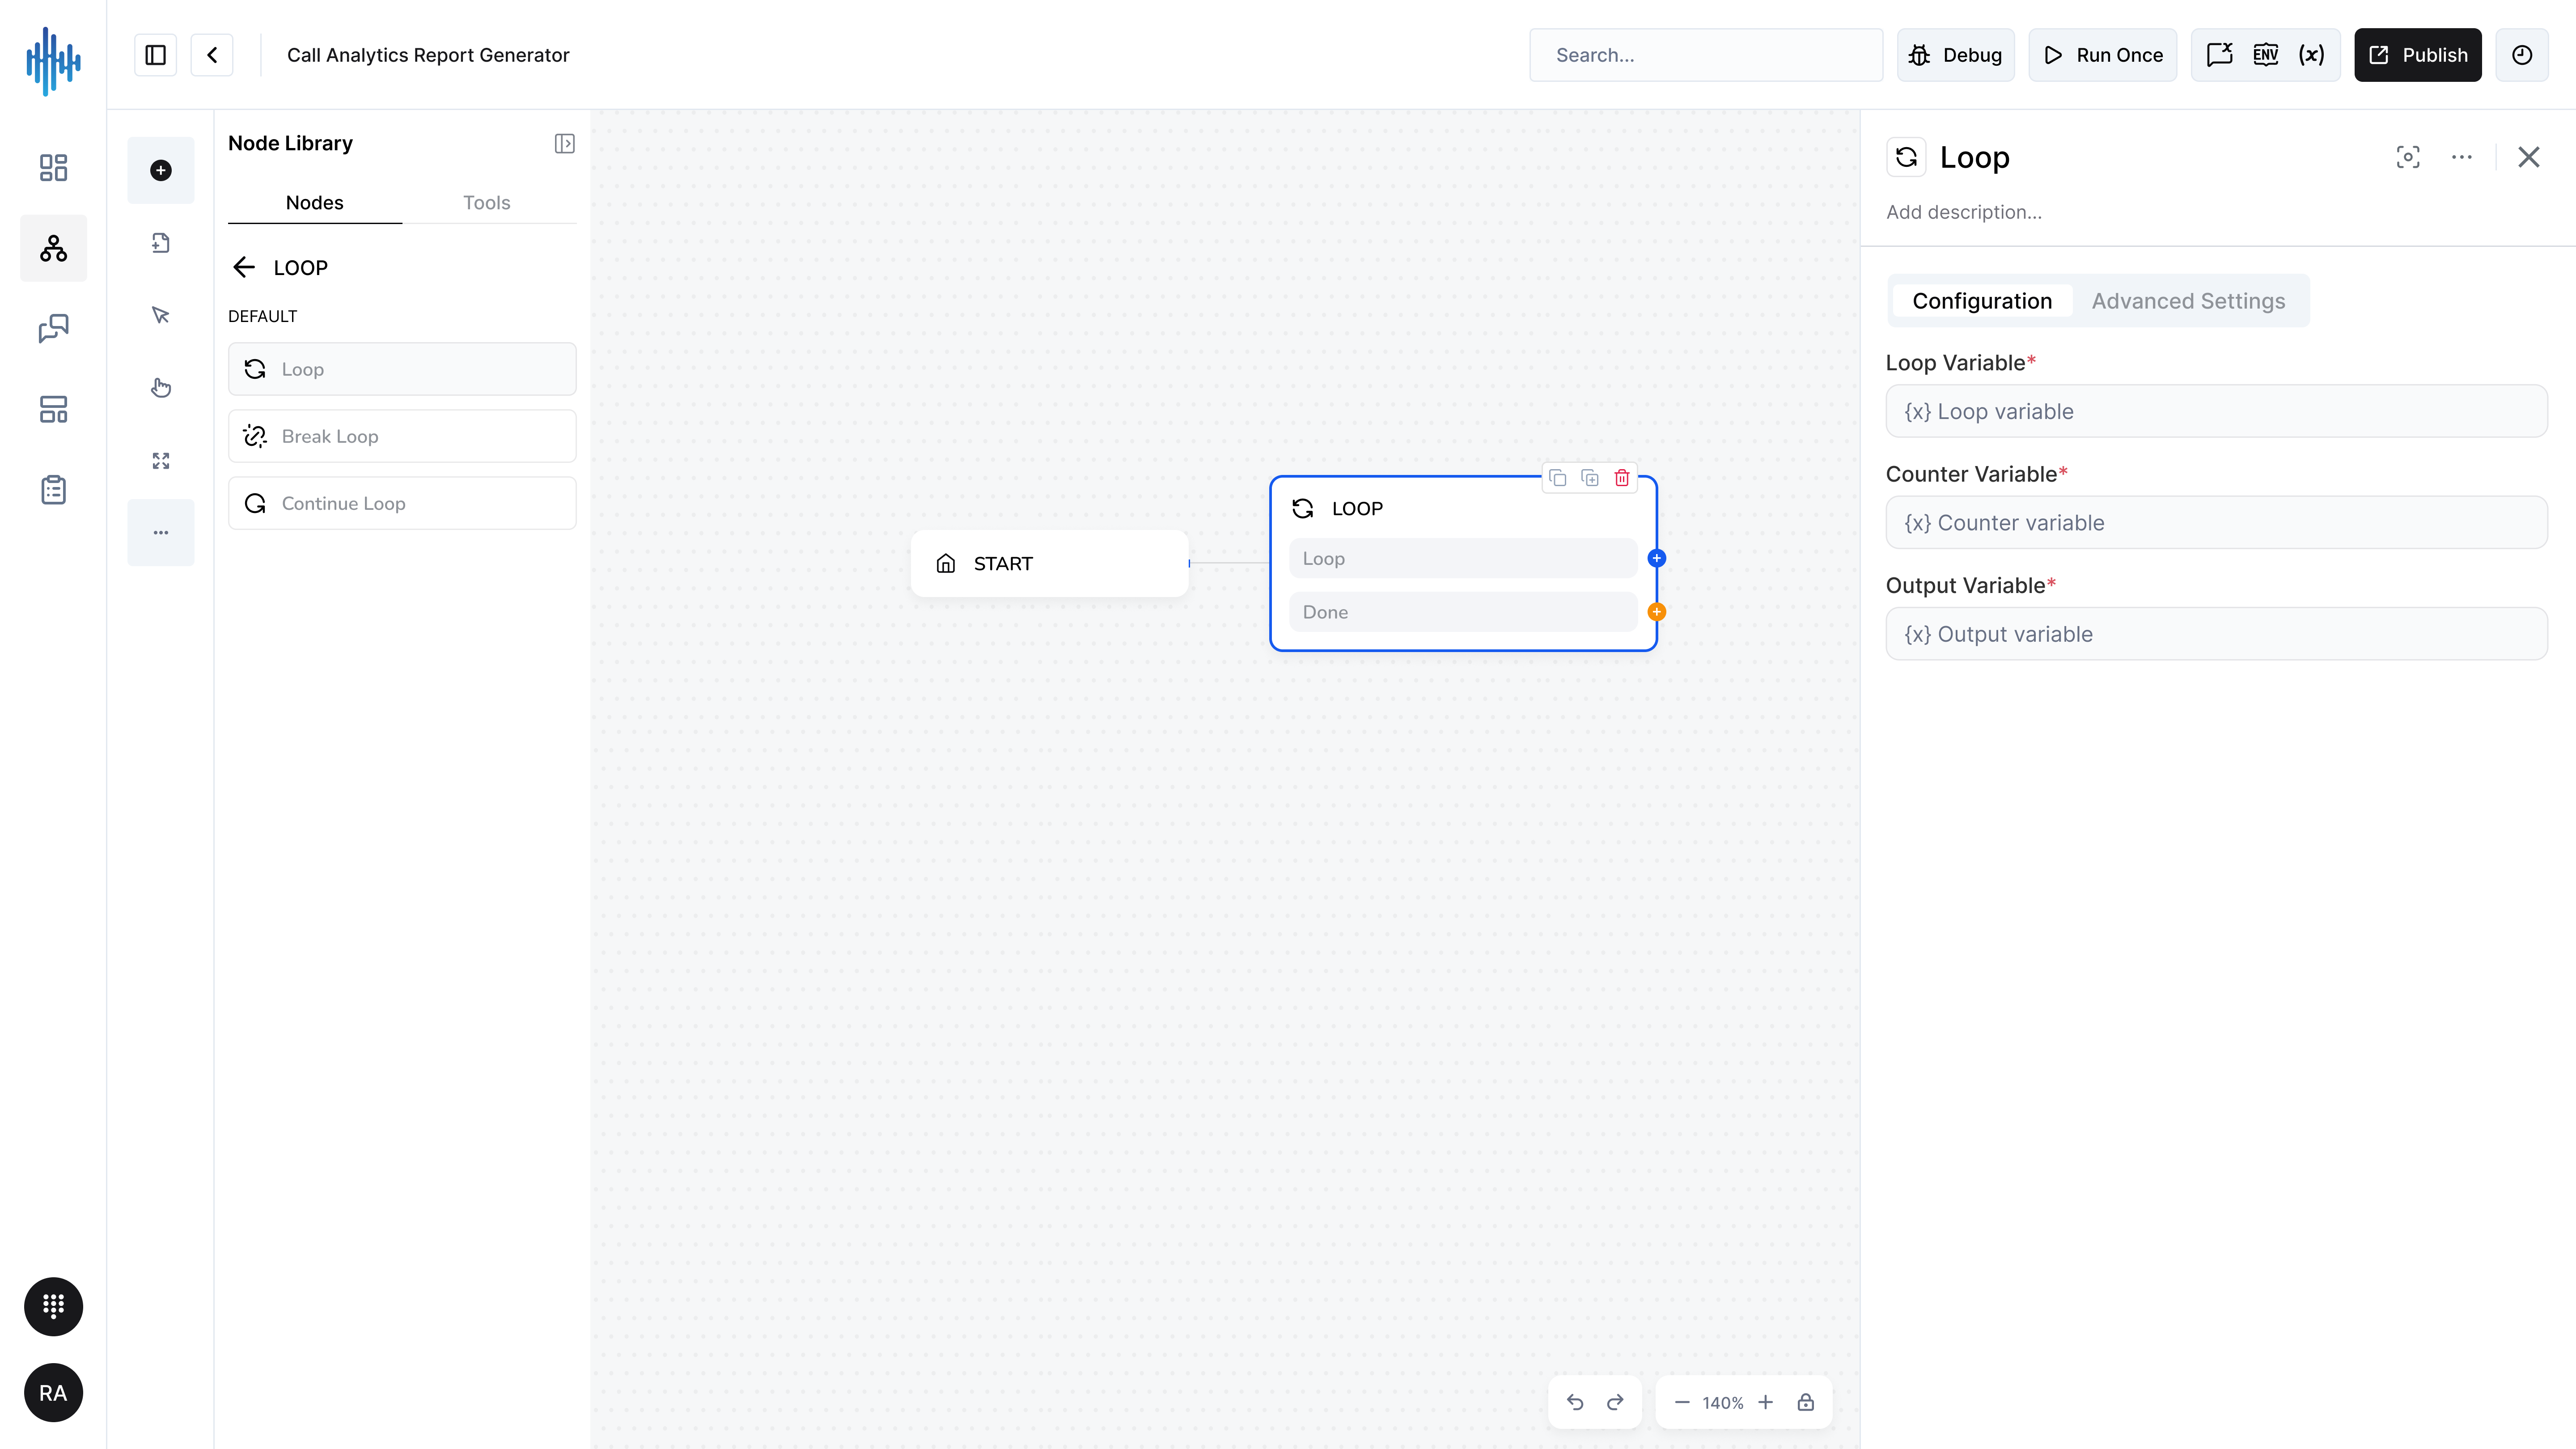
Purpose: Repeats workflow actions multiple times or iterates over a dataset.
When to Use:
- Process arrays of data
- Repeat actions N times
- Iterate over list items
- Batch processing
- Retry logic with counter
Configuration Tab
Configuration Settings:
| Field | Description | Required |
|---|---|---|
| Max Count | Maximum number of iterations | ✅ Yes |
Setup Steps:
- Add Loop node to start of loop
- Set Max Count (maximum iterations)
- Add actions to perform in loop
- Add Break Loop or Continue Loop for control
- Loop exits when count reached
Advanced Settings Tab
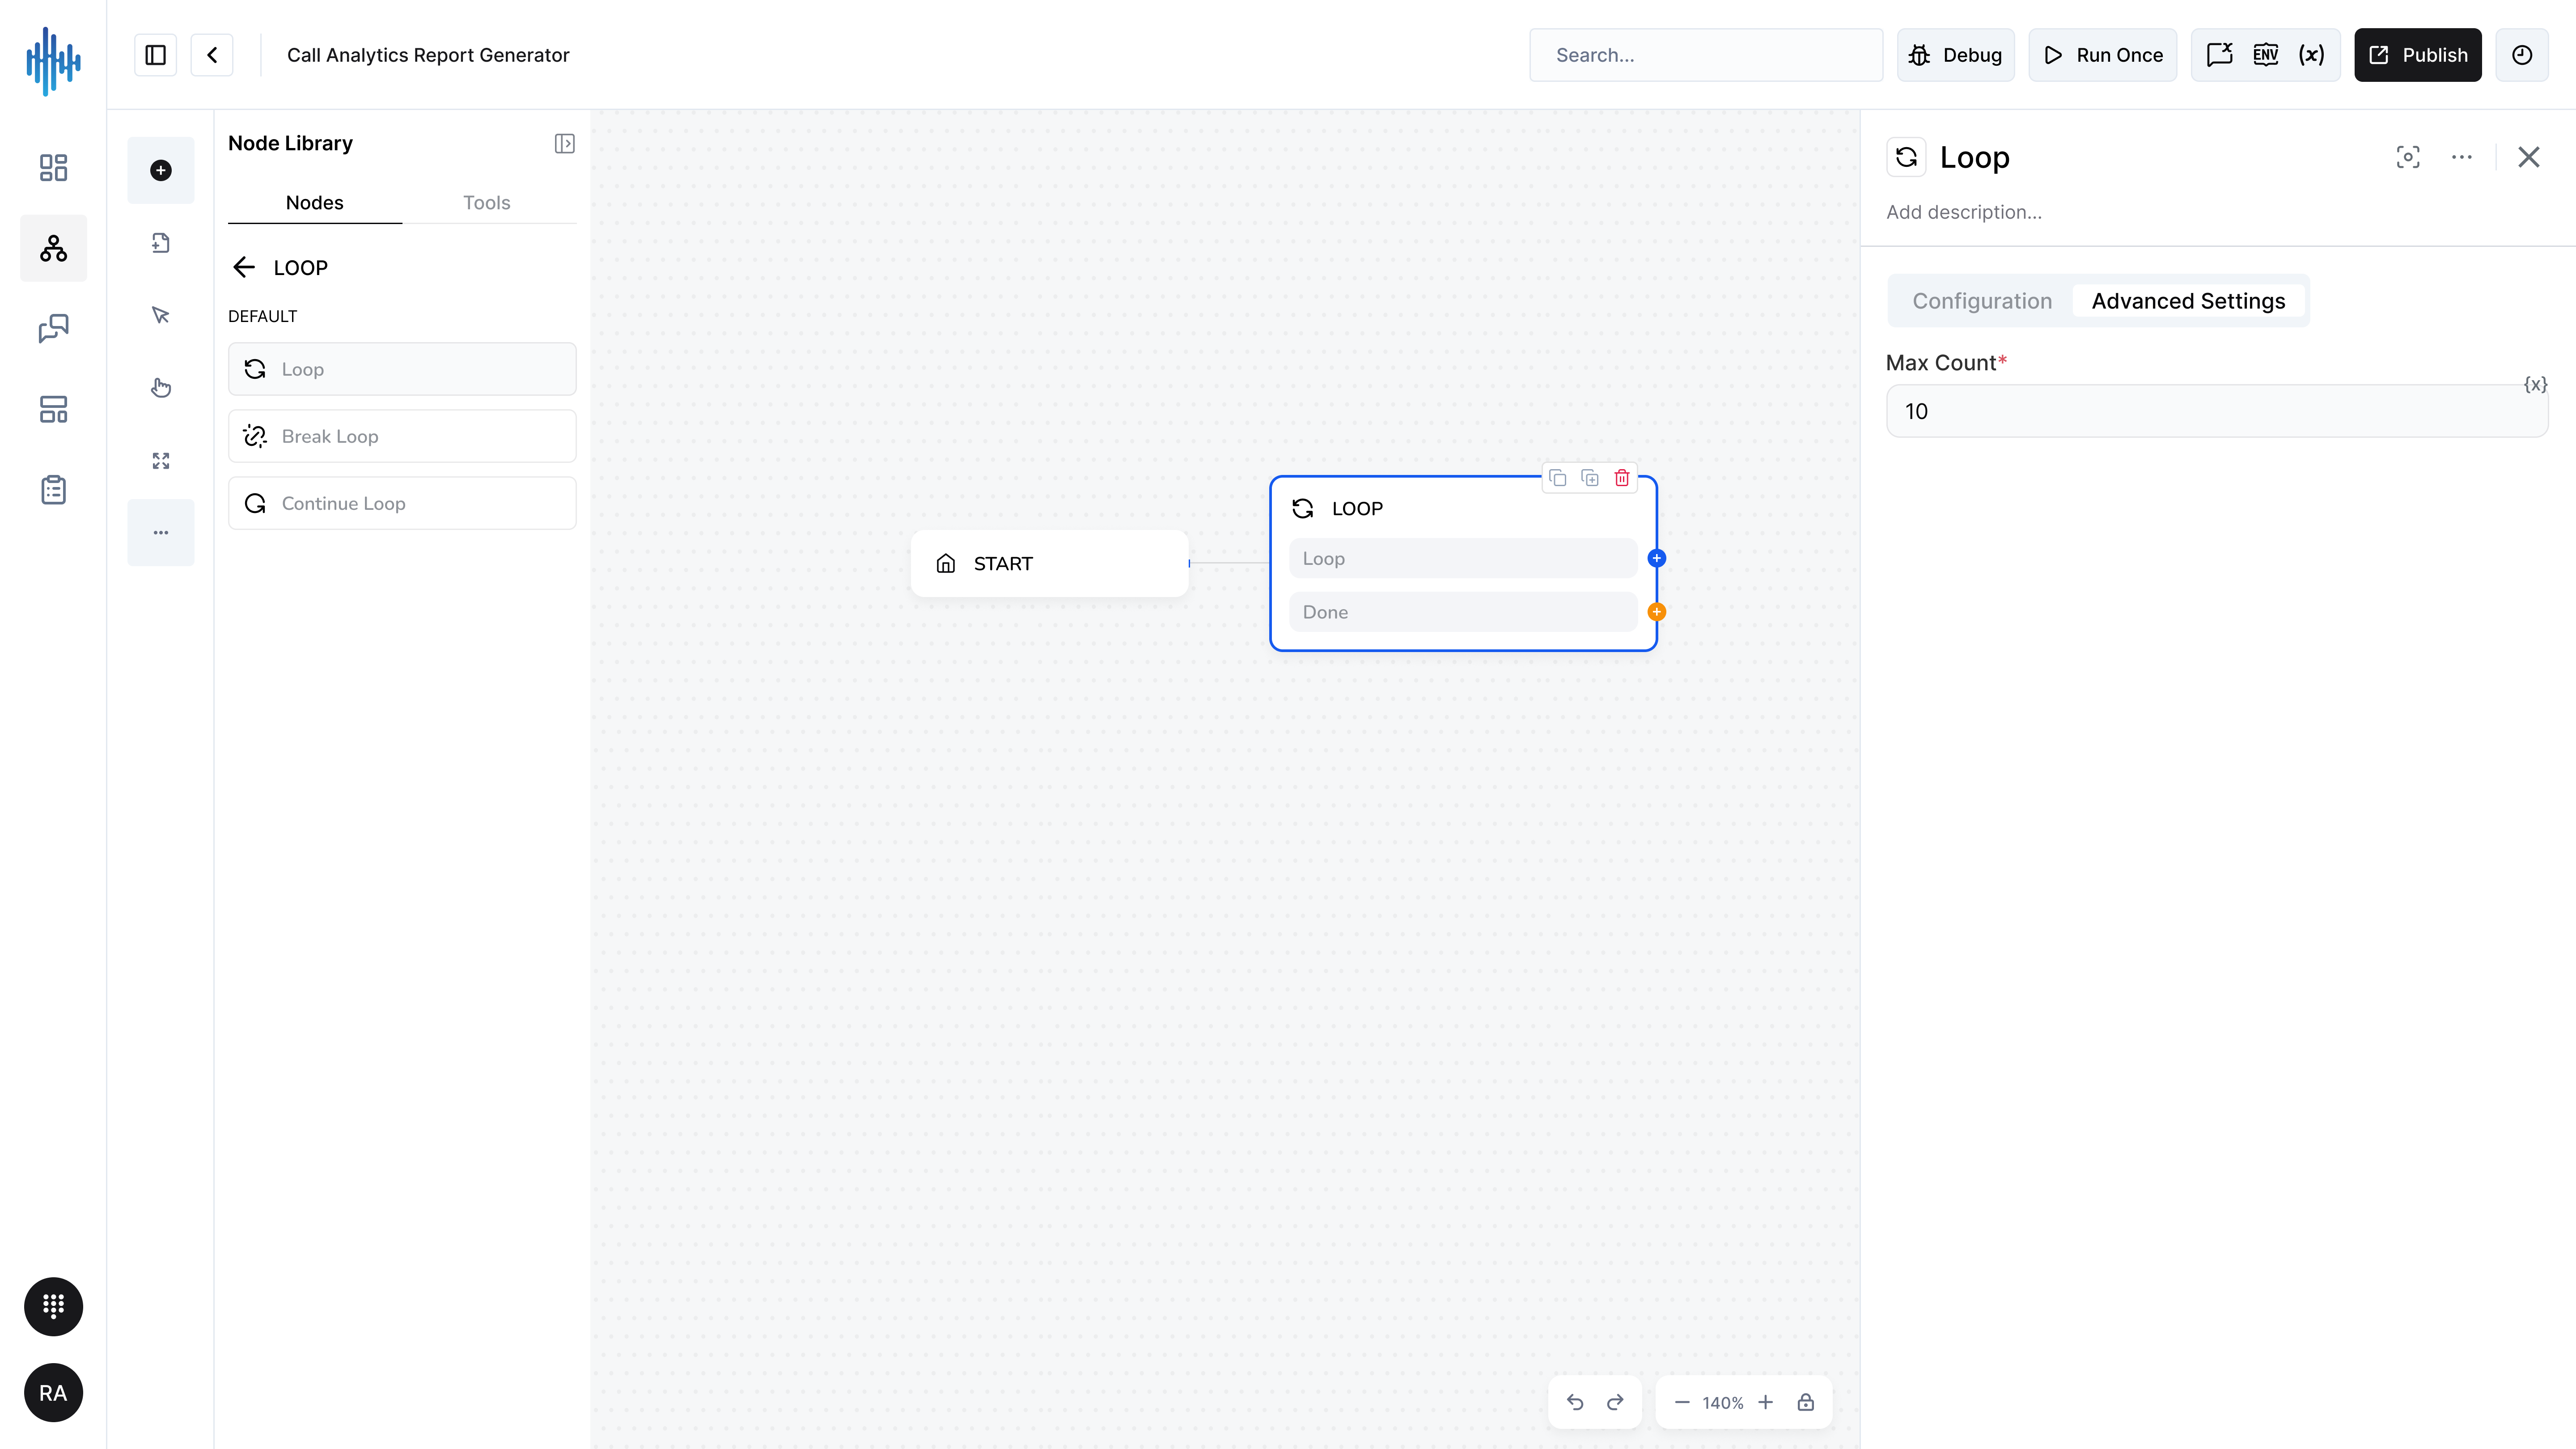
Variable Configuration:
| Field | Description | Required |
|---|---|---|
| Loop Variable | Array or list to iterate over | ❌ No |
| Counter Variable | Variable to store current iteration count | ❌ No |
| Output Variable | Variable to store loop results | ❌ No |
Setup Steps:
- Switch to Advanced Settings tab
- Set Loop Variable (array to iterate)
- Set Counter Variable (tracks iteration)
- Set Output Variable (stores results)
How It Works:
- Loop Variable: Array of items to process
- Counter Variable: Current iteration number (0, 1, 2...)
- Output Variable: Accumulated results
Best Practices:
✅ DO:
- Set reasonable max count
- Use counter variable for tracking
- Handle loop exit conditions
- Process data efficiently
❌ DON'T:
- Create infinite loops
- Set max count too high
- Process large datasets without limits
- Forget to break loop when needed
Common Use Cases:
Process Array:
Loop Variable: {{customer_list}}
Counter Variable: index
Max Count: 100

For each customer:
  - Send email
  - Update record
Retry Logic:
Max Count: 3
Counter Variable: attempt

Loop:
  - Try API call
  - If success → Break Loop
  - If failure → Continue Loop
Batch Processing:
Loop Variable: {{orders}}
Max Count: 50

For each order:
  - Process payment
  - Send confirmation
  - Continue to next
Continue Loop Node
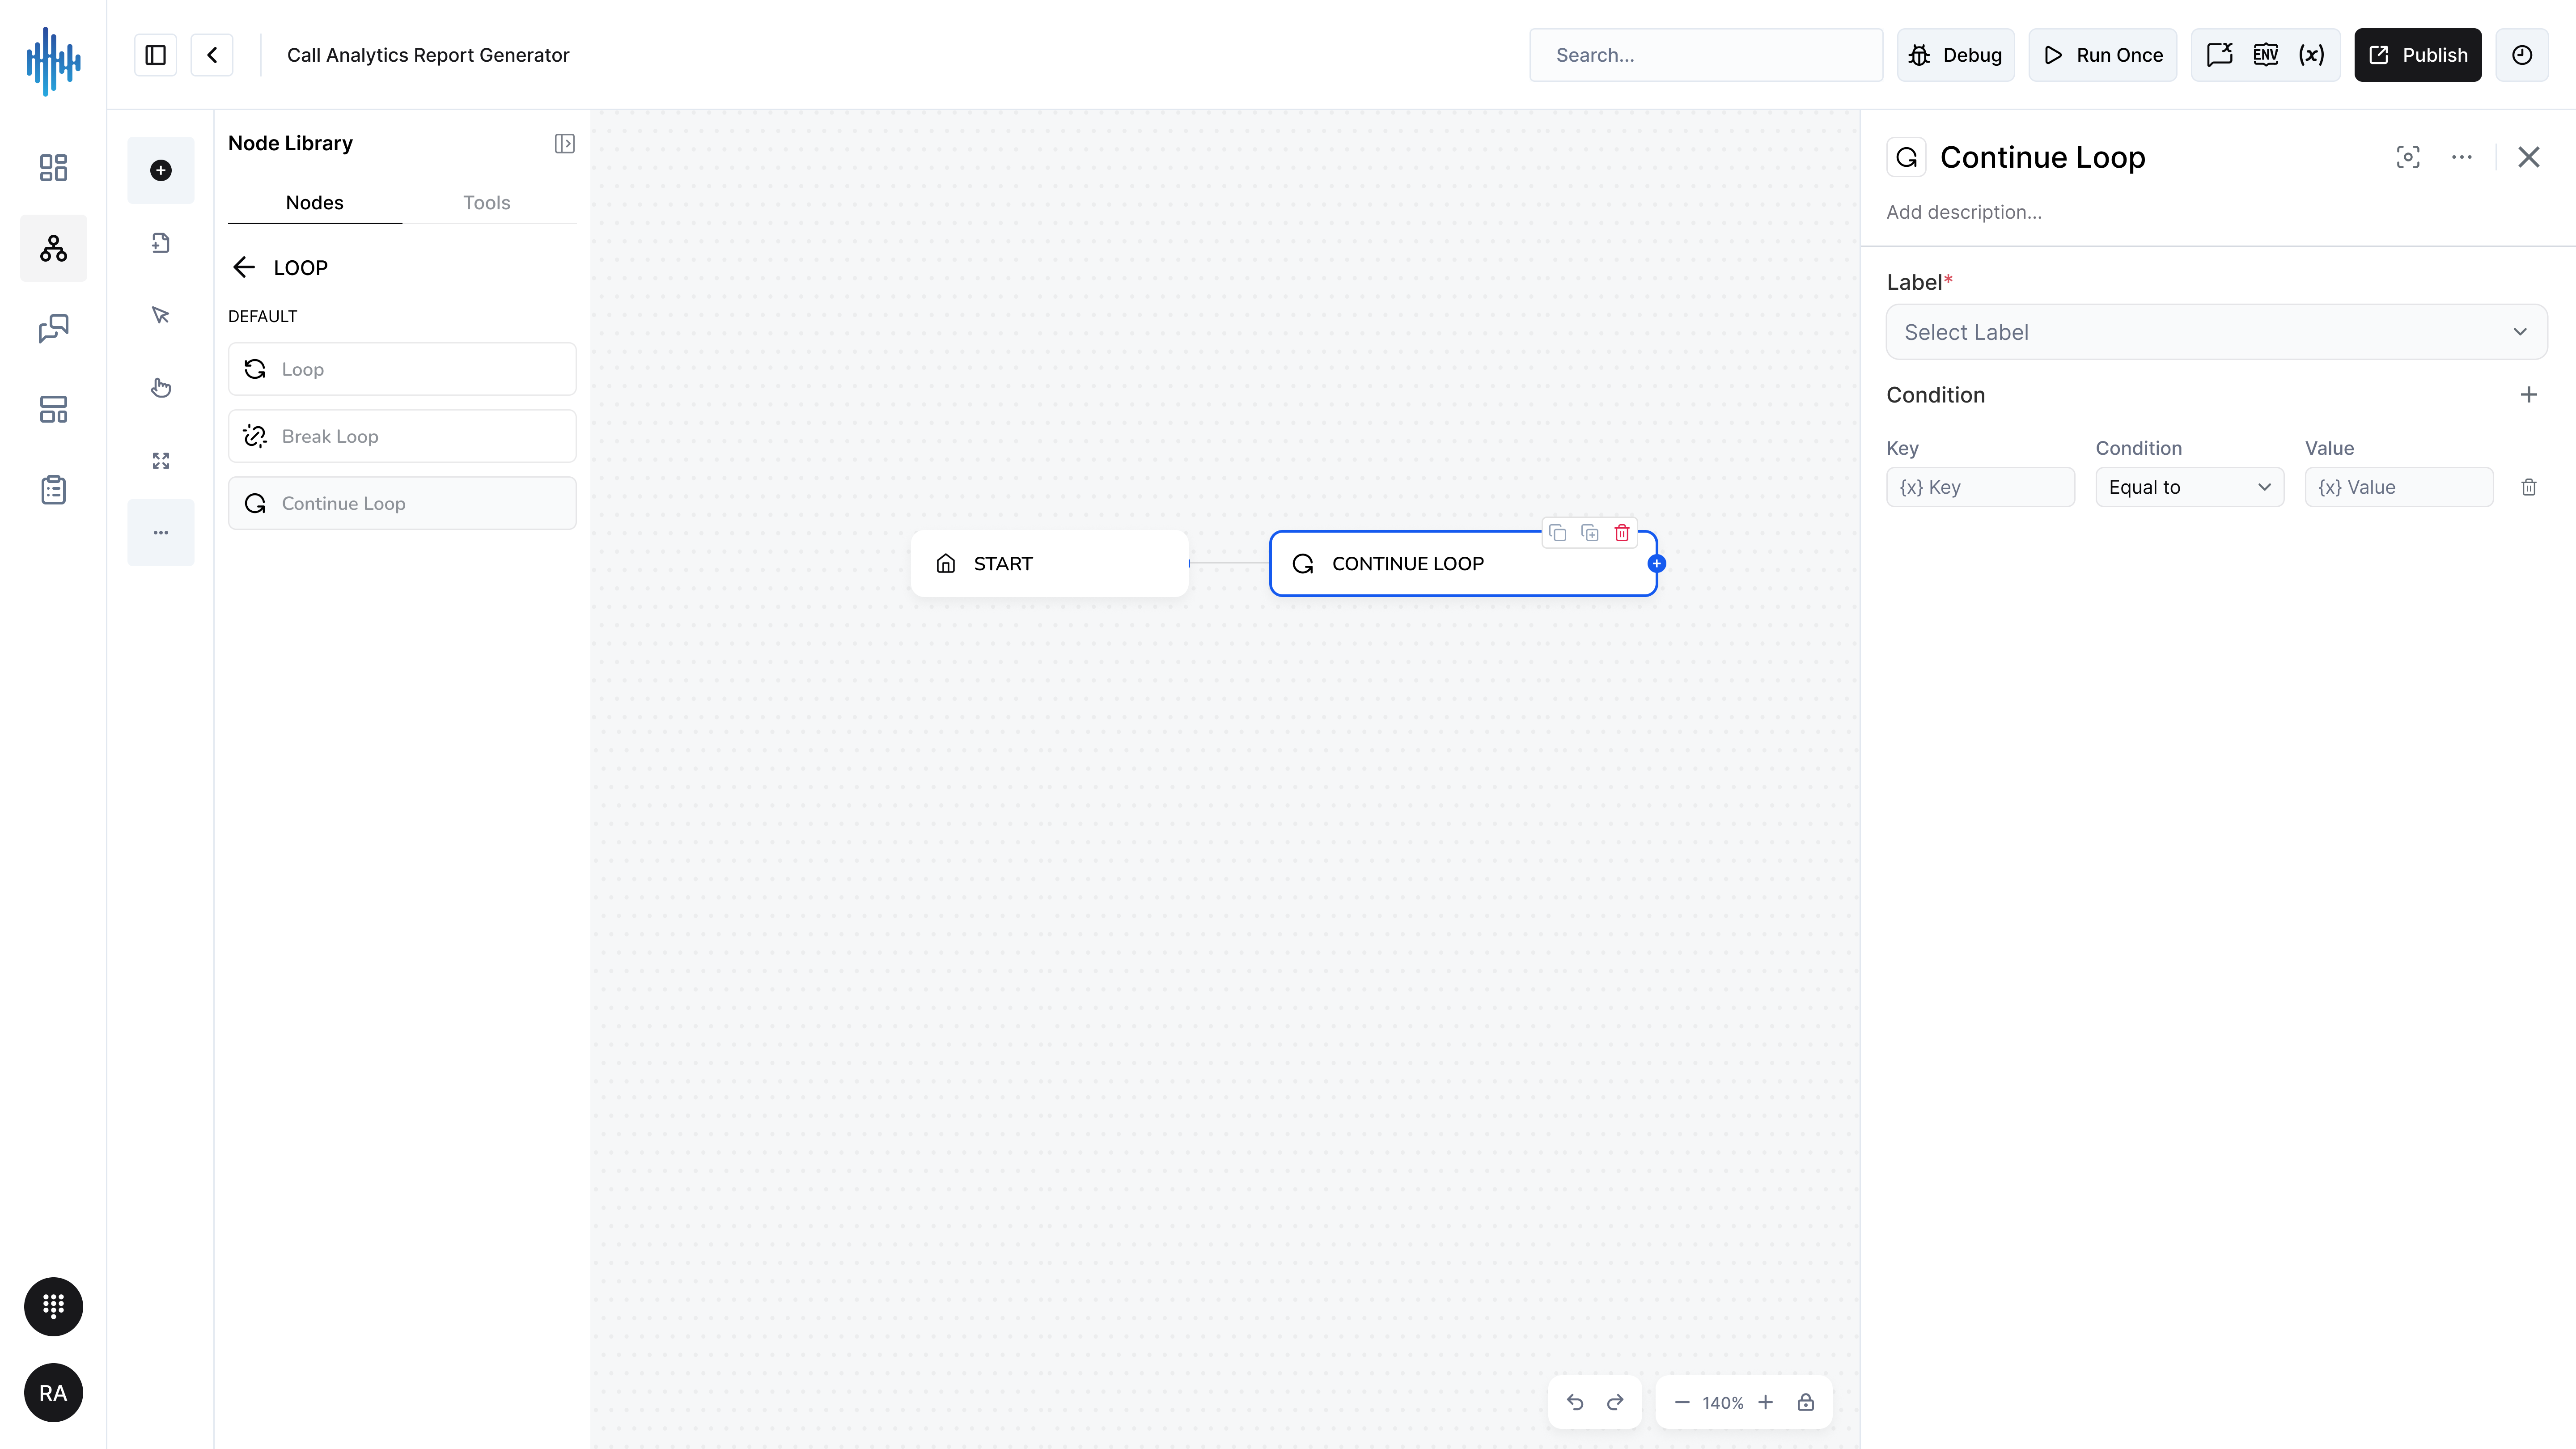
Purpose: Skips remaining actions in current iteration and continues to next iteration.
When to Use:
- Skip invalid items
- Skip to next iteration conditionally
- Filter items during processing
- Handle errors and continue
Configuration Settings:
| Field | Description | Required |
|---|---|---|
| Label | Loop label to continue | ✅ Yes |
| Condition | When to continue (optional) | ❌ No |
Condition Settings:
- Add conditions to determine when to continue
- Multiple conditions with AND logic
- Only continues if conditions match
Setup Steps:
- Inside loop, add Continue Loop node
- Select Label (which loop to continue)
- Add Condition if conditional continue needed
- Remaining actions in iteration are skipped
Best Practices:
✅ DO:
- Use for filtering invalid data
- Add clear conditions
- Document why skipping
- Handle edge cases
❌ DON'T:
- Overuse (consider filtering before loop)
- Create complex conditions
- Skip without reason
Common Use Cases:
Skip Invalid Items:
Loop through items
↓
If item is null
  → Continue Loop (skip this item)
↓
Process valid item
Filter During Processing:
Loop through customers
↓
If customer.status != "active"
  → Continue Loop
↓
Send email to active customer
Break Loop Node
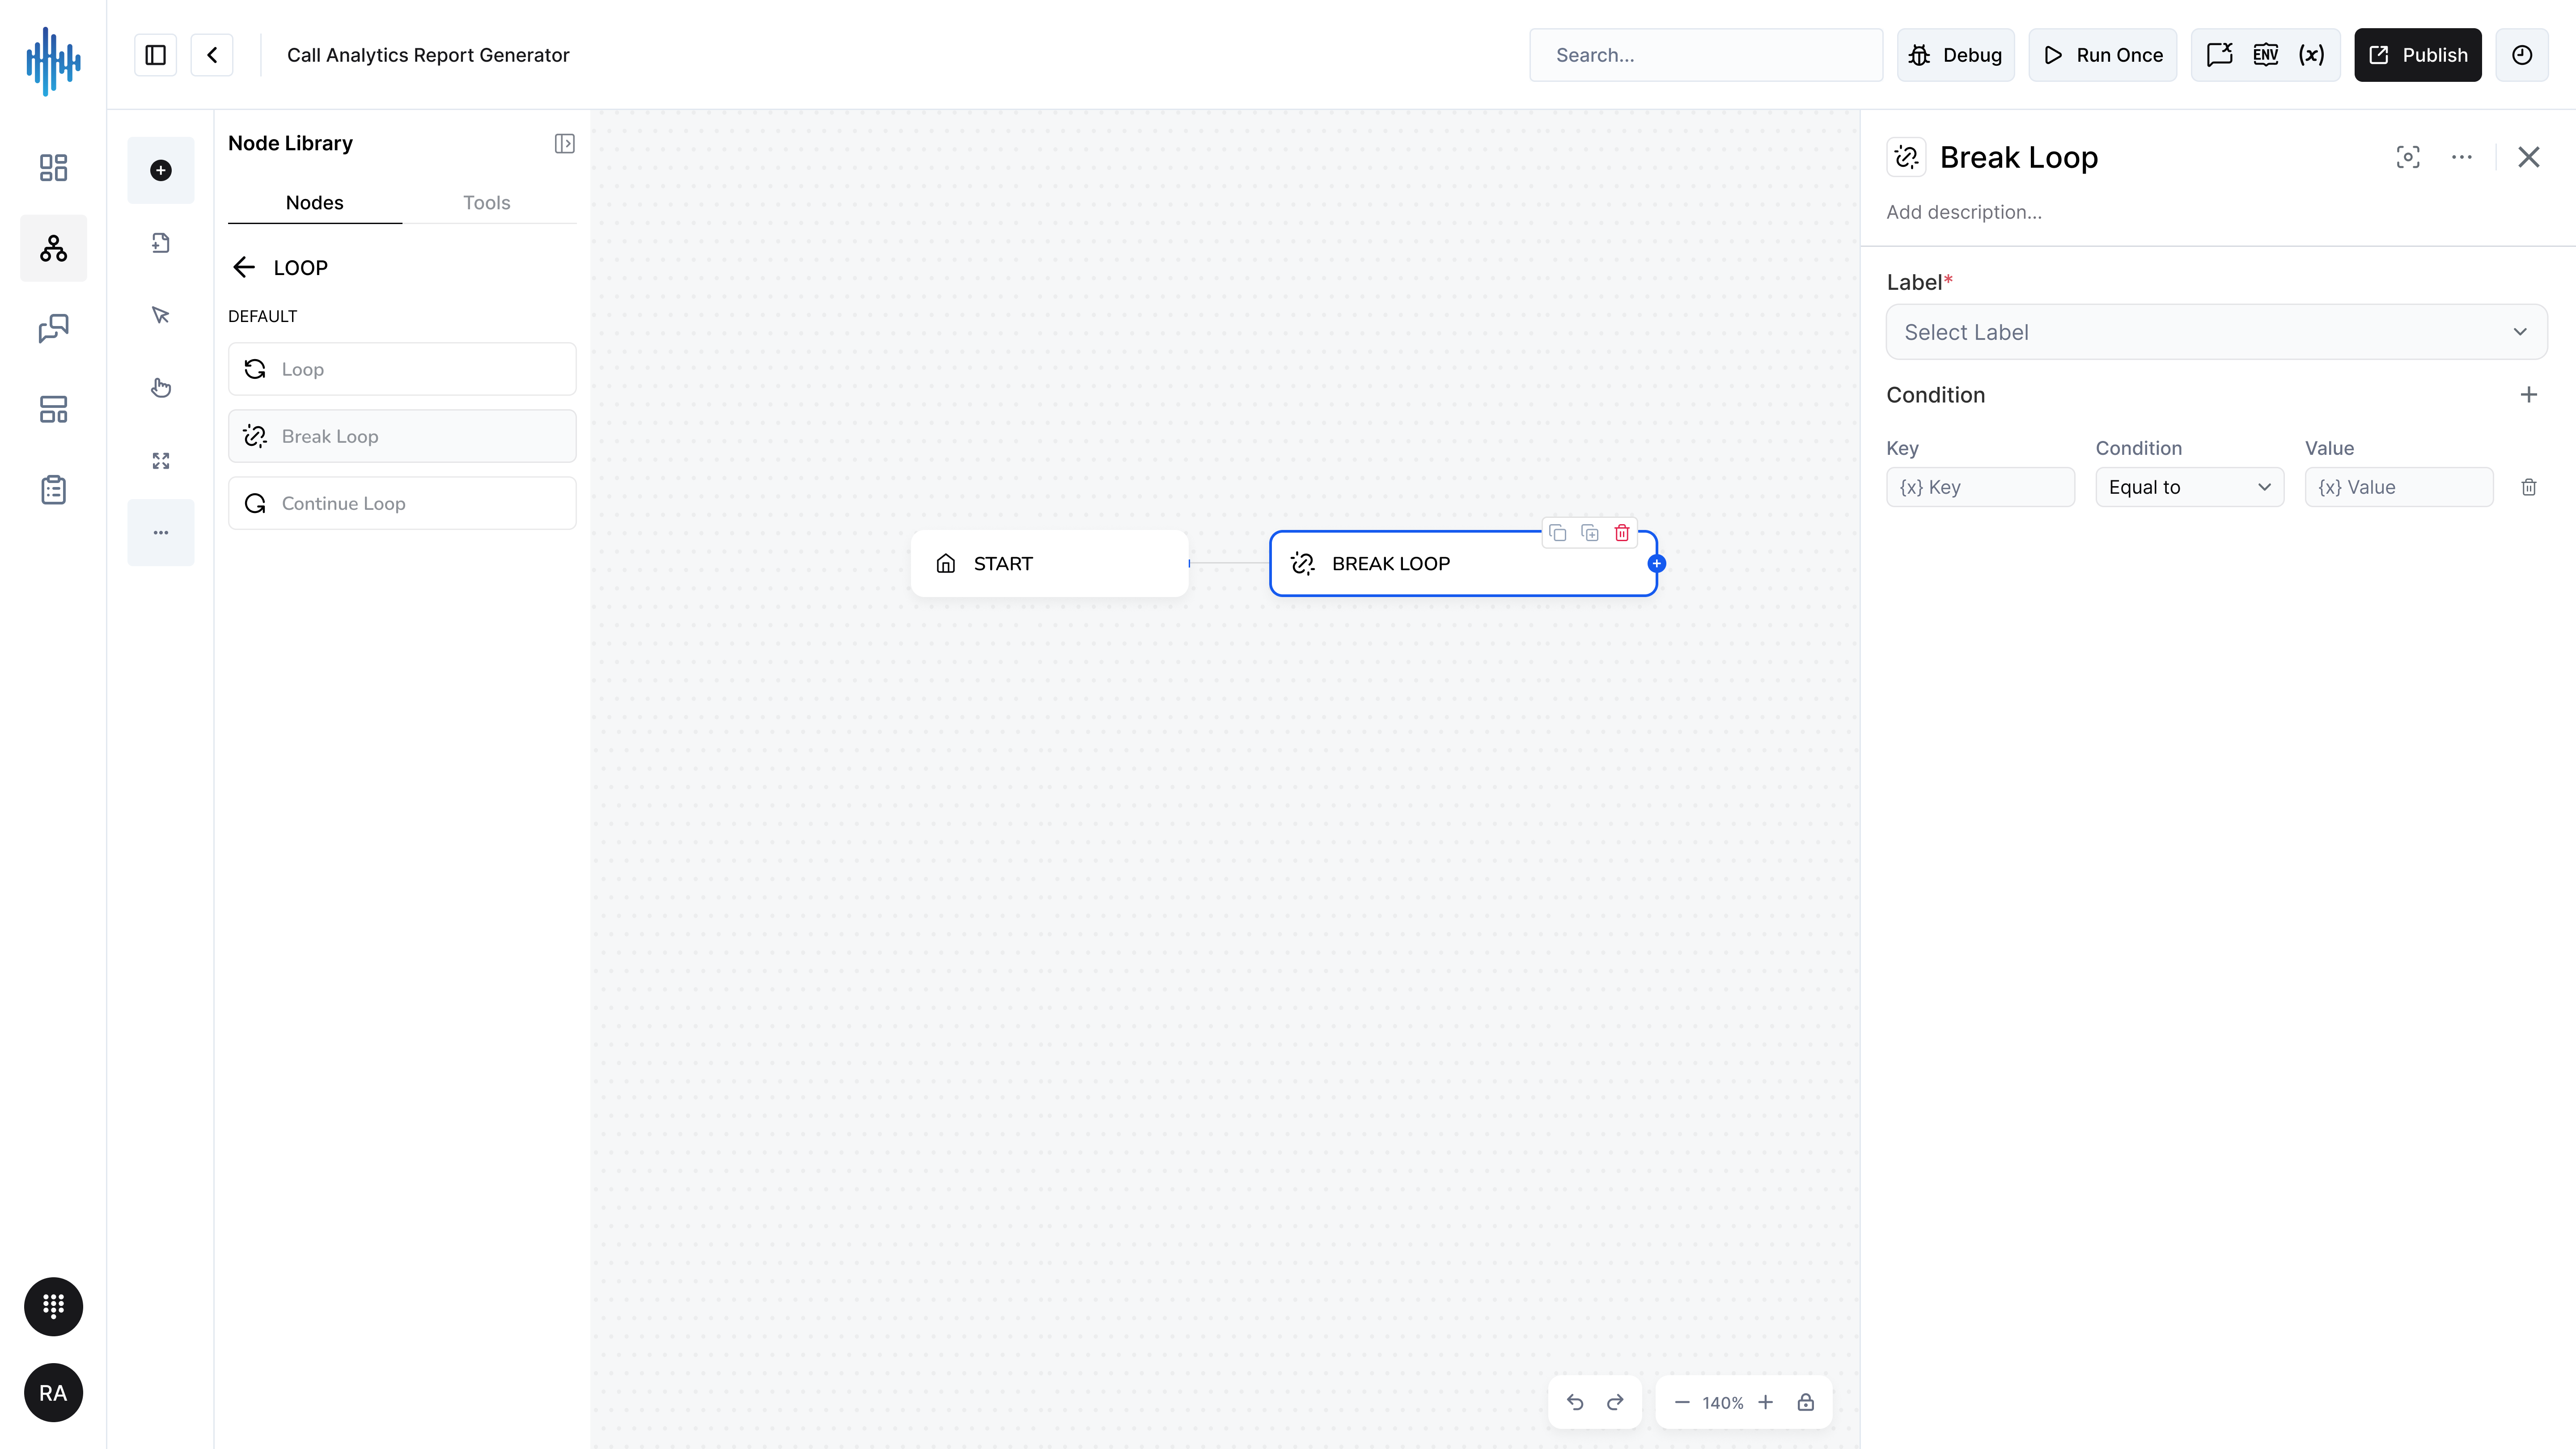
Purpose: Exits loop immediately, stopping all further iterations.
When to Use:
- Exit when condition is met
- Stop on error
- Exit after finding item
- Limit processing time
Configuration Settings:
| Field | Description | Required |
|---|---|---|
| Label | Loop label to break | ✅ Yes |
| Condition | When to break (optional) | ❌ No |
Condition Settings:
- Add conditions to determine when to break
- Multiple conditions with AND logic
- Only breaks if conditions match
Setup Steps:
- Inside loop, add Break Loop node
- Select Label (which loop to break)
- Add Condition if conditional break needed
- Loop exits immediately when triggered
Best Practices:
✅ DO:
- Use for early exit conditions
- Break on critical errors
- Break when goal achieved
- Document exit conditions
❌ DON'T:
- Break without cleanup
- Use instead of proper condition checking
- Forget to handle post-loop logic
Common Use Cases:
Find First Match:
Loop through items
↓
If item matches criteria
  → Break Loop (found it!)
↓
Process matched item
Error Handling:
Loop through API calls
↓
If error occurs
  → Break Loop
↓
Handle error after loop
Limit Processing:
Loop through large dataset
↓
If processed 100 items
  → Break Loop
Additional Resources
Need Help?
- Contact StreamSpace Studio support
- Visit the documentation portal
- Join the community forum
Related Guides:
- Workflow Builder Guide
- Best Practices for Node Configuration
- Advanced Workflow Patterns
- Troubleshooting Common Issues