Getting Started with StreamSpace Studio
Learn how to access StreamSpace Studio, navigate the platform, and start building automated workflows.
What is StreamSpace Studio?
StreamSpace Studio is an AI-powered workflow automation platform that transforms documents into actionable insights through intelligent automation. The platform enables you to design, deploy, and monitor automated workflows that integrate seamlessly with your existing systems.
Key Capabilities:
- Workflow Automation - Design and configure multi-step automation processes with AI agents
- Real-time Monitoring - Track execution logs, history, and system performance
- Enterprise Integration - Connect with your existing technology stack via APIs and webhooks
- Analytics & Insights - Transform organizational data into actionable intelligence
Step 1: Entering Your Workspace
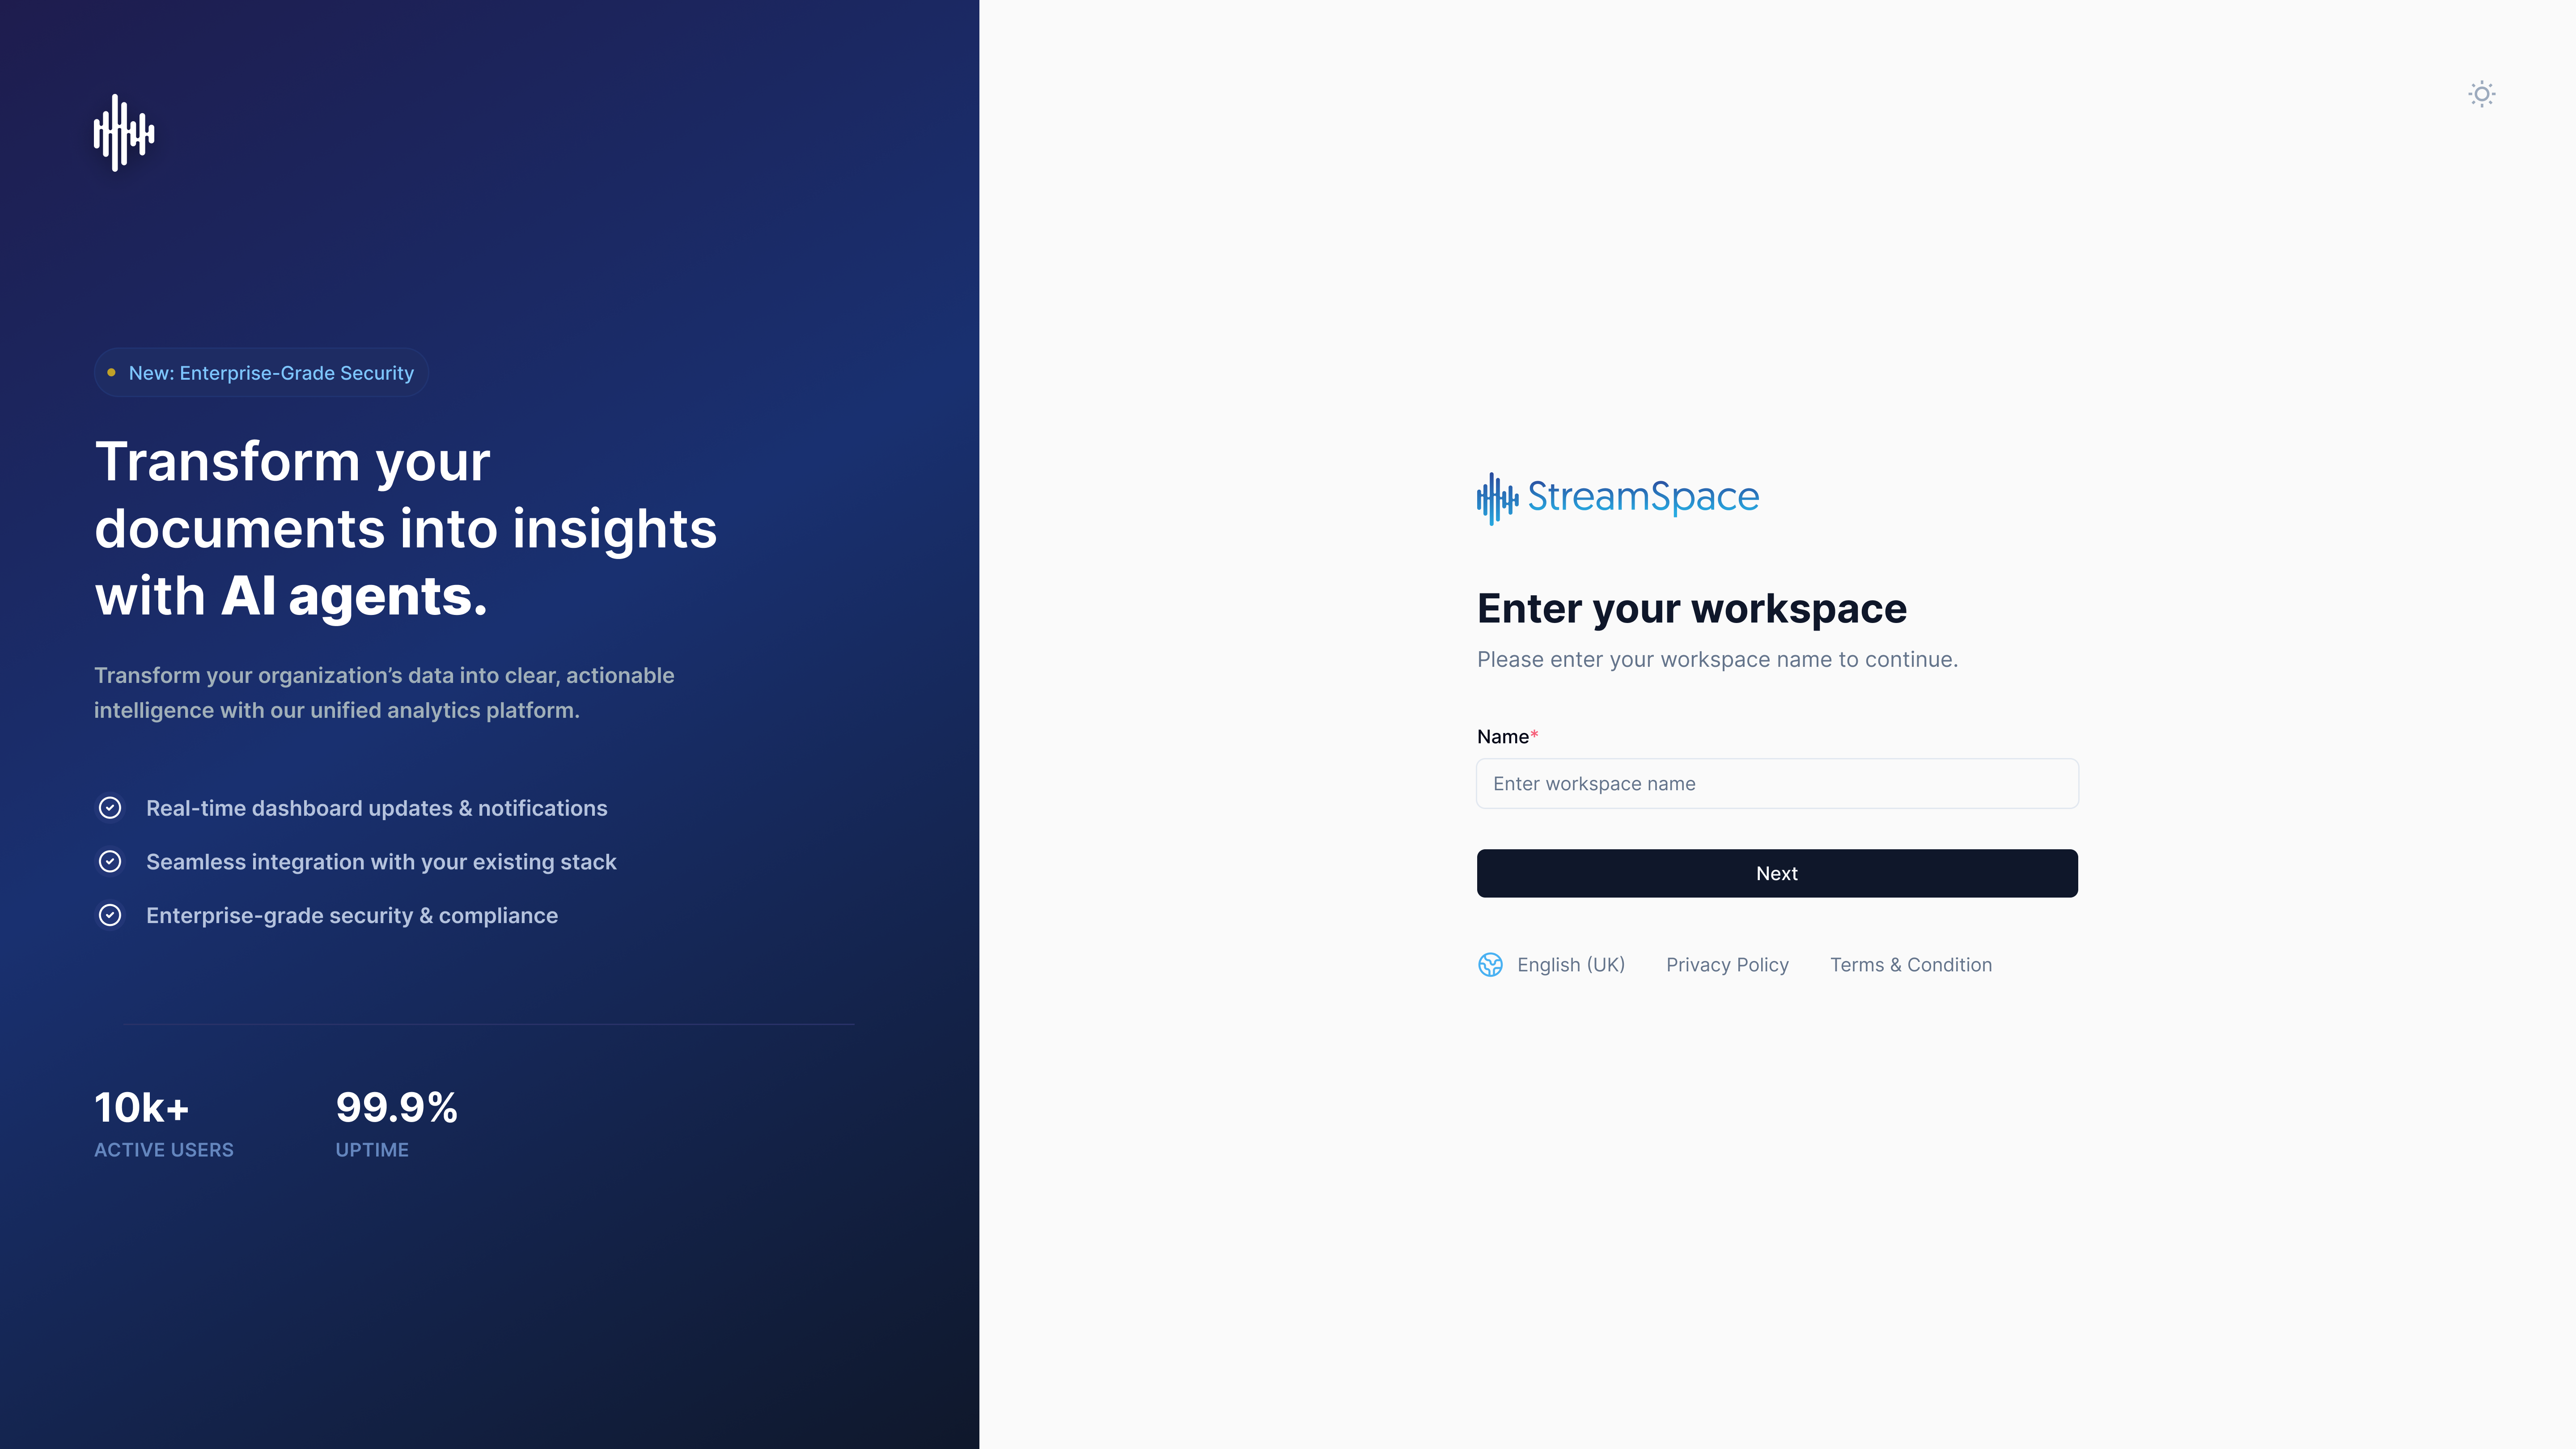
When you first access StreamSpace Studio, you'll be prompted to enter your workspace name to continue.
What is a Workspace?
A workspace (also called a tenant) is your organization's dedicated environment in StreamSpace Studio. It contains all your workflows, executions, configurations, and team settings isolated from other organizations.
How to Enter Your Workspace:
- Navigate to the StreamSpace Studio login page
- Enter your Tenant Name in the input field (e.g., "acme-corp" or "marketing-team")
- Click the Next button to proceed to sign-in
Platform Highlights:
The welcome screen showcases StreamSpace Studio's core value proposition:
- 99.9% Uptime - Enterprise-grade reliability and availability
- Real-time Dashboard Updates - Live notifications and monitoring
- Seamless Integration - Works with your existing technology stack
- Enterprise-grade Security - Advanced security and compliance features
Need Your Workspace Name?
If you don't know your tenant name, contact your organization's StreamSpace Studio administrator or check your welcome email for workspace details.
Each workspace is isolated, ensuring your data and workflows remain private to your organization.
Step 2: Signing In to Your Account
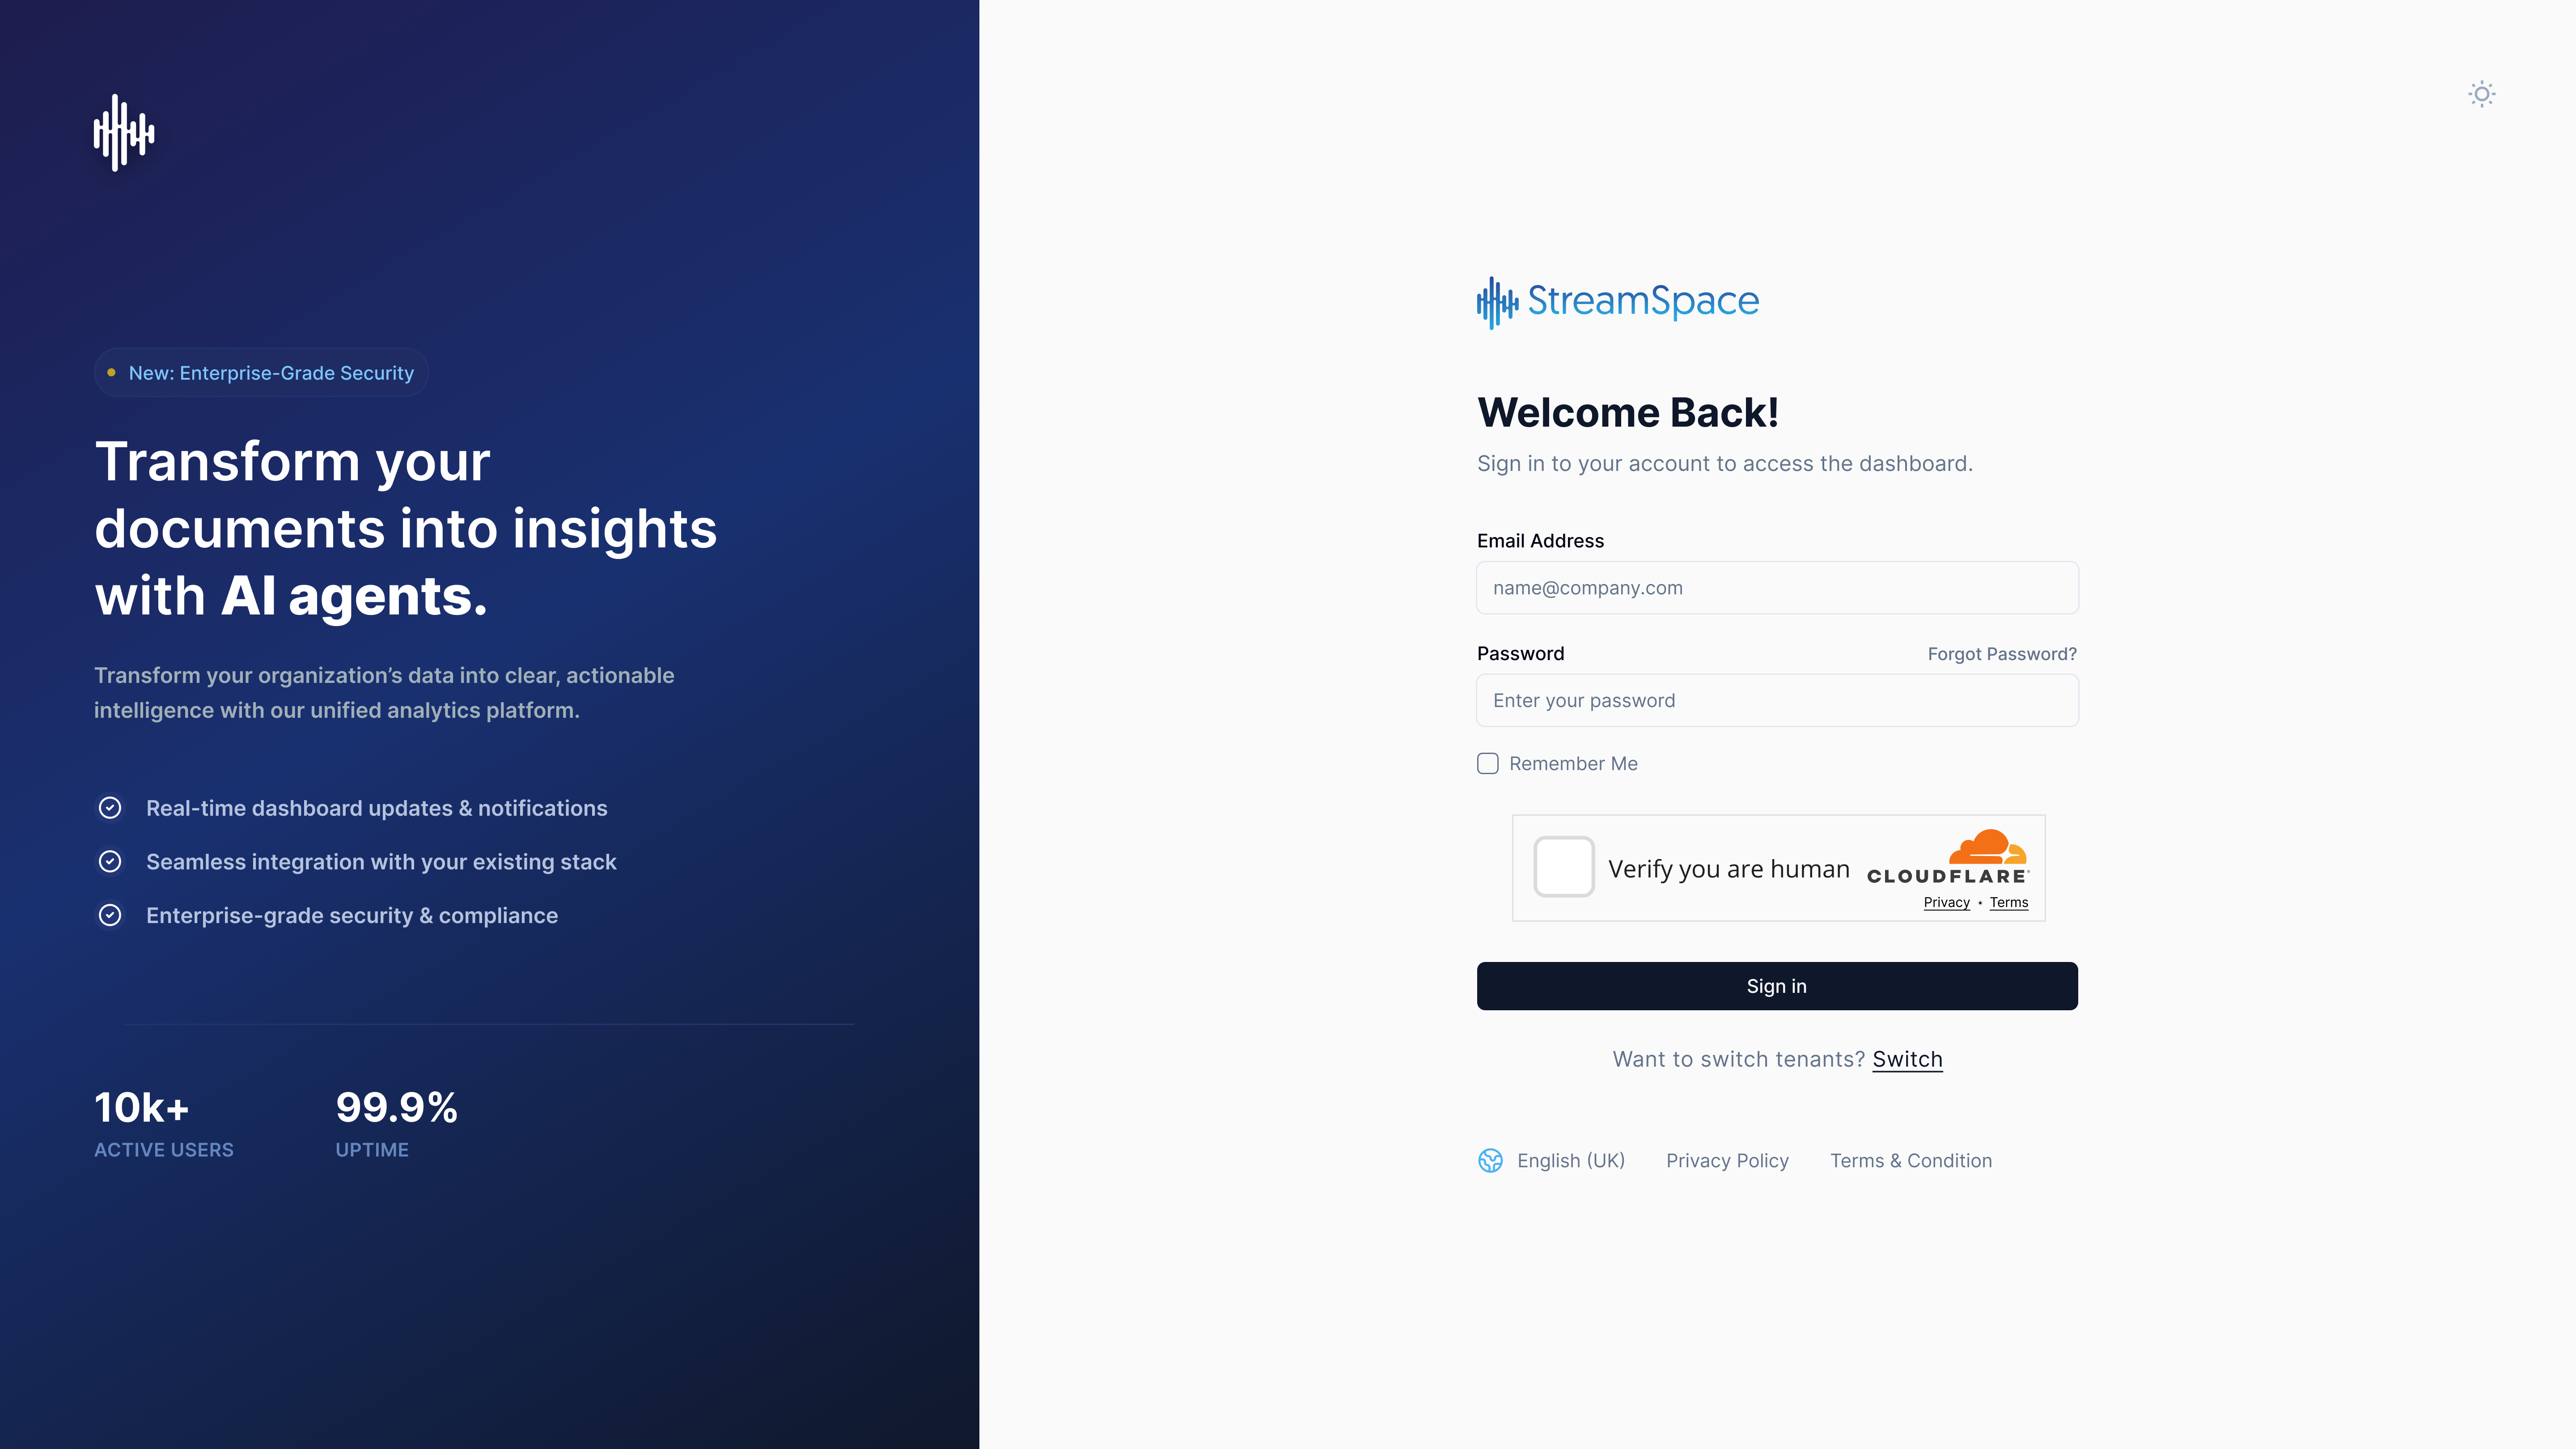
After entering your workspace name, you'll be directed to the sign-in page to access your account.
Sign-In Process:
1. Enter Credentials
- Email or Username: Enter your registered email address or username (e.g., name@company.com)
- Password: Enter your account password (click the eye icon to show/hide your password)
2. Account Options
- Remember Me: Check this box to stay signed in on trusted devices
- Forgot password?: Click this link if you need to reset your password
3. Sign In
Click the Sign in button to access your StreamSpace Studio dashboard
Switching Workspaces:
If you belong to multiple organizations or workspaces, click the "Want to switch tenants?" link to return to the workspace selection screen.
Platform Benefits Reminder:
The sign-in screen reinforces StreamSpace Studio's value:
- Transform documents into insights with AI agents
- Real-time dashboard updates and notifications
- Seamless integration with existing systems
- Enterprise-grade security and compliance
Forgot your password?
Can't remember your username?
Account locked?
Wrong workspace?
Security Best Practices:
- Use a strong, unique password for your StreamSpace Studio account
- Only check "Remember Me" on your personal, secure devices
- Sign out when using shared or public computers
- Enable two-factor authentication if available in your workspace
Step 3: Understanding the Dashboard
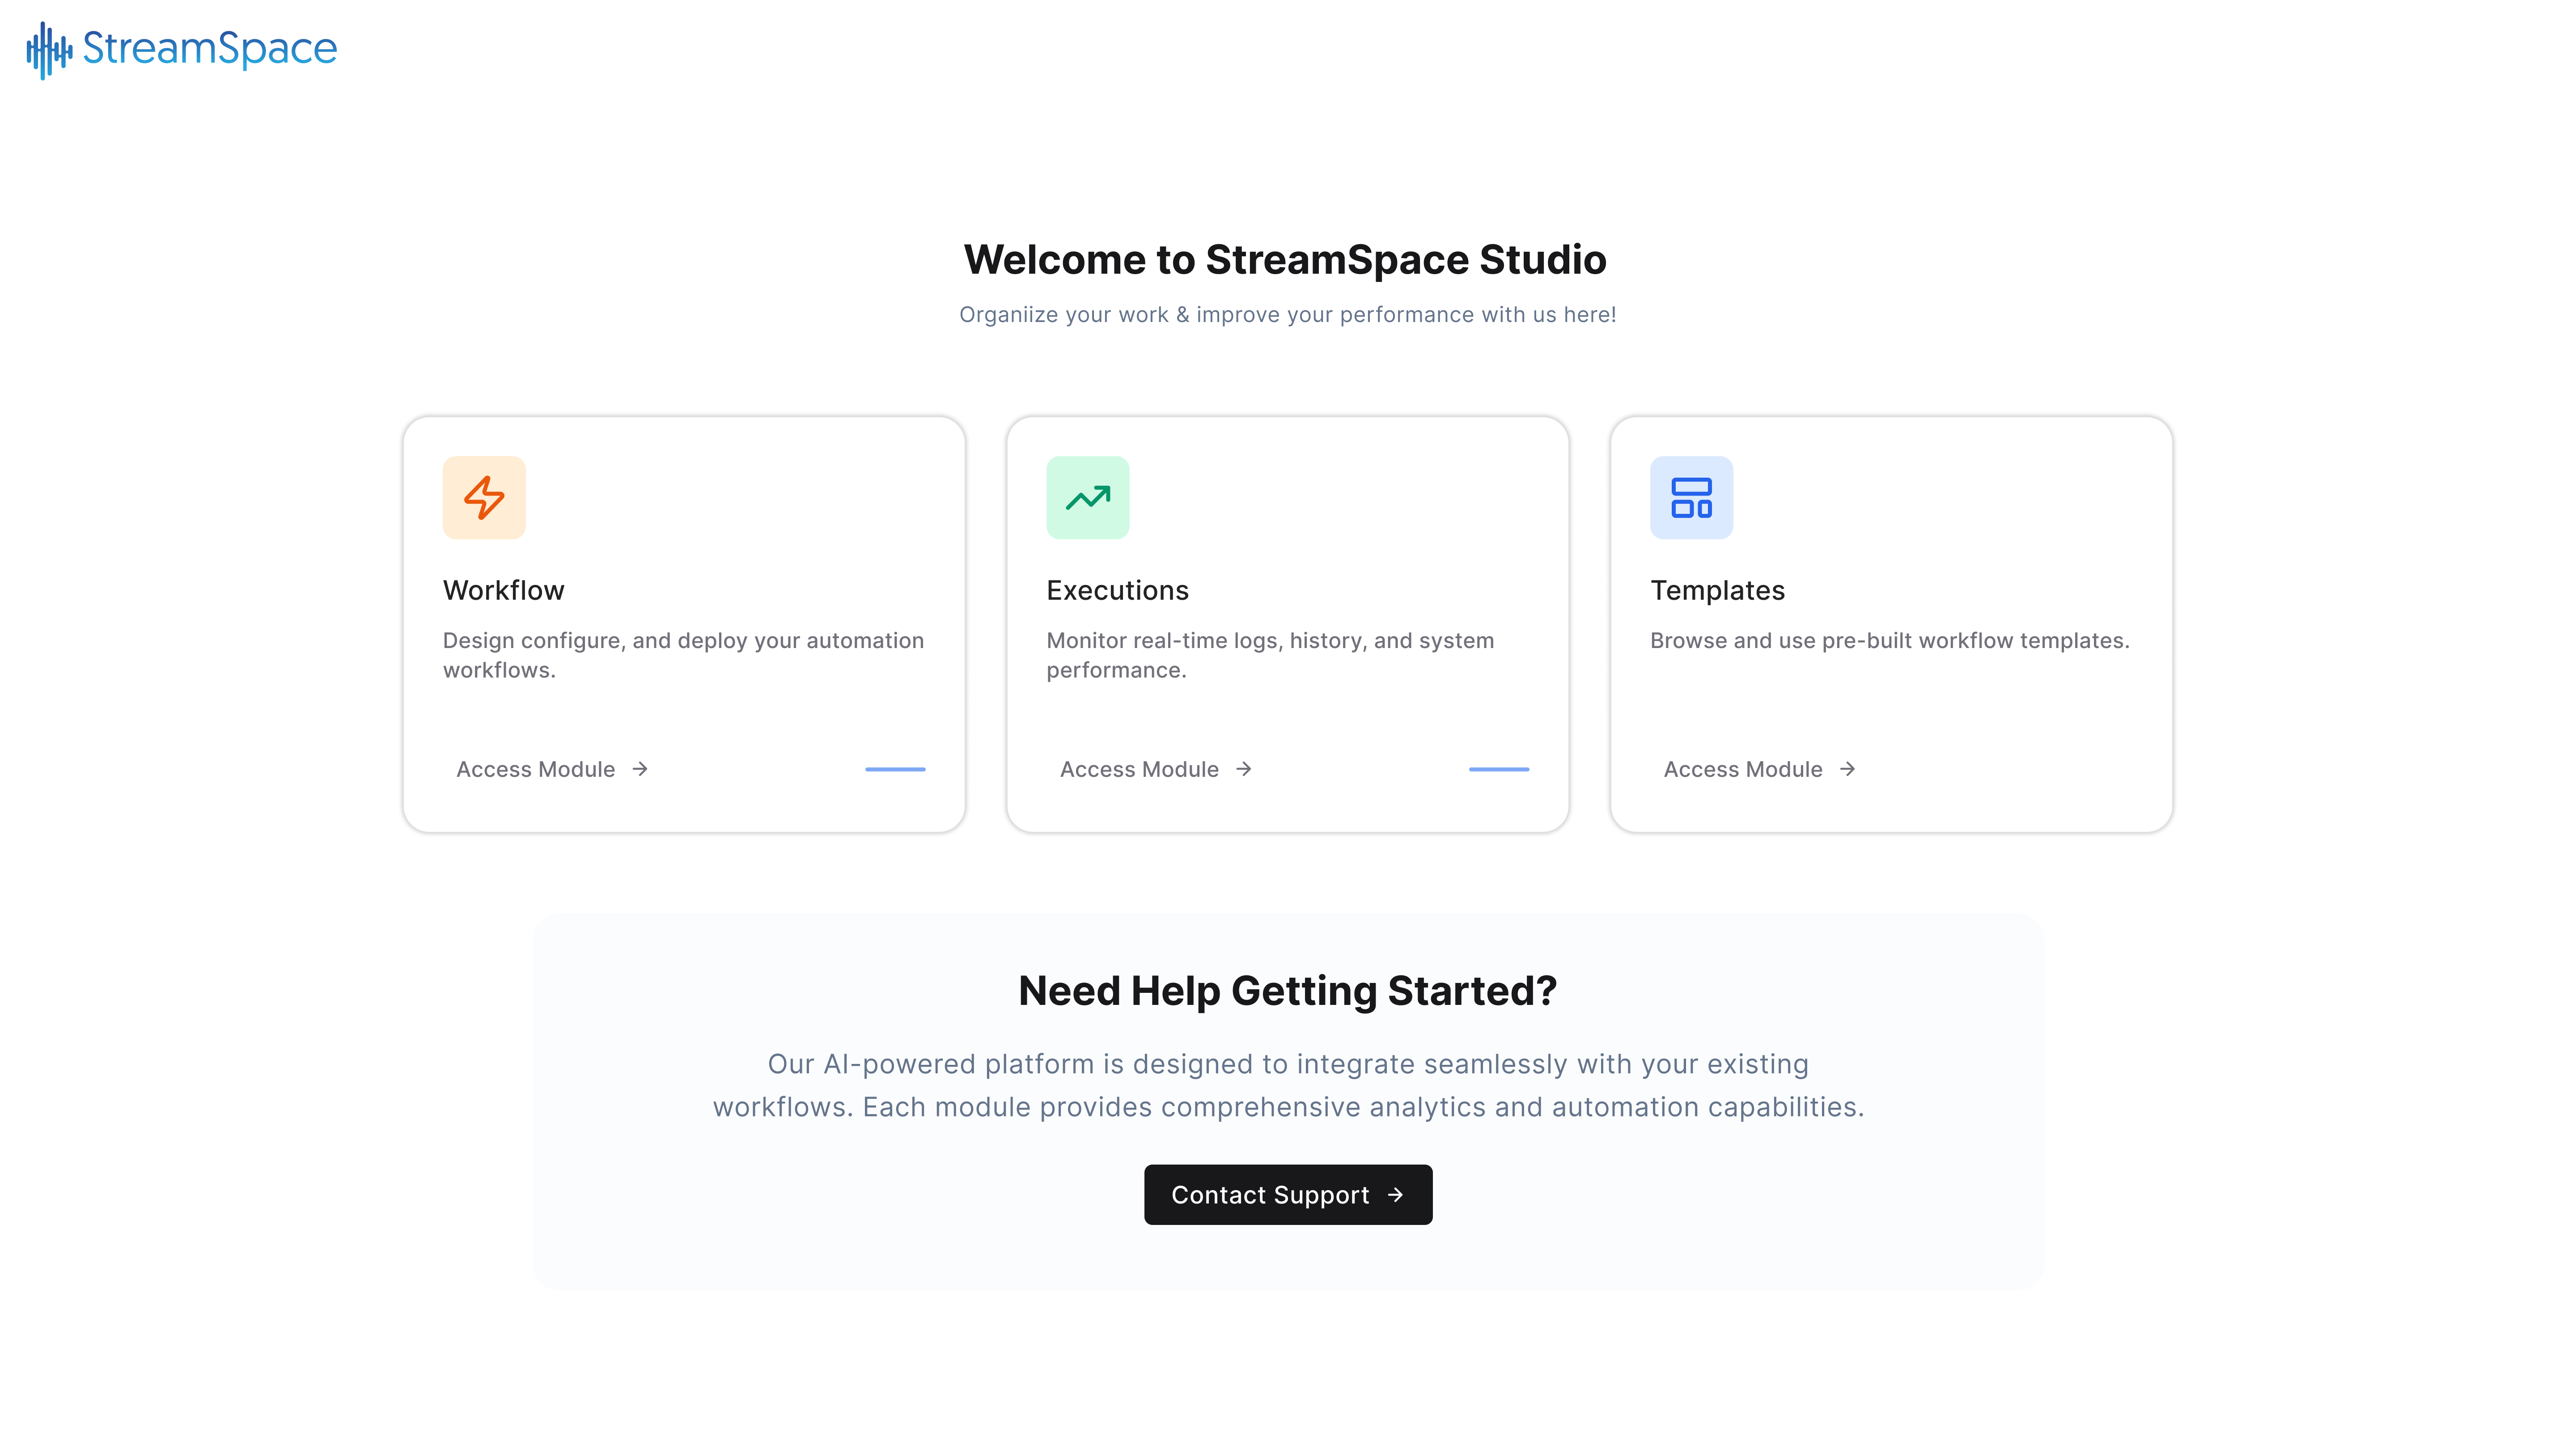
After signing in, you'll arrive at the StreamSpace Studio welcome dashboard featuring two main modules.
Dashboard Overview:
The welcome screen provides quick access to StreamSpace Studio's core functionality through two primary modules:
1. Workflows Module
![Workflows icon - lightning bolt symbol]
Purpose: Design, configure, and deploy your automation workflows
What You Can Do:
- Create new automated workflows from scratch
- Configure workflow logic and decision trees
- Integrate AI agents and custom processes
- Manage workflow versions and deployments
- Publish workflows to production
Access: Click "Access Workflow" to open the Workflows module
2. Executions Module
![Executions icon - monitoring graph symbol]
Purpose: Monitor real-time logs, history, and system performance
What You Can Do:
- View live workflow execution logs
- Track execution history and patterns
- Monitor system performance metrics
- Debug workflow issues
- Analyze execution statistics
Access: Click "Access Workflow Execution" to open the Executions module
Need Help Getting Started?
The dashboard includes a comprehensive support section:
"Our AI-powered platform is designed to integrate seamlessly with your existing workflows. Each module provides comprehensive analytics and automation capabilities."
Getting Support:
Click the "Contact Support" button to:
- Get help with platform setup
- Ask questions about workflow design
- Request technical assistance
- Access documentation and resources
- Report issues or bugs
Next Steps:
- New to StreamSpace Studio? Start by exploring the Workflows module to understand how automation works
- Ready to monitor? Check the Executions module to see real-time activity
- Need guidance? Click "Contact Support" for personalized assistance
Step 4: Managing Workflows
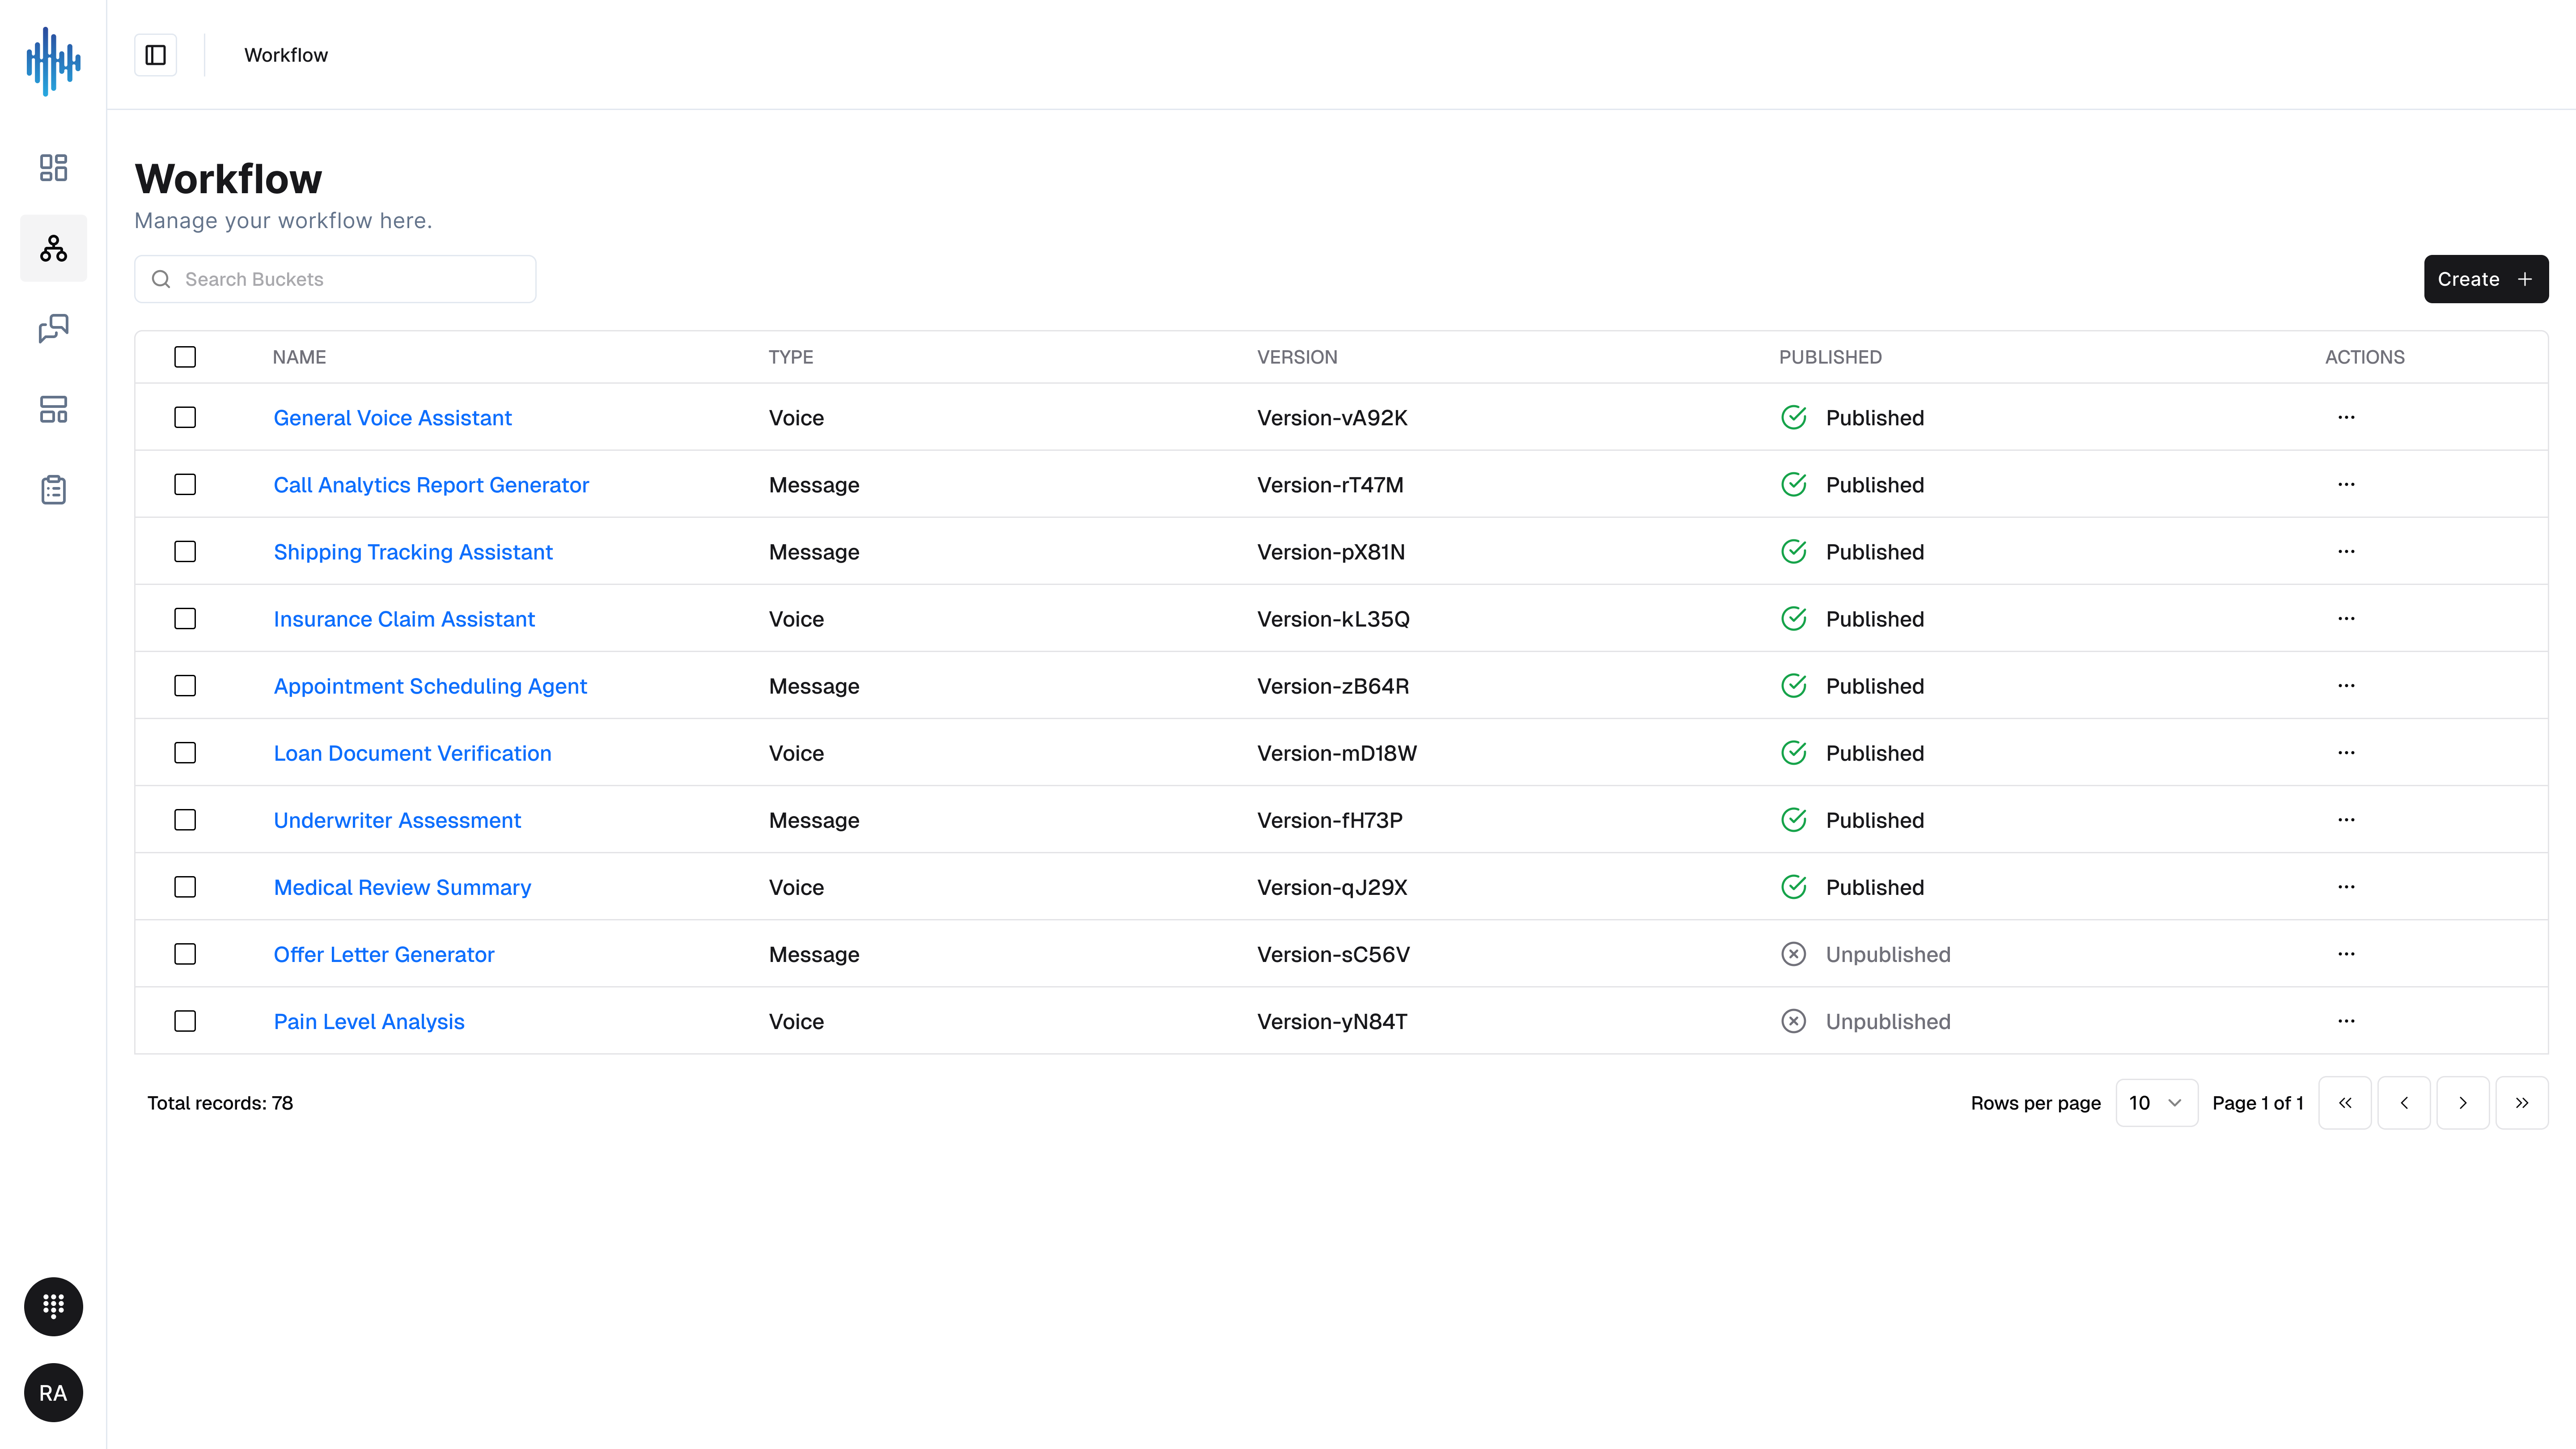
The Workflows module is where you design, manage, and deploy your automation workflows.
Workflows Dashboard Layout:
Header Section:
- Page Title: "Workflow" with subtitle "Manage your workflow here."
- Search Bar: Quickly find workflows by name or keyword
- Create Button: Create new workflows (top-right corner)
- View Options: Customize how workflows are displayed
Workflow Table Columns:
The workflow list displays key information at a glance:
| Column | Description | Examples / Status |
|---|---|---|
| Name (Clickable) | The workflow's unique identifier. Click to open the builder and edit. | "dokob-test", "New-New" |
| Type | The communication channel or message trigger type. | Message, Voice |
| Version | Current version identifier to track workflow iterations. | "Test", "0.2.2", "Published!" |
| Published Status | Indicates whether the workflow is live in production or is in draft. | Published (green checkmark), Unpublished (gray circle) |
| Actions Menu (⋮) | Context menu for advanced workflow management operations. | Edit, Duplicate, Delete, Publish/Unpublish |
Workflow Management Best Practices:
Creating Workflows:
- Click the "Create +" button in the top-right corner
- Choose your workflow type (Message, Voice, etc.)
- Design your automation logic
- Test thoroughly before publishing
- Publish when ready for production
Organizing Workflows:
- Use clear, descriptive names for easy identification
- Maintain version control for tracking changes
- Keep unpublished workflows as drafts or backups
- Archive obsolete workflows instead of deleting
Publishing Workflows:
- Only publish tested and approved workflows
- Unpublish workflows during maintenance or updates
- Monitor execution logs after publishing
- Maintain previous versions as backups
Search and Filter:
- Use the search bar to quickly locate specific workflows
- Filter by type (Message, Voice) to narrow results
- Sort by name, version, or status for better organization
Workflow States:
- Published Workflows: Active and processing requests in production
- Unpublished Workflows: Inactive drafts or workflows under development
- Version Numbers: Track iterations and changes over time
Common Workflow Types:
- Message Workflows: Process text-based inputs from chat platforms
- Voice Workflows: Handle voice interactions and phone calls
- Custom Workflows: Specialized automation for specific use cases
Step 5: Monitoring Workflow Executions
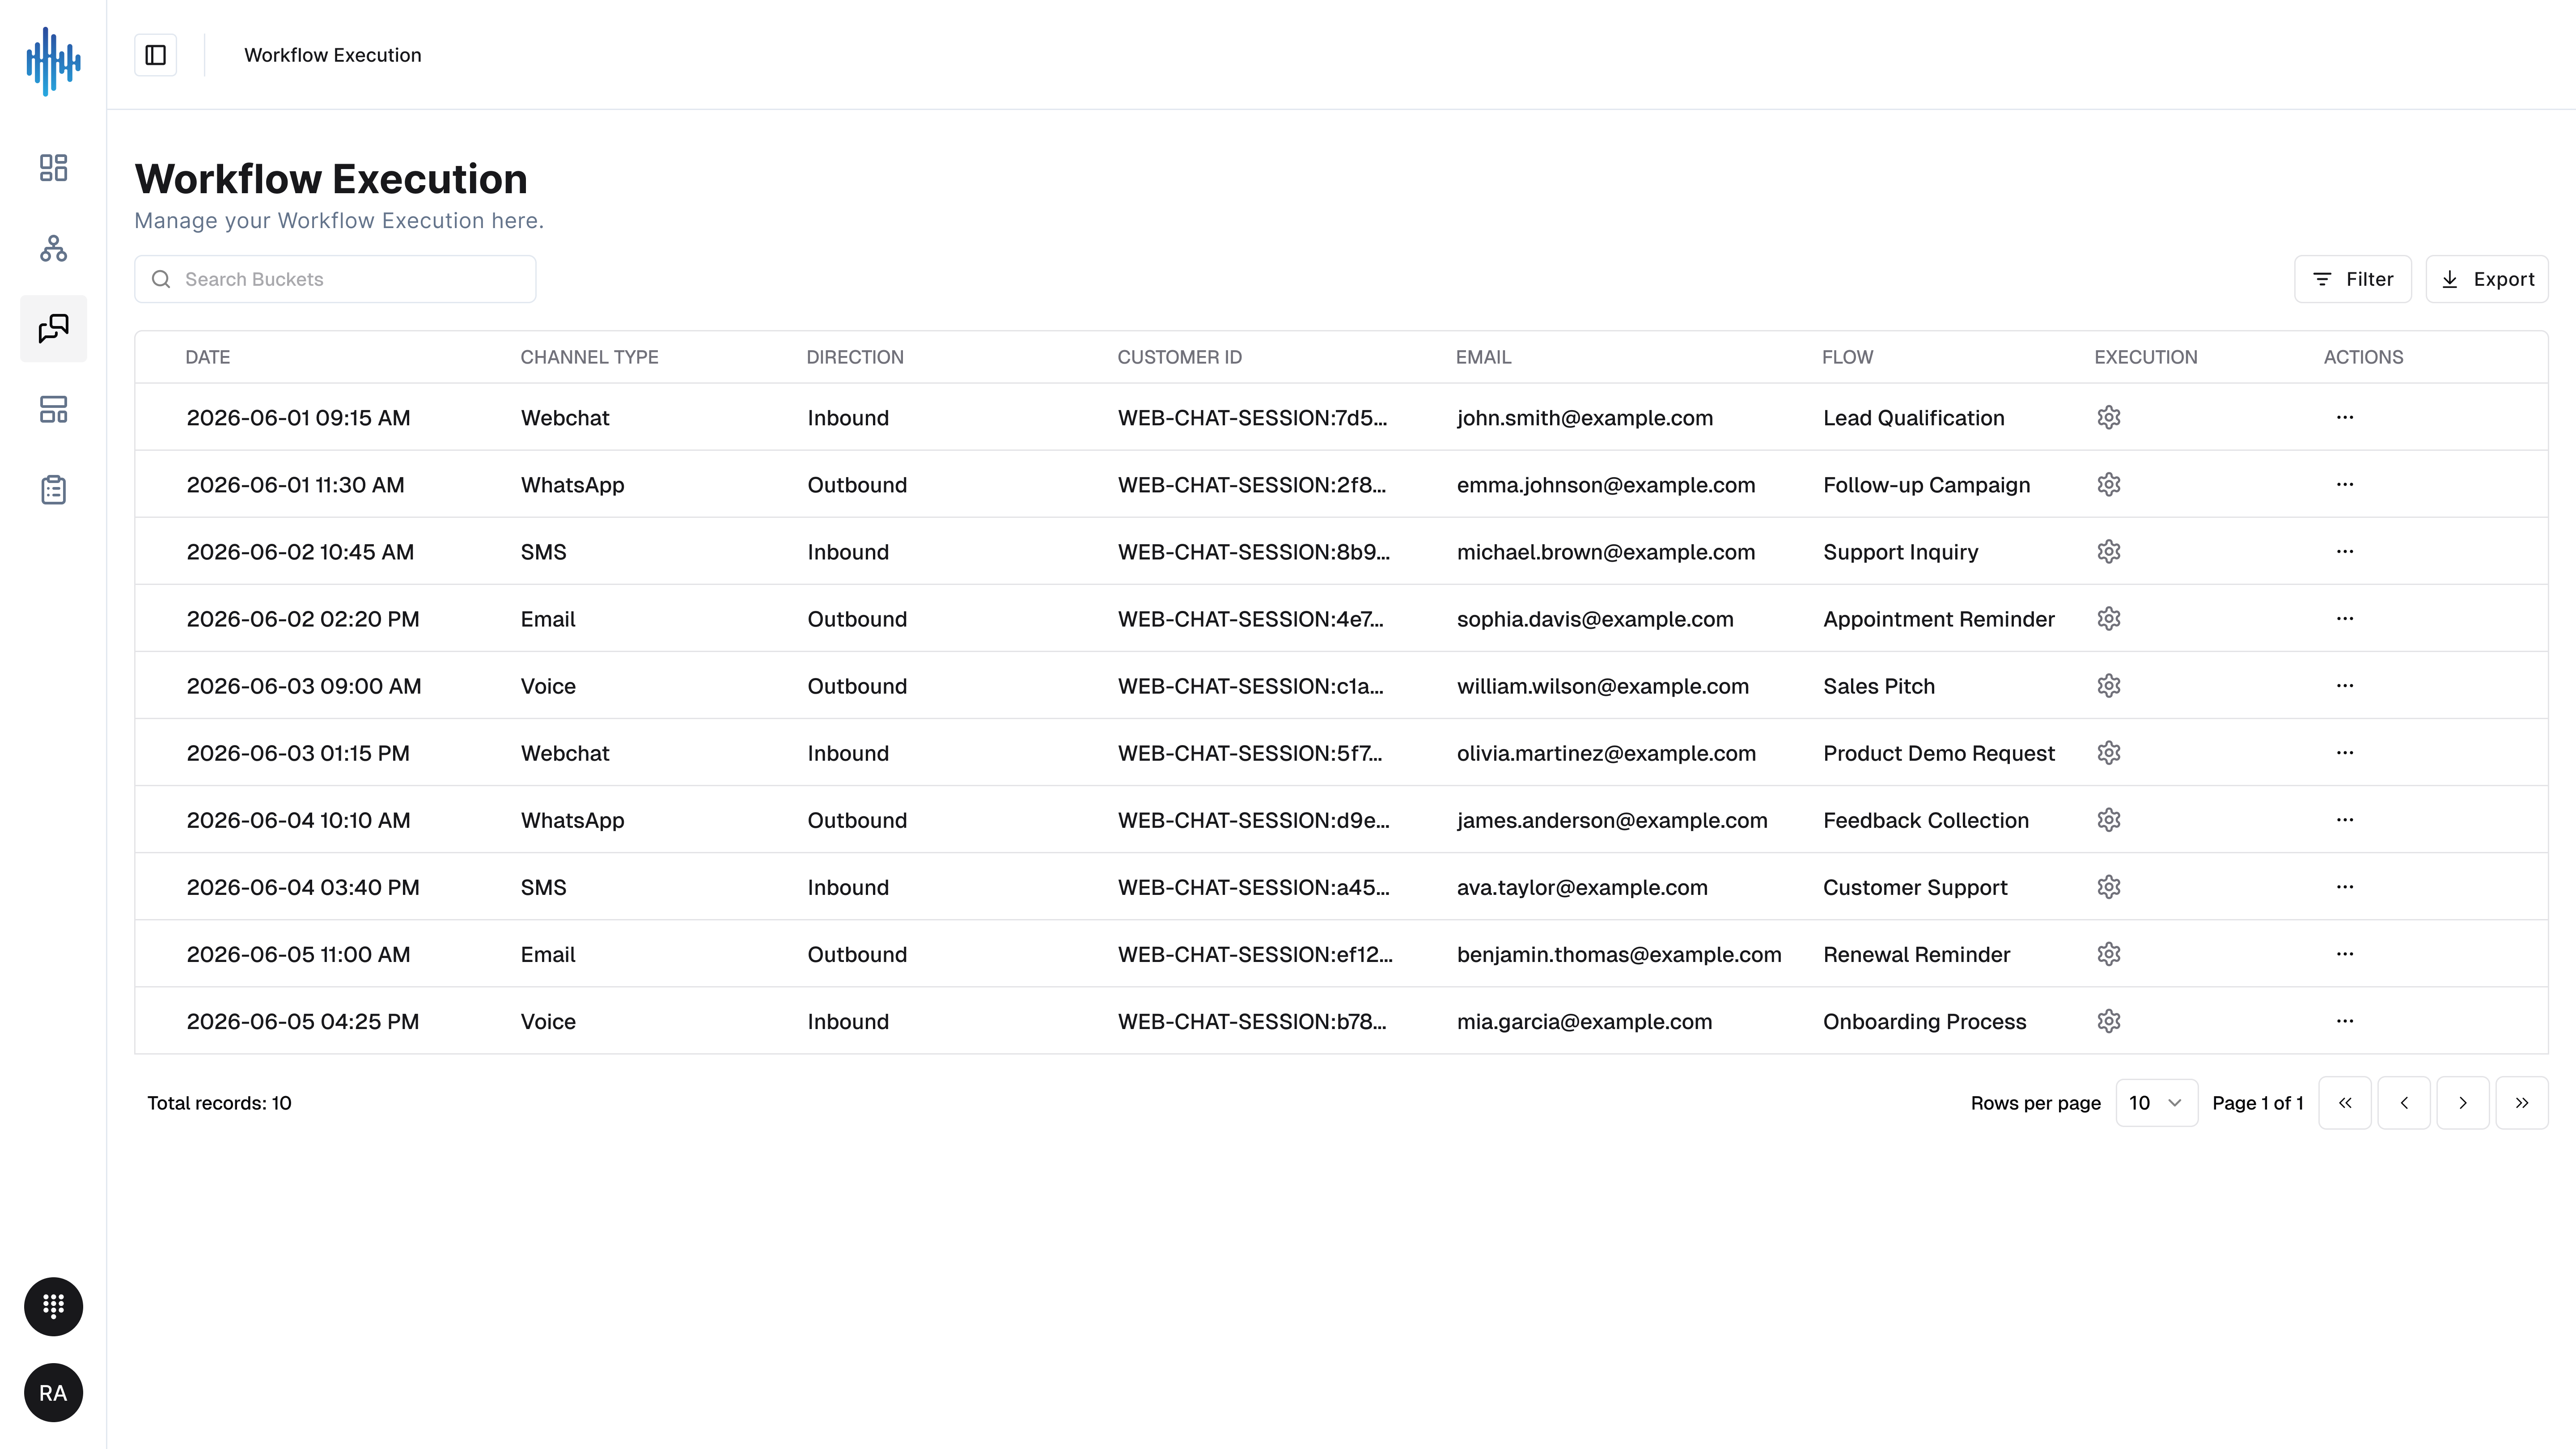
The Workflow Execution module provides real-time monitoring and detailed logs of all workflow activity.
Execution Dashboard Layout:
Header Controls:
- Filter Button: Apply custom filters to execution logs
- Export Button: Download execution data for analysis
- Page Title: "Workflow Execution"
Execution Log Columns:
The execution table provides comprehensive tracking of every workflow run:
| Column | Description | Format / Examples |
|---|---|---|
| DATE | Timestamp of when the execution occurred (sorted by most recent first). | YYYY-MM-DD HH:MM:SS (e.g., 2026-02-09 15:03:25) |
| CHANNEL TYPE | The communication channel that triggered the workflow. | Webchat, Voice, Email, API |
| DIRECTION | Flow direction of the communication interaction. | Inbound (external request), Outbound (system-initiated) |
| Customer ID | Unique identifier for tracking individual customer sessions (truncated for privacy). | WEB-CHAT-SES... |
| User | The system user account associated with the execution owner. | Admin@Develop... |
| Flow | The name of the specific workflow that was executed. | Jat42-DoNotTou... (linked to the builder) |
| Execution Icon | Action icon to inspect detailed execution steps, variables, and logs. | Click to open detailed logs |
| ACTIONS Menu (⋮) | Option menu to troubleshoot or rerun executions. | Access logs, replay, or delete |
Pagination Controls:
Located at the bottom-right of the table:
- Rows per page: Adjust how many executions to display (default: 10)
- Page navigation: "Page 1 of 7" with navigation arrows
- Total count: "0 of 61 row(s) selected" shows available executions
Using the Execution Monitor:
Real-Time Monitoring:
- Executions appear automatically as they occur
- Refresh to see the latest activity
- Watch for patterns or anomalies in execution frequency
Filtering Executions:
- Click the "Filter" button
- Select criteria:
- Date range
- Channel type
- Direction (Inbound/Outbound)
- Specific workflow
- User or customer ID
- Apply filters to narrow results
Analyzing Execution Data:
- Review execution timestamps to understand usage patterns
- Identify which channels generate the most activity
- Track specific customer interactions
- Monitor workflow performance by flow name
Exporting Data:
- Click the "Export" button
- Choose export format (CSV, Excel, etc.)
- Select date range or use current filters
- Download for external analysis or reporting
Debugging Workflows:
- Locate the execution you want to investigate
- Click the settings icon in the Execution column
- Review detailed logs, variables, and decision points
- Identify errors or unexpected behavior
- Return to the Workflows module to make corrections
Performance Insights:
Monitor these key metrics:
- Execution frequency: How often workflows run
- Channel distribution: Which channels are most active
- Peak usage times: When executions occur most frequently
- Workflow performance: Which flows execute most often
Troubleshooting Common Issues:
No executions showing:
- Verify workflows are published
- Check channel integrations are active
- Confirm correct date range in filters
Unexpected execution patterns:
- Review workflow logic for errors
- Check trigger conditions
- Verify channel configurations
Performance concerns:
- Analyze execution frequency
- Look for bottlenecks in workflow design
- Consider optimizing complex workflows
Navigation and User Settings
Left Sidebar Navigation:
StreamSpace Studio provides a consistent navigation menu across all pages:
- Overview: Dashboard homepage with module access
- Workflow: Manage and create automation workflows
- Workflow Execution: Monitor real-time execution logs
User Account Menu:
Located at the bottom-left corner:
- Profile Avatar: Shows your initials (e.g., "RA" for Region Admin)
- User Name: Displays your role (e.g., "Region Admin")
- Email: Shows your account email (e.g., "admin@develop...")
- Settings Access: Click to access account settings and preferences
Next Steps
Now that you're familiar with StreamSpace Studio basics:
- Explore Workflows: Create your first automation workflow
- Monitor Activity: Check the Execution module to see real-time logs
- Learn Advanced Features: Explore workflow variables, conditions, and integrations
- Optimize Performance: Review execution patterns and refine workflows
- Get Support: Reach out via "Contact Support" for personalized assistance
Welcome to StreamSpace Studio - Start automating your workflows today!